U12 - Defensive Skills & Pressuring the Puck
U12 - Defensive Skills & Pressuring the Puck

Practice Notes
This practice focuses are several defensive concepts, specifically when it comes to applying pressure on the puck.
- Taking Away Time & Space
- Stick Positioning
- Angling
Spend 10-minutes working on the technical skating components, specifically transitions/pivots and transition backward to forward. This allows players to get "feel reps". Encourage good posture and footwork. Allow kids to get multiple reps of each skill and working on both directions. All of your athletes should practice these skills, regardless of the position they play.
Practice Layout
How to Perform a Transition Turn
Transistion turns in hockey are necessary any time you need to change direction in the game of hockey. In this video Dwayne Blais discusses how to transition from forwards to backwards.
To break it down into steps:
- Side stop
- Backwards cross-over / backwards start
- Backwards skating into our C-cuts
Coaching Points
- start with a wide base
- Start low (instead of bobing up and down)
- Preferably 1, maybe 2 cross-overs as you transition backwards
- Try to maintain a straight line instead of a wide semi-circle
Backwards to Forwards Pivot
Key coaching points for pivoting from backwards to forwards:
- Make a C-cut to open up hips
- Bring heels together
- Transfer weight and push off back foot
Iron Cross Stick on Puck
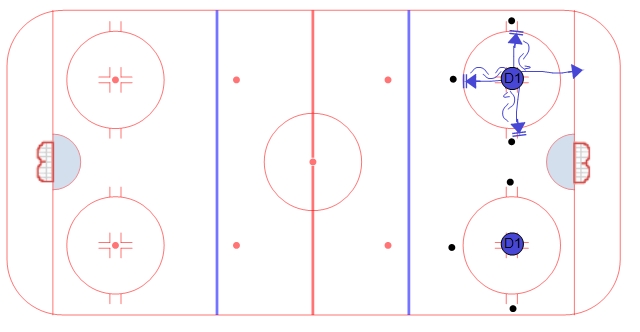
The player starts on the dot and explodes to the puck to the top of the circle. The player needs to emphasize a good stick on puck, then transition quickly backwards, pivot 90 towards the outside and explode to the second puck. Again, the player needs to have a good strong stick on puck. Now they transition backwards again and quickly pivot 180 degrees towards the third puck. The player does the same thing at the third puck, transitions backwards and then pivots 180 degrees plus a little bit more as they go around the dot and sprint down to the goal line.
Quick Gap 1 on 1
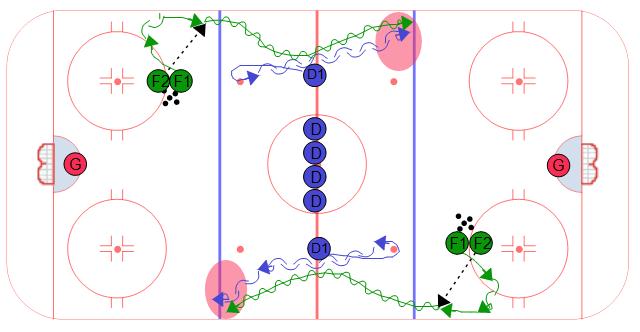
Gap control is a tough concept to teach young players. It is so important yet most players like to play it safe and give up the blue line way to easy. In this drill the defense is put in a position where they are forced into a good gap. The defense are lined up at center ice and the forwards are lined up in line with the dots just insude the blue line. The position of the forwards may vary depending on the level of play. If the defense end up to large of a gap then move the forward line closer to the blue line. It may take a couple of reps to gauge where to place the forwards.
To start the drill, F1 makes a quick transition to the boards making sure to always face the second player in line. The second player in line will make a pass to the first player as they transition up ice. The defense starts at the red line and skates up to the dot and transitions backwards to face the one on one. Remind the players to stay on their half of the ice until they cross center ice to avoid a collision.
Make sure D work on pivoting both directions and always pivot taking away the middle first.
Double Gates Activation Game
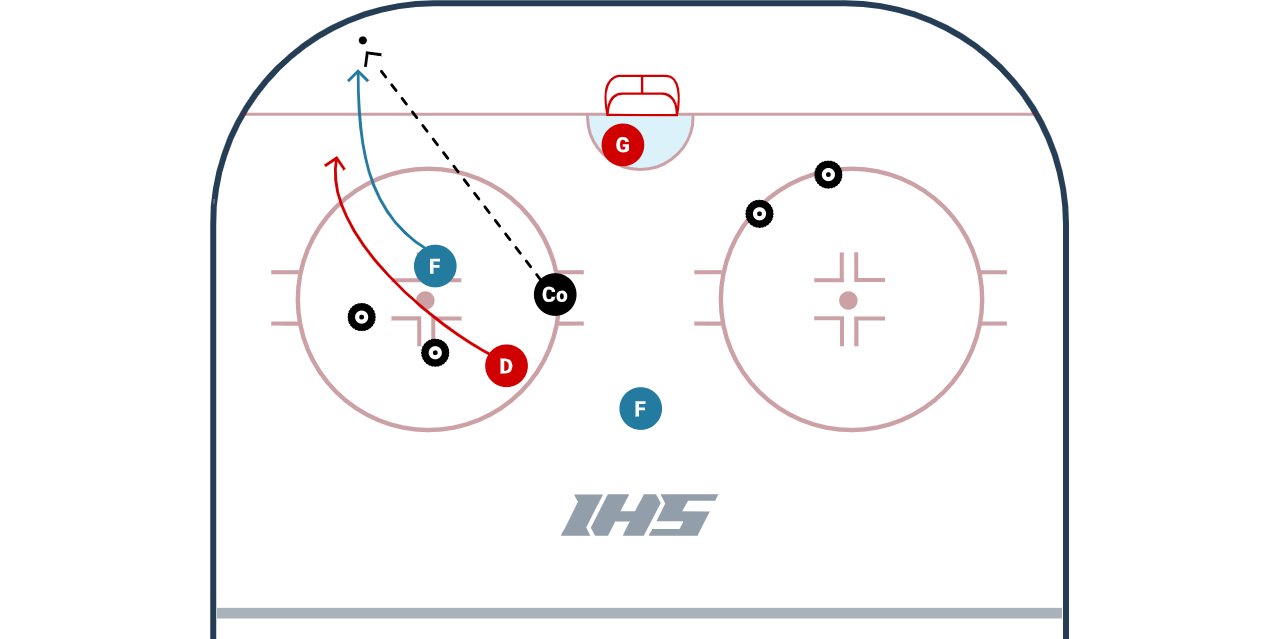
The Double Gates Activation Game from Coach Alyssa Gagliardi is a competitive small area game that starts out as a 1 on 1 and becomes a 2 on 1 after a player skates through one of the gates. This can also be modified to be a 2 on 2 that becomes a 3 on 2.
Setup
- Place a gate (gates can be made by tires, cones, etc) on each side of the net. This will create two gates and two options for the offensive player to skate though.
- Place one forward and one defender in one of the corners or circles.
- Place an additional player at the high slot or point.
- To start: a coach chips a puck in the corner to begin a 1 on 1 battle.
- The forward is trying to first skate through a gate. Once the forward skates through the gate, they are able to pass it to the open player at the point to begin a 2 on 1. The offensive team is trying to score a goal.
- The defender is trying to strip the puck during the 1 on 1 and/or the 2 on 1 and skate out of the zone.
- The coach can stop the play when there is a goal, the defender skates the puck out of the zone, the goalie freezes the puck or enough time has passed (15 - 30 seconds).
Coaching Points
- Offensive player:
- Look over your shoulder to see where the pressure is coming from.
- Do not expose the puck until you are ready to make a play. Use the net and the boards to protect the puck!
- Keep head up to be aware of where the gates are and the extra player is.
- Defending player:
- Work on taking a good angle.
- Keep your stick on the ice to go after the puck and to block passing lanes.
Game Variations
- Can allow the forward to immediately try to score a goal, or you can require them to first go through the gate before they can score. Either way, if they go through the gate the other forward is activated.
- Can set up gates in different areas of the ice.
- Can add gates at the blueline that the defense needs to skate through instead of skating over the blueline.
- Can start the game in different areas of the zone.
- Can setup the game in smaller areas of the ice (example - 1/4 ice instead of 1/2 ice.)
- Can be modified to be a 2 on 2 that becomes a 3 on 2 (diagram displayed below)
Points for D: 1 point for successfully stealing the puck and skating it out.
Points for F: 1 point for SOG, 2 points for goal
USA 2 VS. 2 Drill
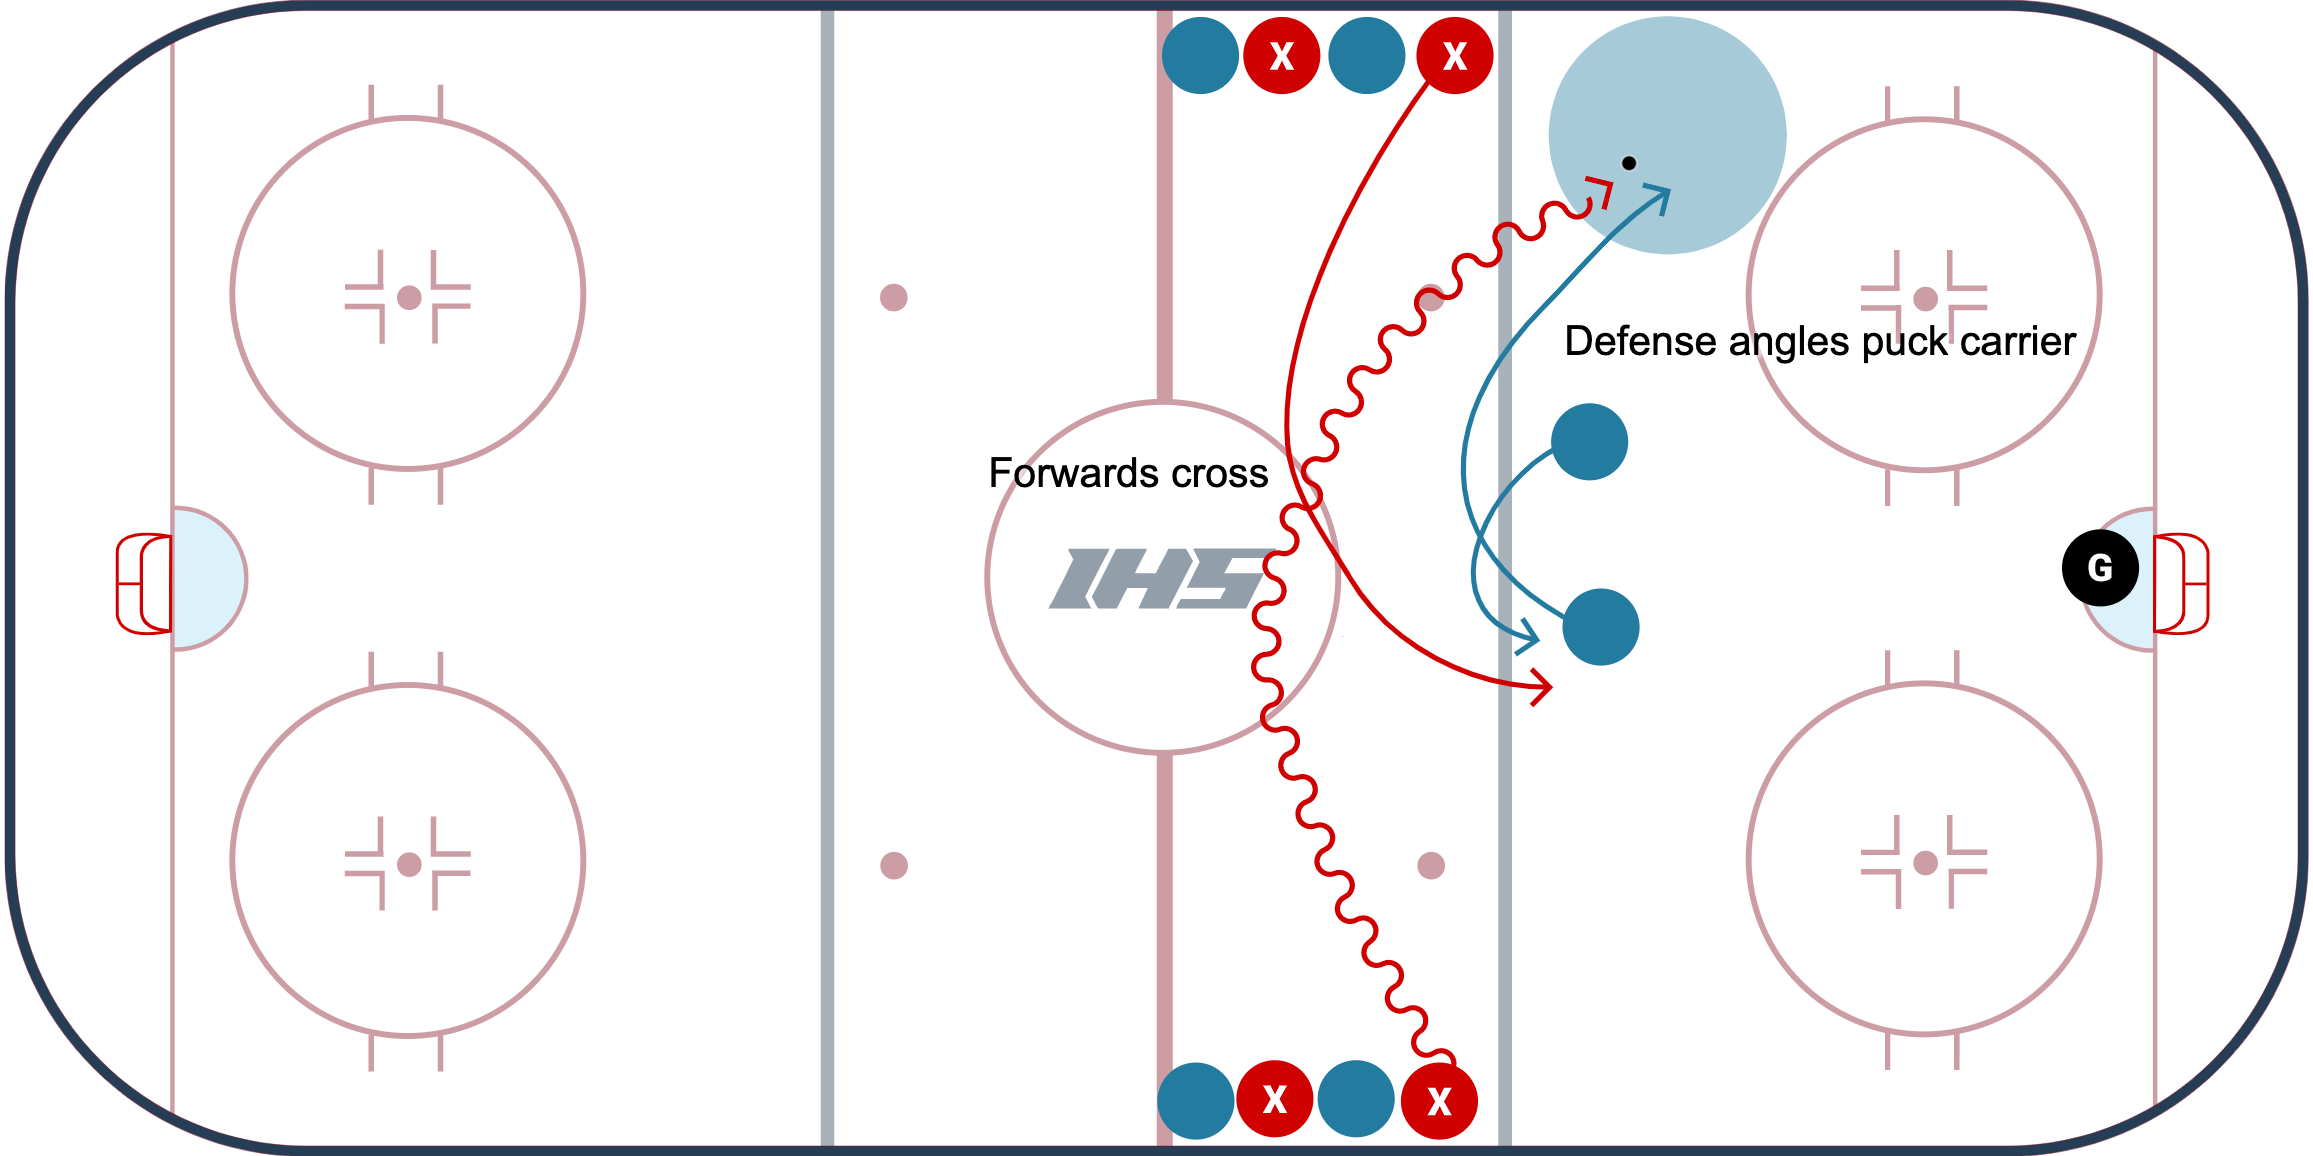
The USA 2 vs. 2 Drill from Coach Scott Moser is an excellent 2 on 2 drill that can be used at the college levels and youth hockey levels. It is a simple, yet highly competitive drill that can also be run out of both ends of the ice at the same time.
Setup:
- Alternate team colors at the points.
- 2 defenders start just inside the blueline.
- 2 forwards will start out with the puck (in the diagram they are Red X's). They must go through the center circle and they can pass to each other or keep the puck as they try to attack the 2 defenders and score a goal.
- The 2 defenders work on defending while skating forwards by closing the gap and angling the forwards into the boards with their sticks on the ice.
- A 2 vs. 2 takes place in the zone, where the forwards try to score a goal, and the defenders work to pass the puck to the next forwards in line.
- When the defenders pass the puck to the next forwards in line, the original forwards (The Red X's) play defense, and the original defenders move to the back of the line.
- The drill transitions to the next group with a breakout pass from the defenders, a goal from the forwards, or a whistle from the coach.
- The drill is continuous!
Coaching Points:
- Defense:
- Communicate with your partner so you can close the gap quickly.
- Defend skating forwards - angle the forwards to the boards with your body and a good stick on the ice (do not let them cut back into the middle of the ice).
- Play through sticks and work to get the puck to the next players in line.
- Offense:
- Communicate with your partner.
- Keep your head up to see where the open ice is.
- After the play transitions work to get to the blue line to defend the next group in line.
Cross-Ice Situational Game
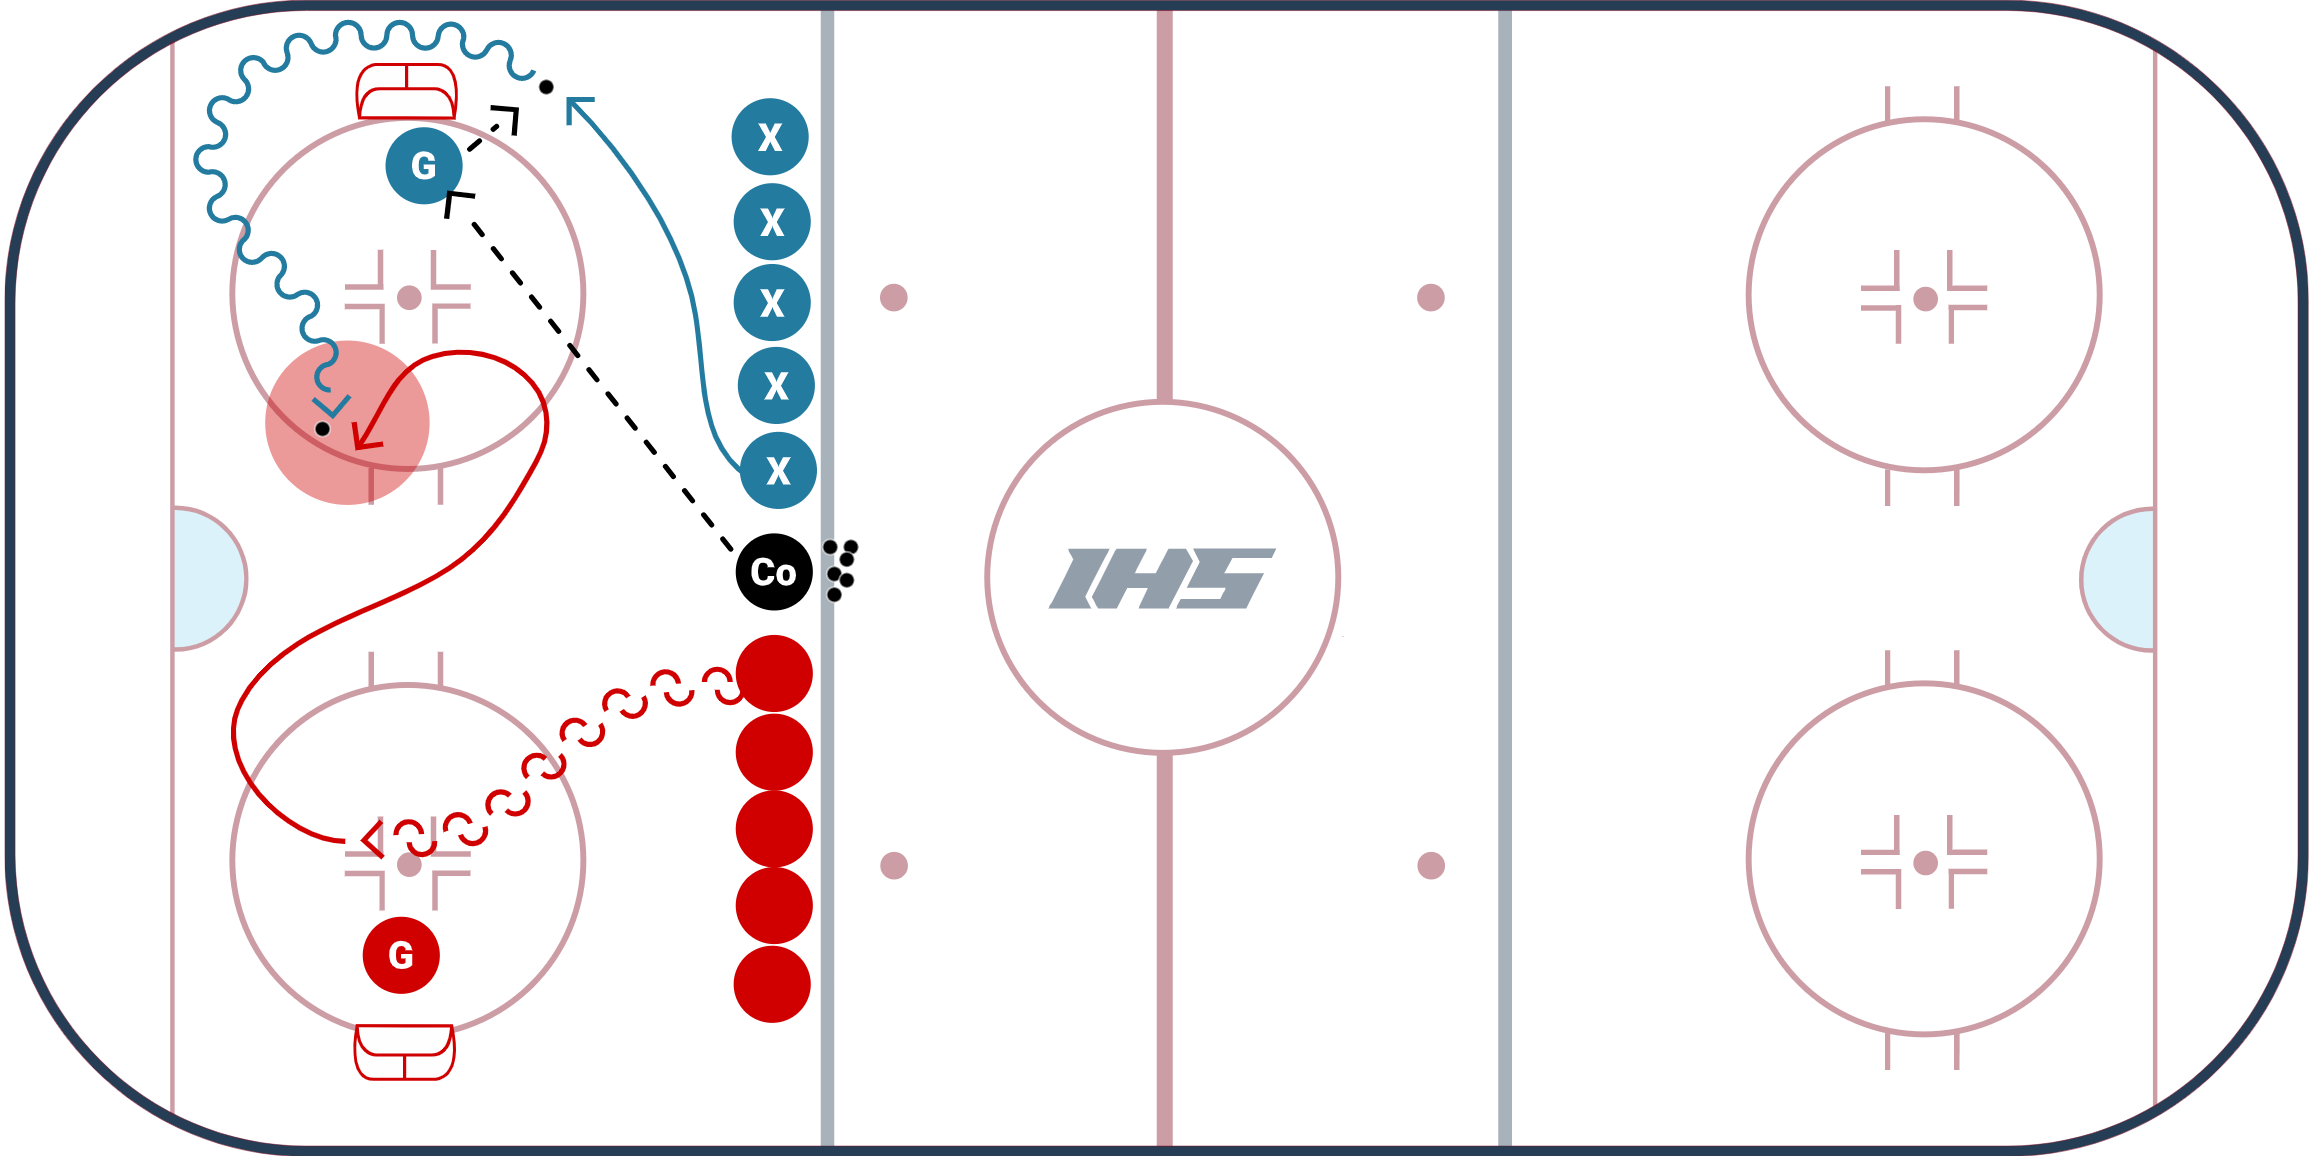
The Cross-Ice Situational Game from Mark Phalon of Alaska Anchorage is an incredible small area game that can be modified into a variety of situations, which requires players to be aware of their surroundings at all times, which will help improve their hockey sense and force them to play with their head up. Also, players that are waiting in line at the blue line need to be ready to jump in at a moment's notice, which keeps everyone alert! This is a fun game that keeps everyone on their toes, even the coach!
Setup
- Teams are split up on the blue line.
- Cross-ice net and goalie setup (as shown in video and diagram).
- To start, the coach sends a puck to the goalie, the goalie stops the puck next to the net.
- As soon as the coach sends the puck to the goalie, a forward races to pick up the puck with speed, while a defender skates back to the dot and heads up ice to put a good angle on the forward.
- From there, the 1 on 1 game begins.
- PLAYER ACTIVATION: One of the best parts of this game, is that the coach can activate additional forwards or defenseman whenever they want. Therefore, this 1 on 1 game can quickly turn into a 2v1, 3v1, 2v2, 3v2, 3v2, 1v2, 1v3, etc. etc. To activate a player, the coach will call out who can jump into the game.
- This player activation situation forces all players (the ones who are playing and the ones on the blue line) to be aware of what is going on at all time. It is a very fun, engaging game!
- The coach can make a variety of situations happen and the whistle is blown when a team scores, a goalie saves the puck, or a coach determines that the shift is over and a next group is up.
Coaching Points
- Angle: The first defender needs to work on taking a good angle to deny the middle of the ice.
- Head up & be aware: ALL players need to be aware of the current situation. At any point in time, the coach can add additional forwards or defenders, so it is important for everyone to be aware and keep their head up to be ready for this ever evolving game!
Can progress to 2v2
