U14 - Quick Transitions
U14 - Quick Transitions

Practice Notes
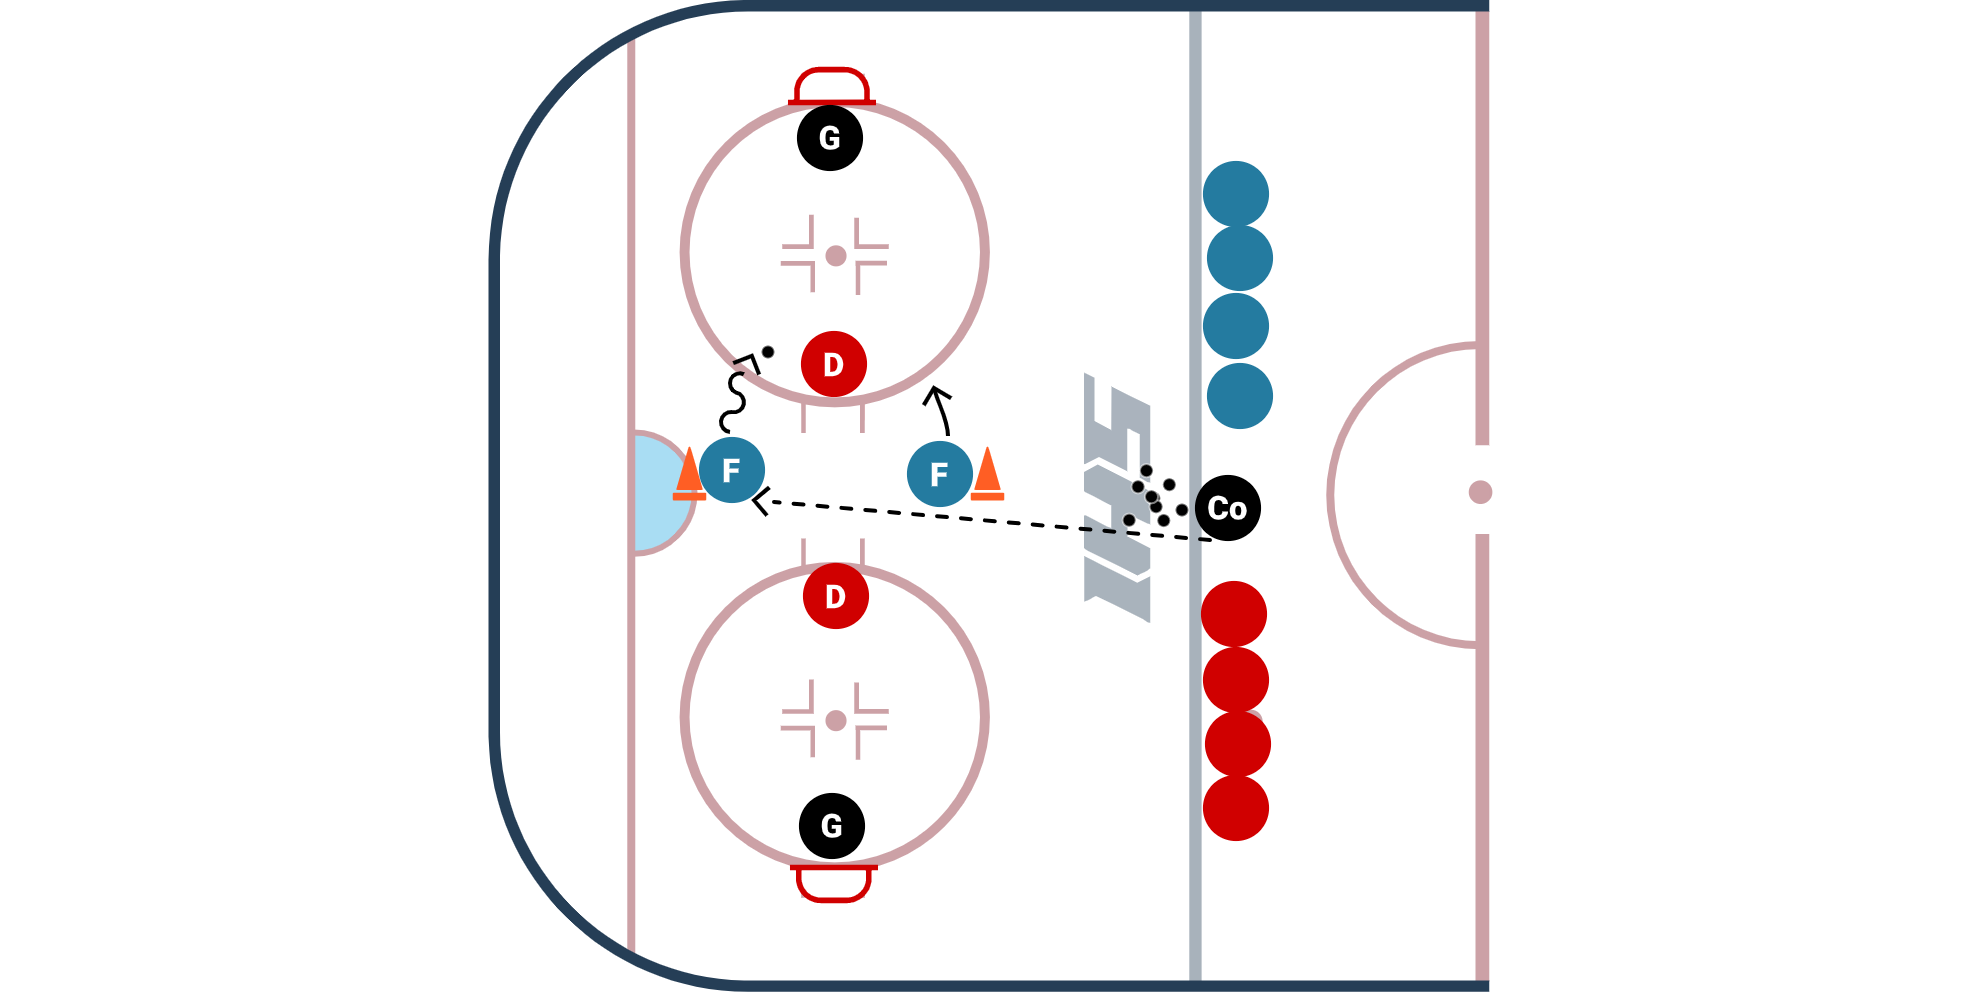
This practice plan is focused on developing skills, both without and without the puck, for quick transitions -- from defense to offense and offense to defense -- in various situations all over the ice.
Key Coaching Points
- Mindset: Encourage players to anticipate and react quickly on turnovers or takeaways to quickly transition offensively and defensively. Finding openings, seams, and space to quickly take advantage of advantage situations is a key awareness and decision-making skill.
- Technical Skills: The focus areas are to develop skills to quickly transition with skating, puck control and passing execution.
- Tactical Skills
- Defense to Offense: When your team regains possession of the puck, players looking to recognize and create 2v1 situations through passing and player movement.
- Offense to Defense: When a puck is turned over, quickly sorting out defensive positioning and making reads on what the situation is, where your teammates and support players are, and looking to limit scoring chances while trying to get the puck back as quickly as possible.
- Defense to Offense: When your team regains possession of the puck, players looking to recognize and create 2v1 situations through passing and player movement.
Practice Layout
How to Perform a Transition Turn
Transistion turns in hockey are necessary any time you need to change direction in the game of hockey. In this video Dwayne Blais discusses how to transition from forwards to backwards.
To break it down into steps:
- Side stop
- Backwards cross-over / backwards start
- Backwards skating into our C-cuts
Coaching Points
- start with a wide base
- Start low (instead of bobing up and down)
- Preferably 1, maybe 2 cross-overs as you transition backwards
- Try to maintain a straight line instead of a wide semi-circle
Bracket Turns for Hockey Players
A bracket turn is a transition turn where you go forwards, backwards briefly, and then forwards going the opposite direction. Let's break it down into 3 steps:
- Come in to start the turn with a wide base and basically do a two foot side stop.
- Roll into a couple of backwards cross-overs (push pull).
- Open up the hips and accelerate using your forward stride in the other direction.
Tips:
- Try to maintain your speed through the turn with your backwards cross-overs.
- Control the stick and upper body.
- Keep the head as level as possible, try to stay away from bobbing up and down.
Gates of Buffalo Small Area Passing Game
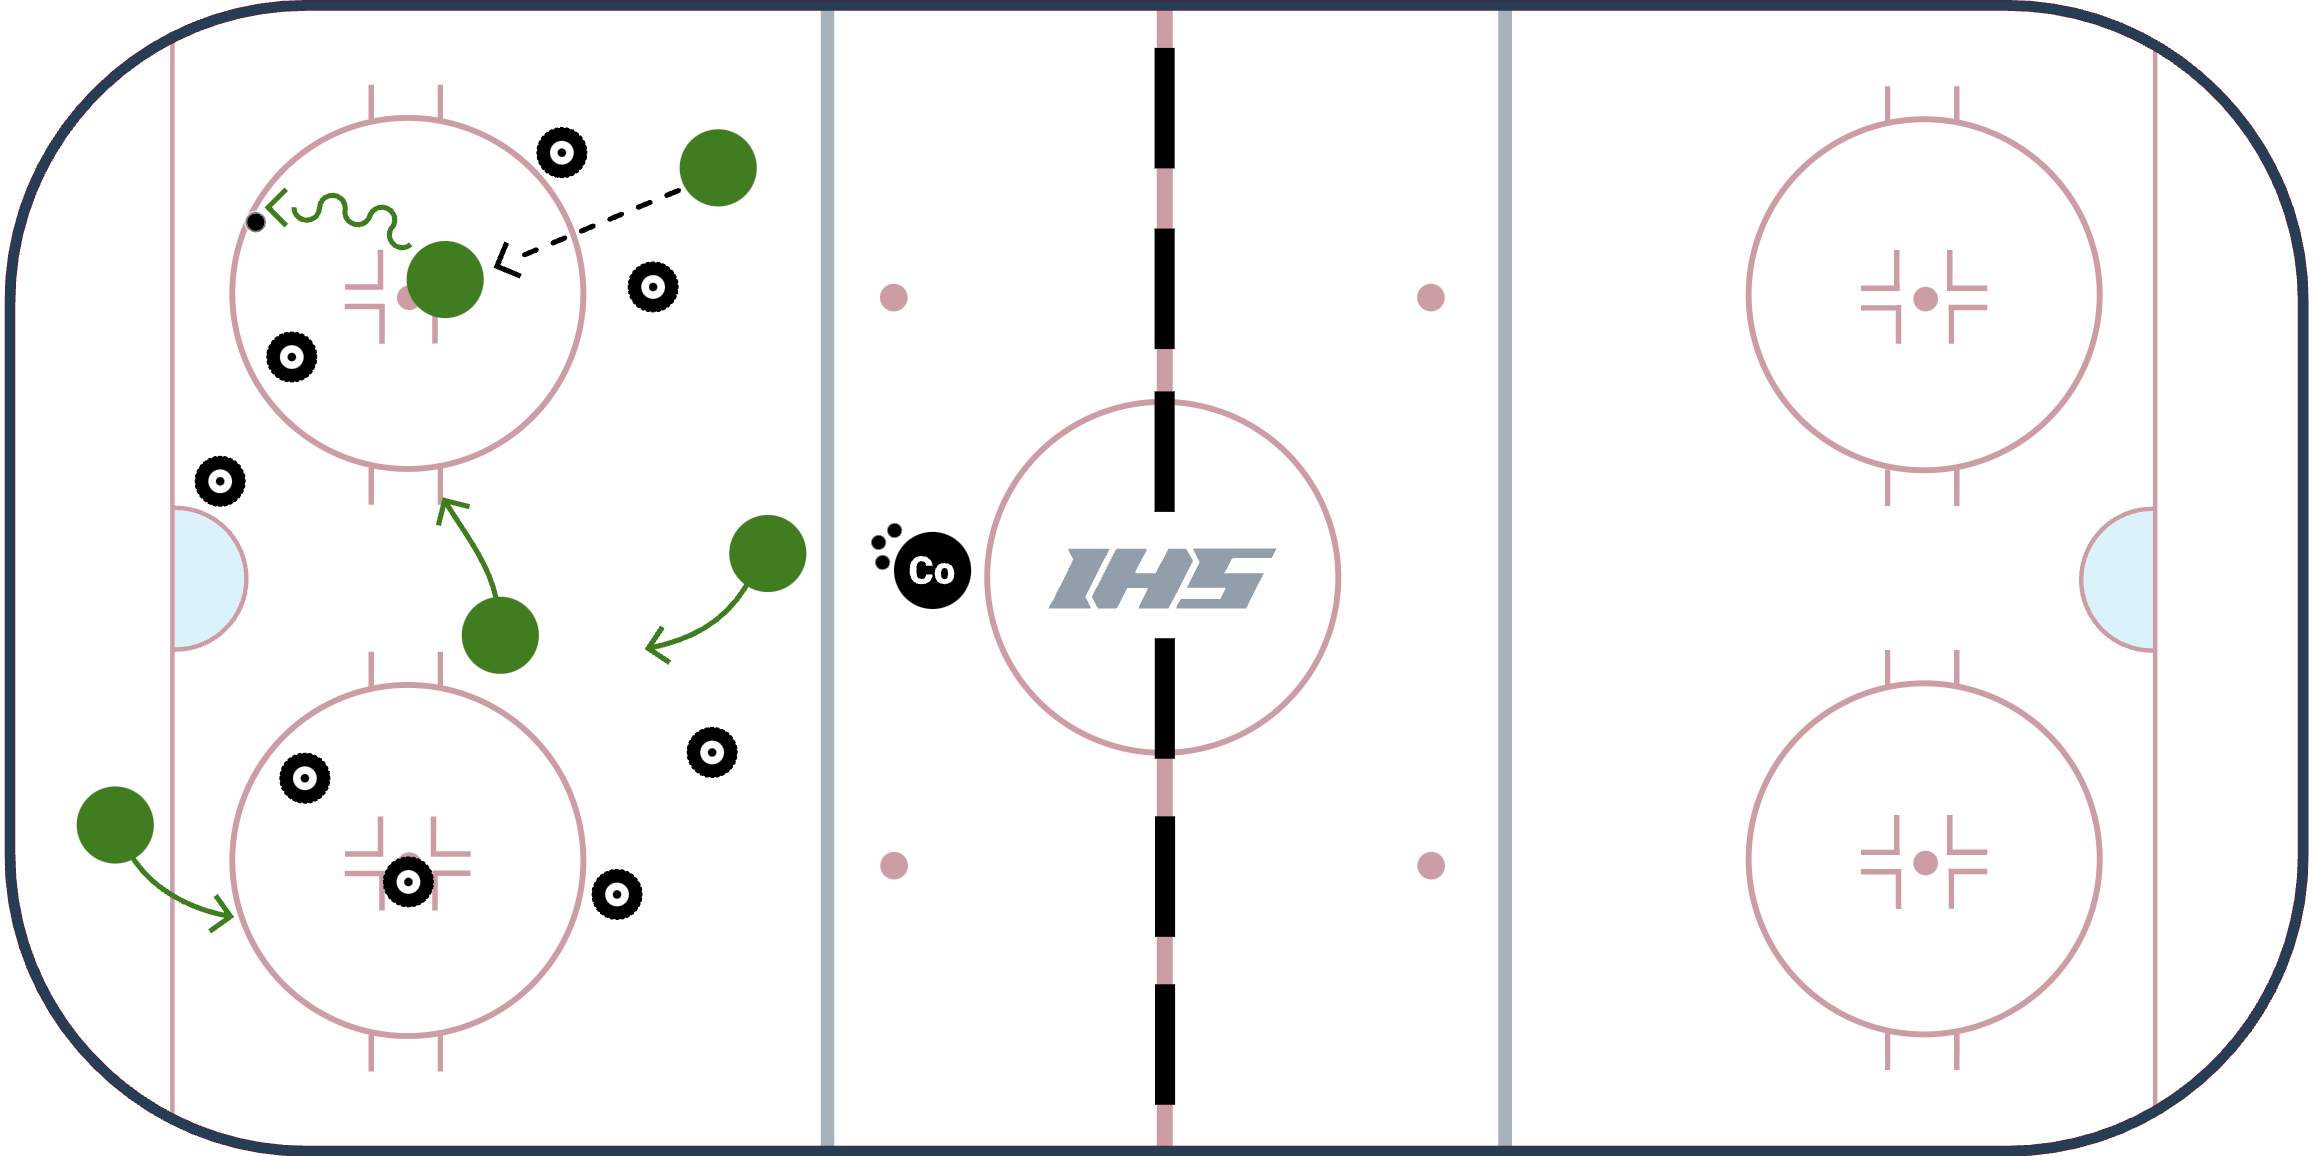
The major concept of the Gates of Buffalo Small Area Hockey Game is to practice moving to open space, communicating verbally and non-verbally with teammates, so they can score Goals by passing through Gates.
This game framework will help players learn to play with their head up, communicate with teammates and move to open space.
As a coach, If you commit to working on activities like this instead of memorization drills for a portion of each practice, you will marvel at how your team begins to work together. It will look extremely messy at first, but players will get better with each repetition. Moving to open space, and moving the puck will eventually become second nature to the team.
GAME OBJECTIVE
- Score as many goals as possible by passing through the "Gates."
- You can not pass through the same gate twice in a row!
SETUP & ACTIVITY VARIABLES
- Players: great for 3, 4 or 5 players at a time.
- Time: You can rotate through groups of players in 30, 45 or 60 second shifts and count how many goals are scored.
- Or you can set a number of goals (let's use 5 for example) and stop the watch after 5 goals are completed.
- 5 players can be participating in the activity, while another 5 rest. Blow the whistle and the next 5 jump in. It gets fun when the teams compete against each other!
- Space: can be set up to be within a zone, or half of a zone (station) or a smaller area. The smaller the space, the more challenging it will be for the players as they are forced to make quicker decisions.
- Added Challenge: add obstacles within the space to challenge the players further.
- Tires, cones, sticks, defenceman, etc placed in the space will make it harder to pass and skate around. As time goes on the added obstacles will help improve their reaction & decision making.
- Group Competition: After the group gets comfortable with the exercises, you can add a natural element of competition between the groups by counting the number of successful goals made in the specified amount of time.
- Or you can time each group and see how fast they can complete 5 (or any other number) goals. You will marvel at how the natural element of competition between groups will make the game more intense, competitive and fun!
- With a Goalie: You can require the players to make 2 (or more) passes through a gate before they can shoot on net. After they shoot on net, they need to make the required number of passes through the gates again.
- Pucks: You can add in 2 or more pucks at a time to make players pay more attention to the game and their surroundings.
- Gates: You can add 3 or more gates. They can be made of tires, cones, pucks and other materials. Change up the sizes of the gates for an extra challenge. The smaller the gate, the more challenging the game is!
- 3 vs 3 Game: You can setup gates and make the game 3 v 3, 3 vs 2, or 3 vs 1 so there is another team working to prevent scoring on the gates. Adding additional players for the team to play against will give the game a whole new spin. View a video demo of the 3 vs 3 game setup.
Setup Suggestions for Elite Players
- Make the gates much smaller.
- You can add a hockey stick at the bottom of each gate so players must "sauce" through a gate and over the stick for the point.
- Add various obstacles on the ice such as sticks that players must be aware of and pass around or sauce over.
- For extra fun, add a defenceman. Or play 3 vs 2 or 3 vs 3.
- If you have a goalie, require 2 or more passes through the gates before players are allowed to take a shot on net.
COACHING POINTS
- Encourage players to always move to open space on the ice. Do not allow them to stand still and pass the puck back and forth.
- Encourage players to find "passing lanes" to allow good passes.
- This skill is extremely valuable for youth players to work on. Finding passing lanes when you have the puck and jumping to open space when you don't have the puck so your teammate can pass to you is extremely beneficial during games.
- Encourage verbal communication (calling teammate by name, saying you are open, etc).
- Encourage non-verbal communication (good eye contact, showing a passing target, tapping a stick, etc).
- Allow players to make mistakes. It will take time to get comfortable with these activities. But as time goes on you will see them picking their head up to make a decision, which is the goal of this small area game.
Why do we call this small area game "Gates of Buffalo?" The game has been called "gates" in the world of soccer and we decided to add Buffalo to it for two fun reasons: First, IHS has strong ties to Buffalo, NY. Secondly, the imagery of a Buffalo can help drive home to your youth players why you are practicing this game. If you do not pick your head up and use your teammates while playing the game of hockey, you run the risk of getting trampled by the other team. This can feel like getting run over by a Buffalo (physically or on the scoreboard). This game helps prevent both of those situations by forcing players to keep their head up while communicating and working with teammates to score goals.
Quick Turn Up 2 On 2
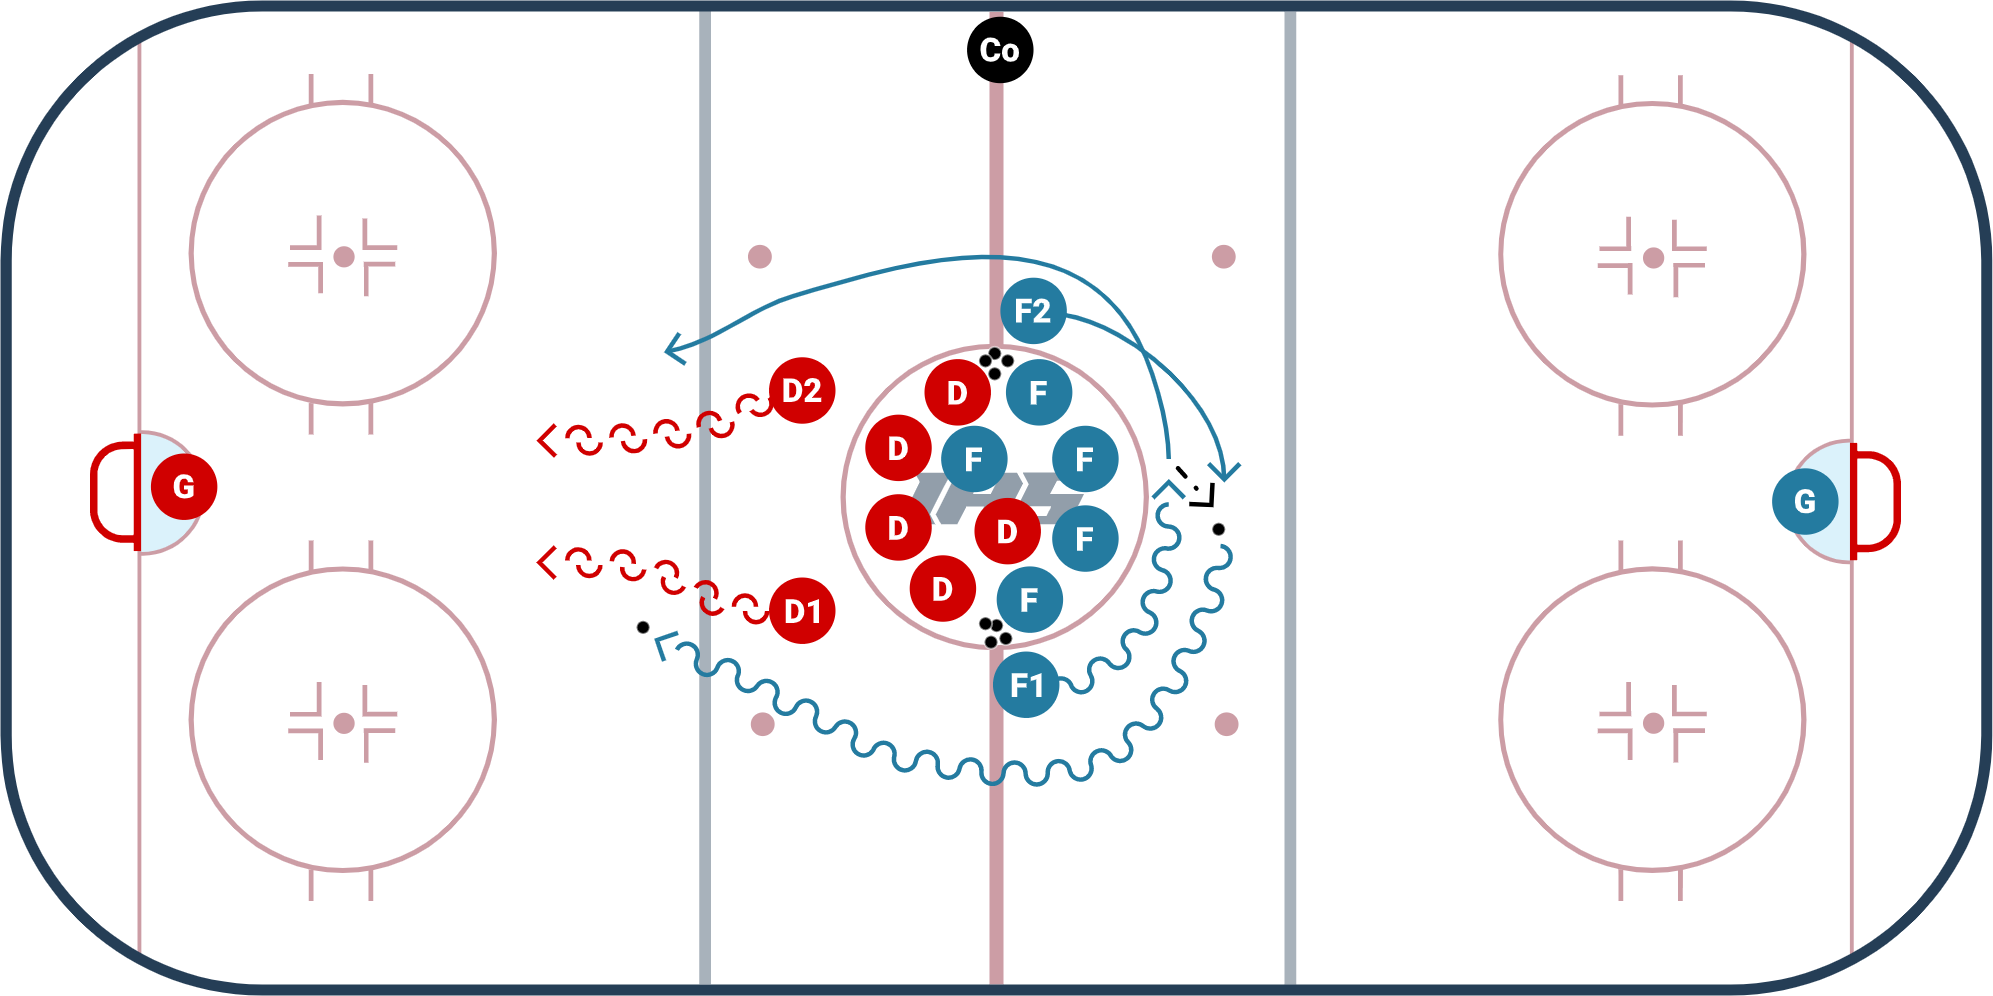
This 2 vs 2 drill is excellent for working on high-speed turnovers or transitions in the neutral zone. When a turnover occurs in the neutral zone it is important for the forwards to get up ice quick, find passing lanes and work to generate a scoring opportunity. On the defensive side of things, it is important to work with your partner to keep the forwards to the outside of the ice with good gap control.
The video clip is from Buffalo Sabres Development Camp. The drill is set up to be half-ice situation but it is running out of both sides of the ice for full ice drill. Coaches can easily set up this drill to be full ice (like shown in the video), half ice (with only one side running), full-ice half-width (so the other width can be used for stations) or a 1/4 ice station. The variety of ways this drill can be set up makes this an excellent option for many ages and skill levels.
Setup:
- Have 2 forwards and 2 defensemen ready to go 2 vs 2.
- Can be full ice, half ice, or set up as a 1/4 station.
- When the whistle blows, the two forwards cross to generate speed coming through the neutral zone. You can have the players skate around the players waiting for their turn (like it is shown in the video). This makes it hard for the defense to know which forward is coming out with the puck.
- The forwards go into the zone and the 2 vs 2 begins.
- The forwards work to score a goal. The play goes until a goal is scored, the play is whistled down, or the defense takes the puck out of the zone.
- When the whistle is blown all players need to sprint out of the zone.
Forward Coaching Points:
- Forwards should work to generate speed crossing over at the start of the drill.
- Forwards should be mindful of the defense and consider crossing with their teammate to drop the puck or changing up their skating speed to create space and throw off the defenceman's gap.
- The forward without the puck should be looking to go to open space to be an outlet or driving to the net to bring the defense with them.
- Communicate with your teammate!
Defensive Coaching Points:
- Stick on the ice!
- Use good defensive stick position to steer forwards to the outside and take away dangerous passes.
- Work on keeping a close gap to the forwards. You do not want to be so far back that they can easily shoot.
- Work to angle forwards to the outside of the ice.
- Communicate with your partner!
Variations:
- Quick Turn Up 3 on 2. Same setup as the drill above but add an additional forward.
- Quick Turn Up 2 on 1
- Quick Turn Up 1 on 1
One option is to start this drill as a quick 2v1 battle where the 2Fs have to win the puck from a D right outside the center circle and then quickly transition back the other direction. The opposing D cannot activate to defend the 2v2 rush until the 2Fs win possession of the puck.
2 vs. 2 2 Ways Game
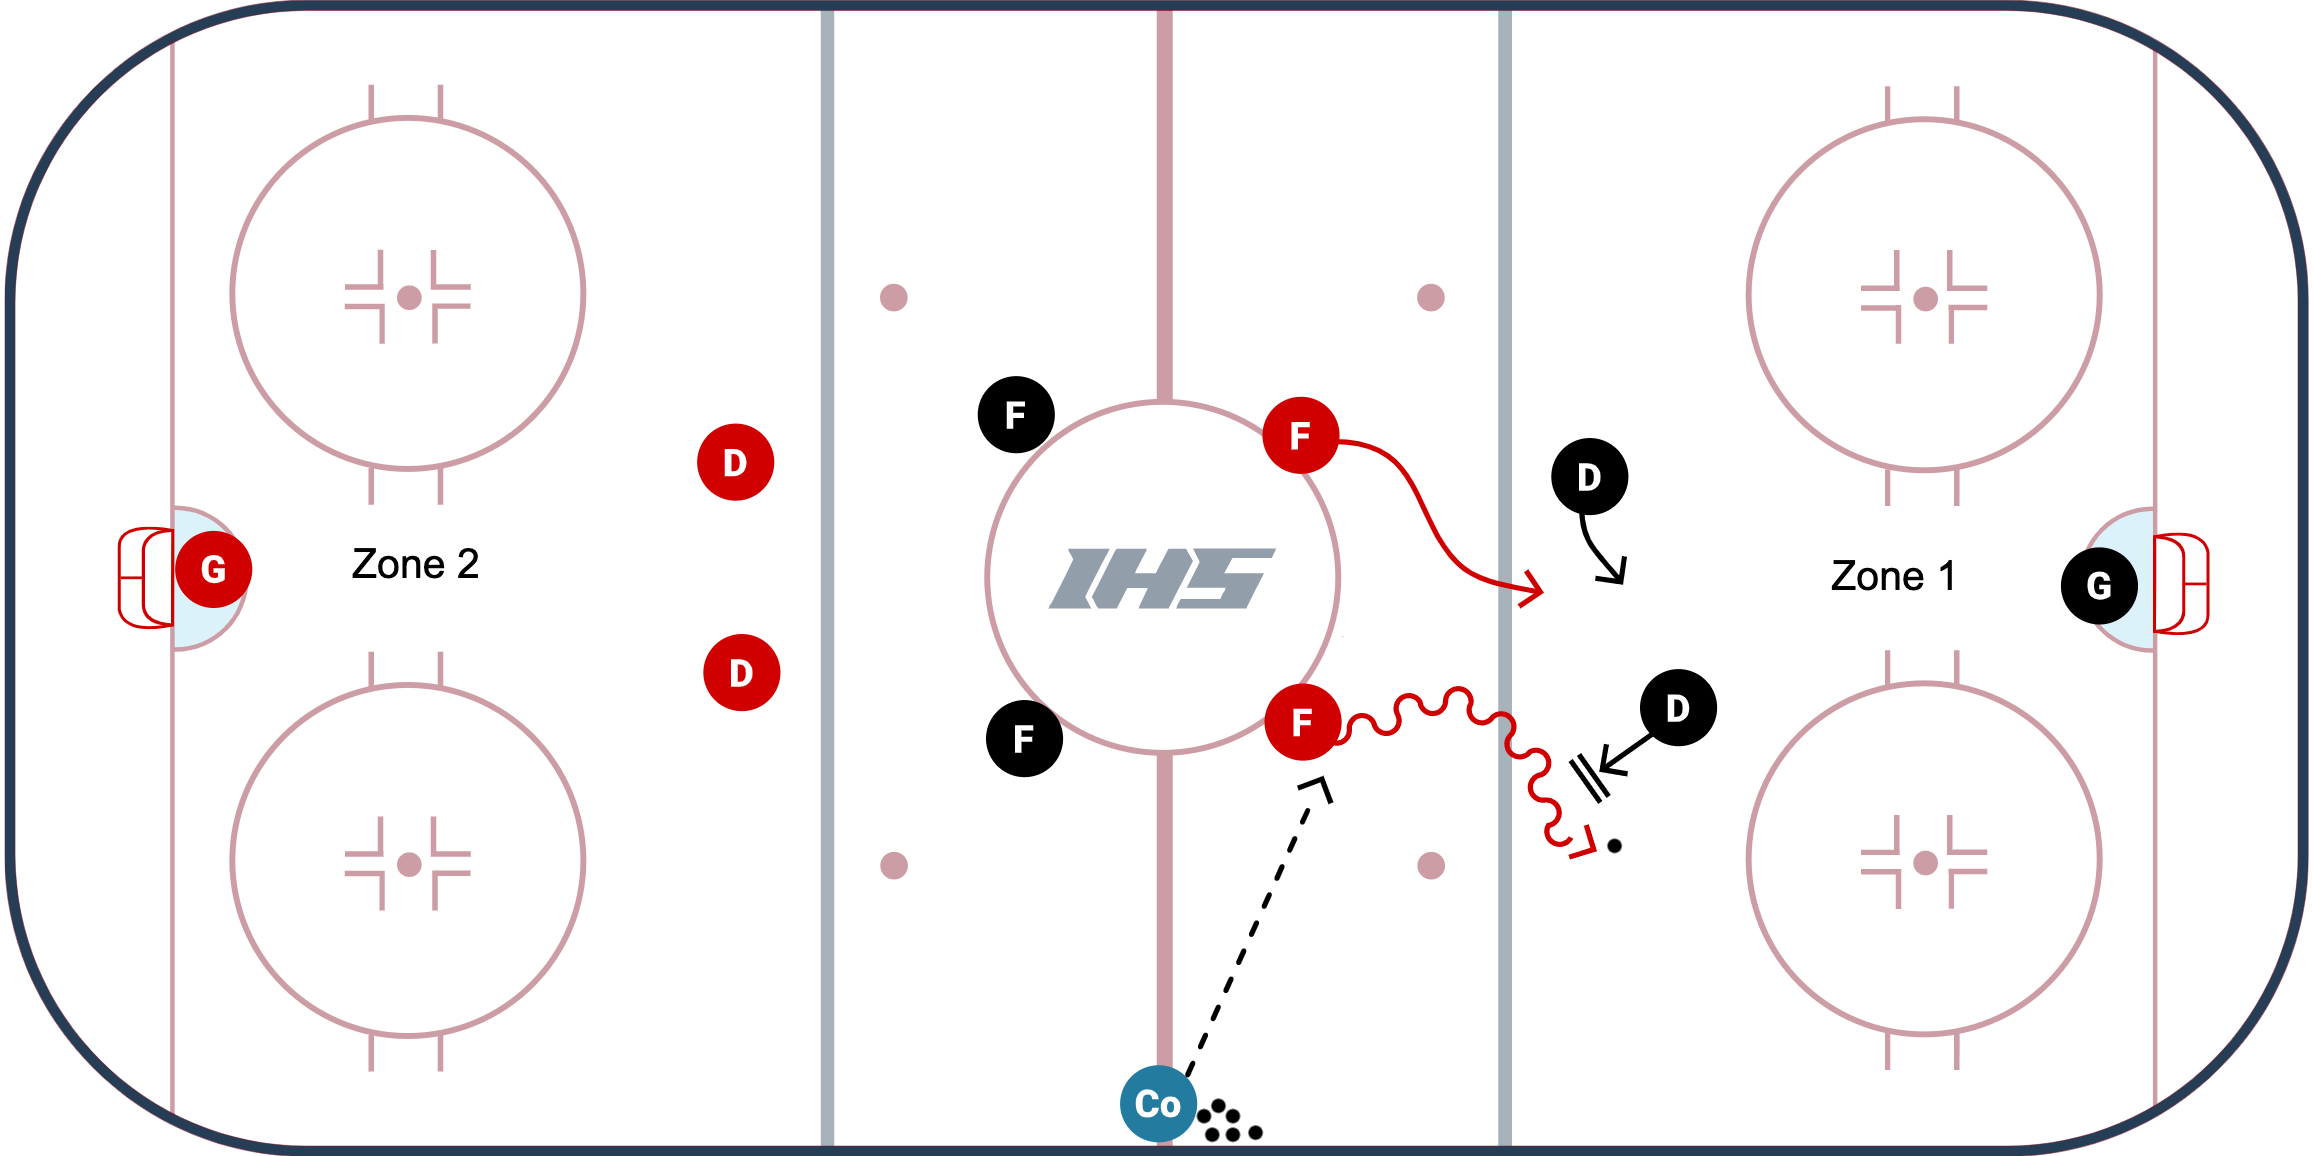
2 vs. 2 2 Ways Game from Topher Scott is a high-energy game that helps forwards practice zone entries while the defense practices stepping up on the puck carrier at the blue line. There is also a conditioning element to this game as you will see that players that finish their 2 vs. 2 game will rush down to the other end of the ice to join a 4 vs. 4 game.
Setup
- Coach passes a puck to any one of the Forwards to begin a 2 vs. 2.
- For the video example above, the Coach passes it to the Forwards that are heading into Zone 1.
- The Forward & their teammate work to get the puck into Zone 1 & score while the Defense tries to hold the blueline and gain possession during the 2v2.
- On a whistle, the Coach passes the puck to the second set of Forwards, and their 2v2 begins into Zone 2.
- The first set of Forwards & Defenders stop their play in Zone 1 and race down to Zone 2 to begin a 4 vs. 4.
Coaching Points
- Defense: work to hold the blue line! Keep stick on the ice drive through the body.
- Offense: practice zone entries by skating or chipping the puck into the zone (do not dump the puck)!
High Tempo 2 vs. 2 to Net
A fast-paced 2 vs. 2 game that allows the forwards to attack either net to score while the defense works to defend both goals. The defense can score a point by stripping the puck and making 4 consecutive passes in a row. Communication is a must to be successful!
- Why are the Forwards & Defence set up differently instead of just setting up like a normal faceoff?
- It forces the D to react quickly! One D will be forced to immediately go backwards while one jumps to backcheck. They will need to communicate with each other to be successful.
- Why does the game allow the forwards to score on either net?
- It prevents the defense from cheating before the game starts!
Game Objective:
- Forwards: After the forwards receive a pass from the coach, they wortk together to score on either net.
- Defense: The defense must work together to prevent the forwards from scoring. If the defense steals the puck, they must pass the puck to each other 4 times in a row to get a point.
- Coaches: Alternate forwards and defenseman and keep track of the score!
Setup:
- Players: Use 2 cones and the hash marks to set up the forwards and defense (as pictured above). If you do not have hash marks you can add 2 additional cones so players are set up evenly.
- This setup puts the defense in a situation where one will start skating backwards and one will be backchecking.
- Coach: Can pass to either forward to start the game. Bonus points if you change it up, add deception and give some bouncing passes.
- Goalies / nets: Use 2 goalies if you have them. If you do not have goalies you can have players skate or pass through a set of tires.
- Size: This game can be set up half-ice or quarter ice. The smaller the ice, the faster the decisions will need to be made.
Coaching Points:
- Move With Tempo! Forwards should explode immediately when they get the puck.
- Communicate: Both forwards and defense need to communicate with their partners to be successful.
- Head up: Encourage players with and without the puck to keep their head up to read the play and jump to space.
- Use Deception: Forwards should not be afraid to skate one way and quickly transition to the other net.
- Skating Tips: Defense should practice the backwards crossover start shown in the video below and forwards should work on tight turns to help create time and space or protect the puck.
- Puckhandling Tips: Forwards should protect the puck and then practice the "attack position" (shown in the video below) when they have space to challenge a defender. This position allows the forward to shoot, pass, or make another move all from one setup.
Variations:
- Can be modified to be 3 vs. 3 or 3 vs. 2 (3 forwards and 2 defensemen).
- The smaller the space, the quicker decisions will need to be made. This game can be set up cross ice or in a smaller 1/4 ice station.
- Add a couple of tires that players need to pass around to keep their head up.
- Add a game constraint (examples: can only shoot if it is a one timer, need to make one sauce pass before you can shoot
This diagram was created with the IHS Drill Designer. Draw drills for free today!
Levels 3 vs 3 Small Area Game
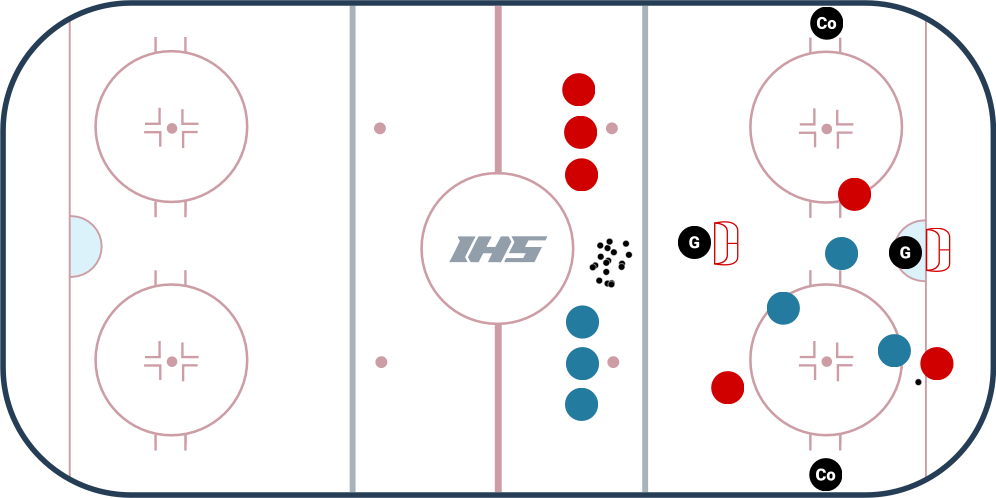
A fun small area game to keep players, goalies and coaches on their toes! The video clip is of The Buffalo Sabres's playing Levels during their development camp. As time went on and the players got more comfortable with the game, you could tell they absolutely loved it. To do well in this game it is important that teams transition quickly, communicate well, create space on offense and takeaway space on defense.
Game Setup
- 2 nets and 2 goalies. 1 net is flipped the other way.
- 3 vs 3 with coaches that act as "bumpers." You can swap the coaches with players to get more players involved.
- For the start of the game, the coach dumps the puck in for 50/50 puck.
- Whichever team gets to the puck and passes to a coach is on offense and is allowed to shoot on both nets. The coach or "bumper" must always pass back to the team that passed them the puck.
- During the game, if the defense gets the puck, they need to transition by passing to a coach first before they can play offense and attack.
- The game presented lots of unique situations and everyone needed to be paying attention.
Please note: Having a net facing the opposite way presents fun, unique opportunities in the game, but it also has the opportunity for players to get hit with shots if someone misses the net. That is one reason why this activity is better for older age groups. If this is a concern for you as a coach, you can keep the exact same rules but flip the nets so they are both facing the "normal" way.
Variations
- You can also swap out the two coaches that are bumpers and use players.
- This can be 2 vs 2 in a smaller area of ice.
- You can flip nets so they are both facing backward or facing the normal way but keep the same rules.
- You can add additional bumpers. Or you can allow all players that are waiting their turn in line to be bumpers so everyone is paying attention and involved!
