IC U16/U19
IC U16/U19

T-Push Progression
T-Push Keys:
- Whichever foot you push with, stop with opposite foot
- Set feet at each spot.
- Lead with eyes
Progression #1
- Start on post
- T-push to top of crease
- T-push to other post
- Repeat
Progression #2
- Start on post
- Push to top of crease on the same side
- T-push across the crease
- Push back to other post
- Repeat in opposite direction
Progression #3
- Start on post
- Push to top of crease on same side
- T-Push diagonally back to other post
- Push to top of crease on same side
- T-push diagonally back to post where you started
- Repeat
Progression #4
- Start on post
- T-push diagonally across to top of opposite side of crease
- T-push across crease
- Push back to post on same side
- Shuffle to other post
- Repeat in opposite direction
This drill we will done as players warm up.
3 cone warm up


Continuous Rim Drill
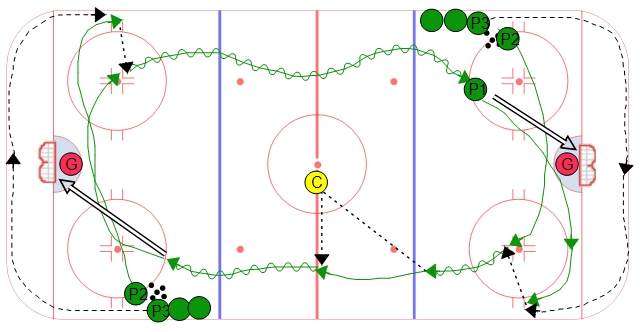
If your wingers need help making plays along the wall in the defensive zone, then this is a good hockey drill which gives players a lot of repetitions in this situation. Form two lines with pucks at the hash marks on opposite ends of the ice as shown in the diagram. The line should face the goal line. Just to start the drill place a player at the blue line with a puck. At the start of the drill this player will skate into the high slot and take a shot on net then follow the shot to the net. After looking for a rebound they will sprint to the corner (opposite the line of players) and get prepared for the rim by P3. P2 has to time their swing into the slot so they can provide good support for P1 as they retrieve the puck off the wall. P1 will make a direct pass or a chip off the wall to P2 as they swing. P2 will then carry the puck down the ice for a shot and become P1 for the next repetition at the other end.
One variation is to place a coach or another player at center ice. As P2 receives the pass from P1 they have to make a give and go with this additional player at center ice.
Another variation is to add defense in the middle of the ice. They have to create a good gap as the puck is rimmed and then play a 1 on 1 against P2.
NEHDA Continuous Retrieval Outlet
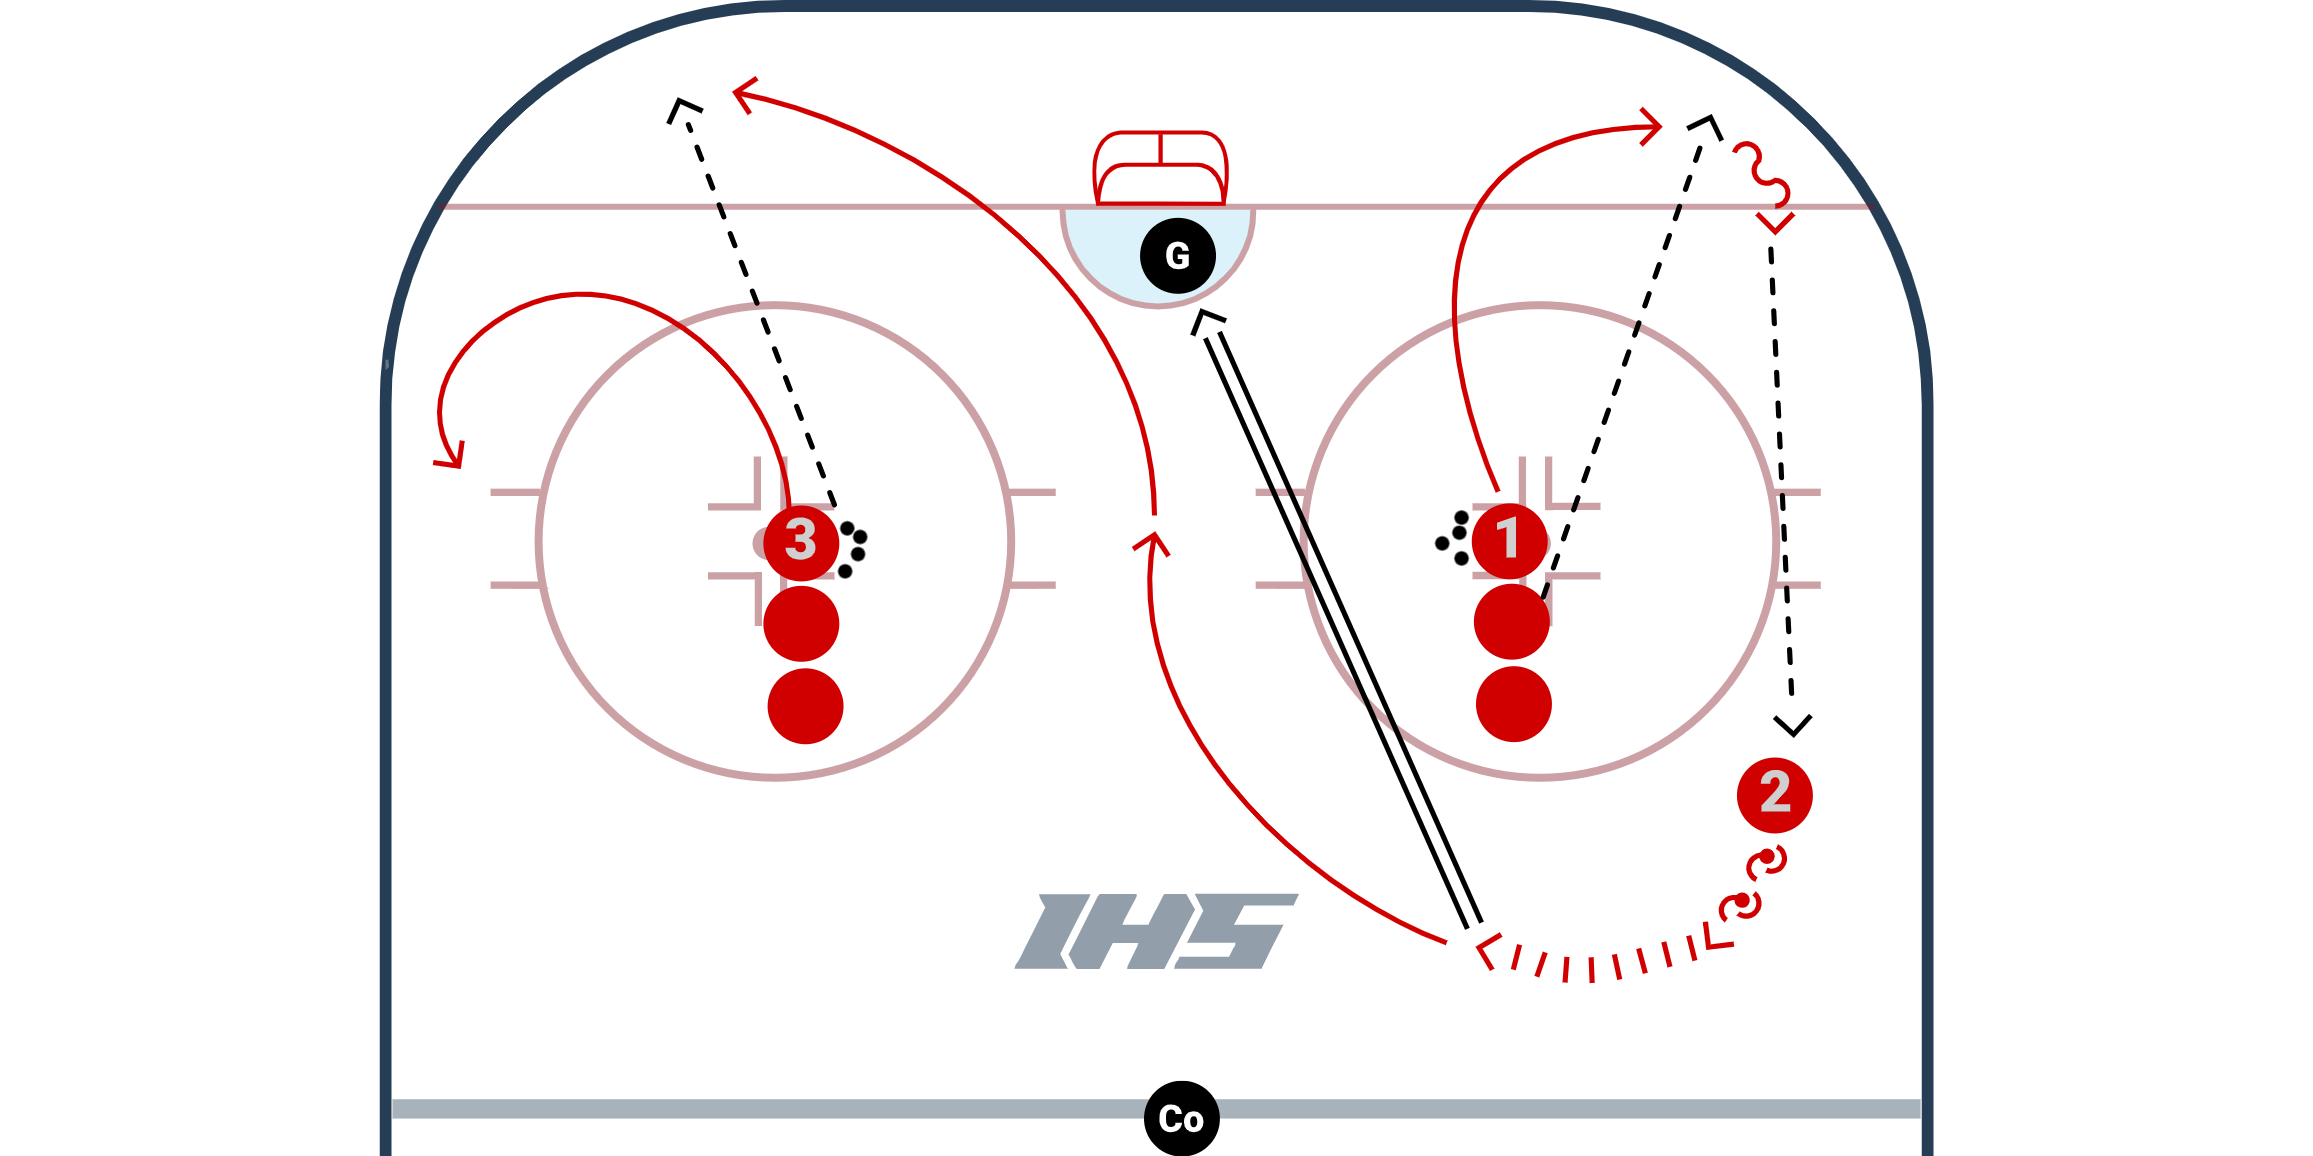
NEHDA Continuous Retrieval Outlet is an excellent drill from NewEdge Hockey that helps players practice puck retrievals, scanning the ice, passing, shooting, and more.
Setup
- Spilt up the players into two groups and have each group on a face-off dot.
- To start the drill, a player chips a puck into the corner, P1 retrieves the puck and passes it to P2 at the point. P2 walks the blue line, takes a shot, and then jumps to retrieve a puck in the opposite corner. The next player in the opposite line, P3, chips a puck into the corner for P2 to retrieve.
- The drill is continuous and there are a variety of retrievals techniques that can be practiced. A few that are shown in the video are:
- Part # 1 Face Up Ice: Retrieve the puck and get it up ice as quickly as possible.
- Part # 2 Puck Protection & Shot: Retrieve the puck and perform to puck protection cutbacks along the boards before passing the puck up.
- Part # 3 Puck Protection & Shot With Tip: Retrieve the puck and perform to puck protection cutbacks along the boards before passing the puck up. After a player passes the puck to the point, they go to the front of the net for a tip.
- Variation: Players can throw puck off the boards instead of a direct pass to the point, so the defenseman works on collecting the puck at the blueline before they take a shot.
Coaching Points
- Head up: Focus on strong surveys / scans before retrieval.
- Deception: Be deceptive and decisive and get the puck on your hip, eyes up and make an excellent pass.
- Shooting: Get shot off quickly.
2 vs 2 Rebound Battle Drill
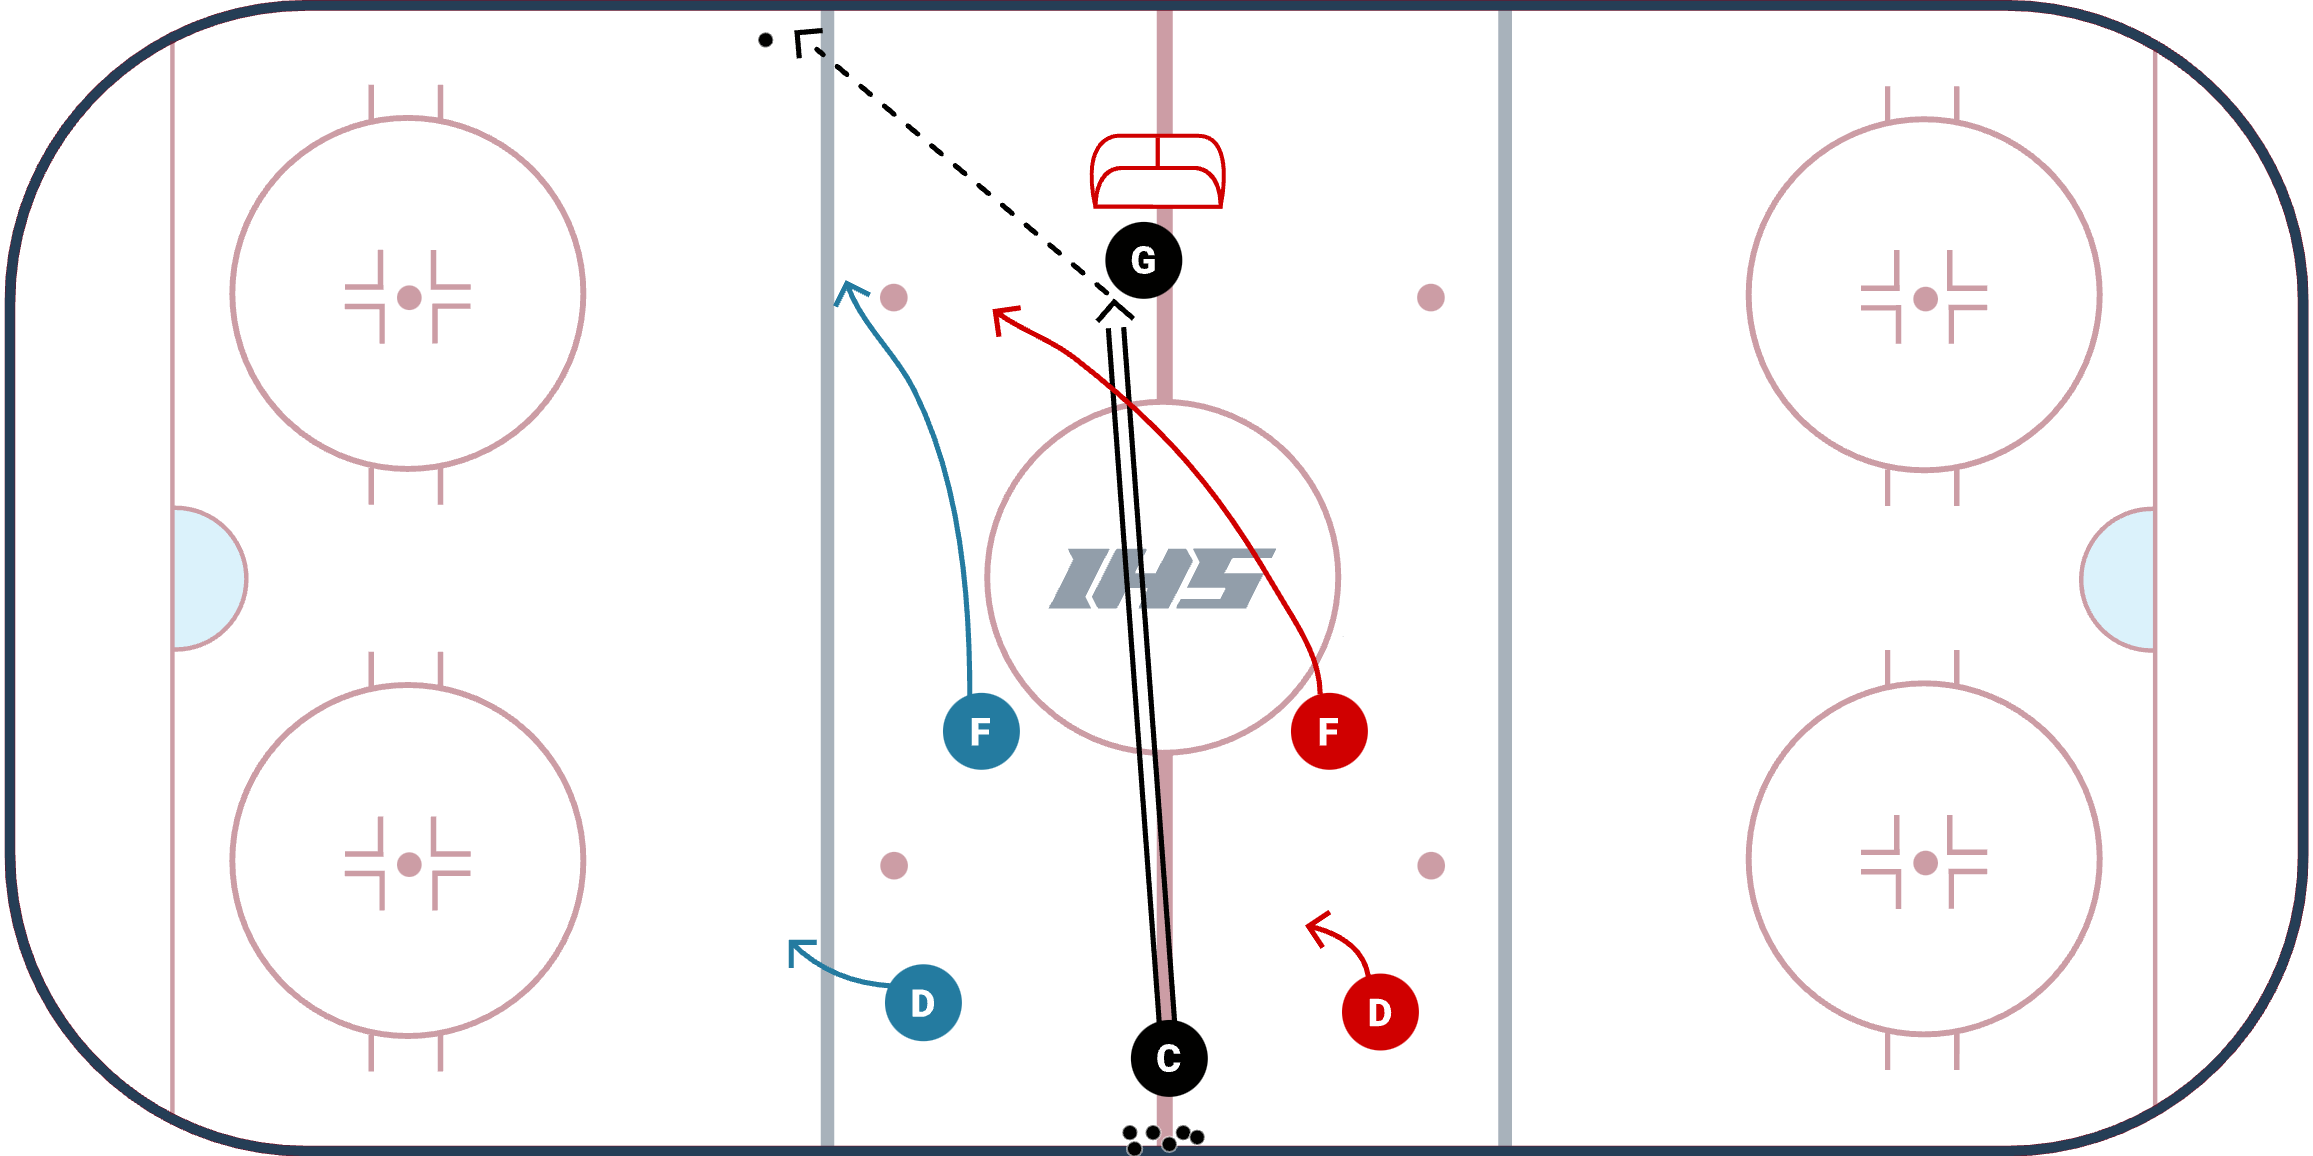
Winning loose puck battles is a major deciding factor in the outcome of a game. This battle drill challenges players to compete for a loose puck after a rebound and have the awareness to pass the puck to their teammate at the point. After the loose puck battle is won, the player passes it back to their teammate at the point, which will begin a 2 vs 1.
Setup:
- This can be setup to be a station, or a half ice drill.
- A coach or player dumps the puck on net and the goalie plays it to either corner.
- 2 players are spread out and charge into the corner to compete for the puck. Whoever comes out with the puck must pass it to their point player to begin a 2 vs 1.
- The drill is stopped after a goal, the goalie freezes it, or the puck is moved out of the zone.
Offensive Coaching Points:
- Players who arrive at the puck first should work on deceptive fakes with their body to escape from the corner. Fakes with your hips and pointing your skates in the opposite direction are extremely effective in this situation.
- Once you have the puck, protect it, get your head up and make a pass to the point.
- The point should be active calling for the puck and moving to space.
Defending Coaching Points:
- The defender should work on playing the body in the corner with stick on puck.
- When 2 vs. 1 begins, the defender should hold the middle and try to force a bad angle shot.
- Have good stick position. Do not swing your stick as it will open up passing lanes and make you off balance.
Variations:
- You can allow the point player that does not receive the pass to jump into the play so it is a full 2 vs 2.
- You can have only one point player, which is demonstrated in the 2 vs 1 Rebound Battle.
Offensive Advantage Game
Description
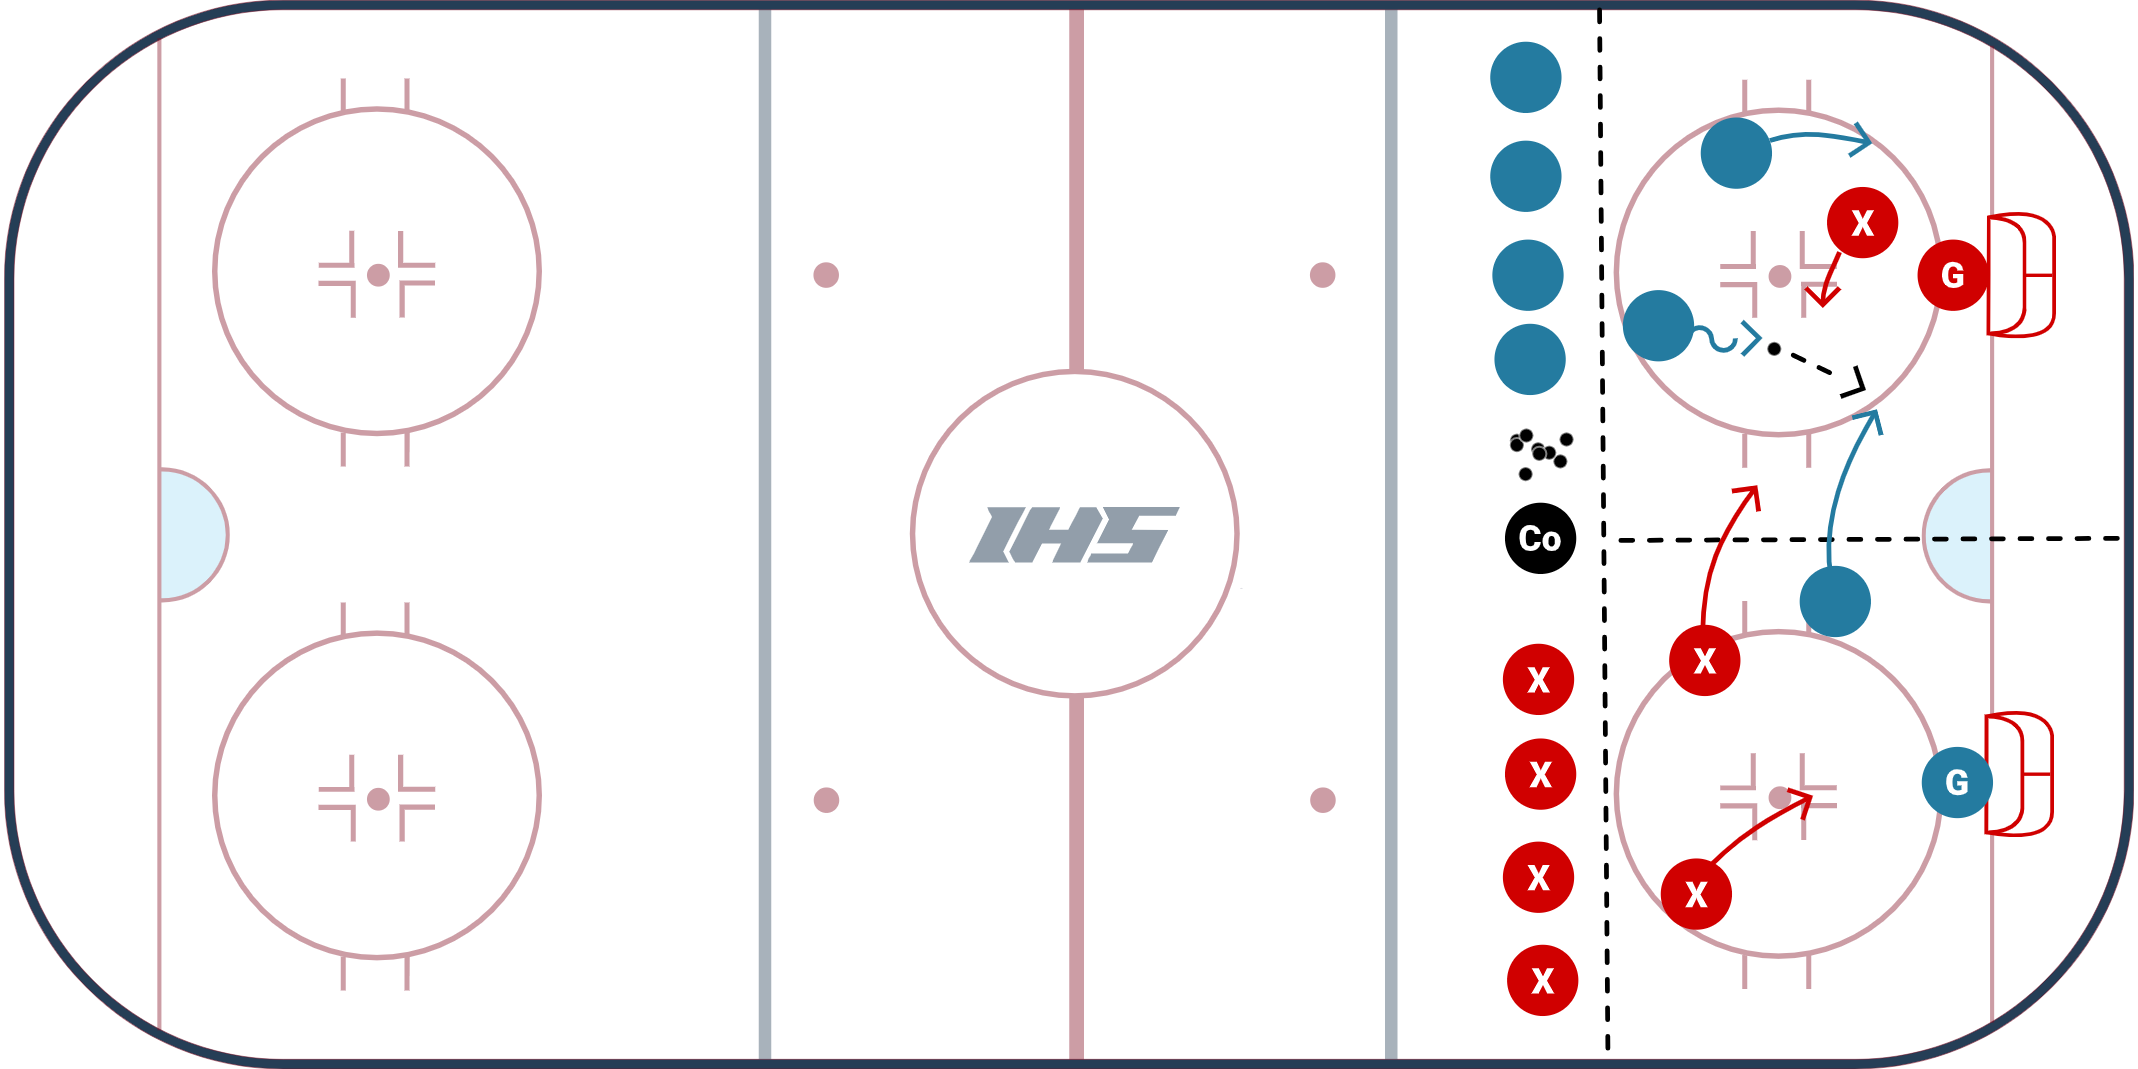
This Offensive Advantage small area game by Kendall Coyne Schofield is a great way to work on skills, scoring and multiple decisions in small spaces. The activation element of this game requires players to be alert, make quick decisions and communicate. Depending on the decisions made by the players, this can be a 2 v1, a 3 v 1 or a 3 v 2 at any given point. Players need to be mindful when activating as they are leaving an opposing player (or two) all alone with the threat to score.
Set Up
- Setup 2 nets, both on the goal lines (as shown in the diagram above)
- Draw a line (or use cones/tires) across the tops of the circles
- Draw a line (or use some cones/tires) across the middle of the zone between the top of the circles and the end boards (through the crease)
- Have 2 players on offense and 1 player on defense on each side of the ice
- Have coaches at the top of the circle (in the middle of the ice) with a pile of pucks
Game
Play a game up to a certain number of goals, team "X" vs team "O"
- Coach should dump the puck in the middle so players have to battle to get it to their side
- The game starts as a 2 v1 on which ever side the puck is on
- At any point, the defensive player on the opposite side can activate over to his or her team's side to make it a 3 v 1
- If the defensive player activates over to the other side, one of the forwards from that original side can join if he or she wants to make it a 3 v 2
- Players do not have to activate if they don't wish to
- At least one offensive player must always remain on their half of the ice
- If the puck crosses the tops of the circles, the coach should put in a new puck
- Coach can rotate in new players as he or she sees fit
- Keep score
Above the top of the circle, the puck is out and the coach needs to put a new puck in
Coaching Points
- Decision Making - players without the puck need to make smart decisions on whether or not to activate to the other side
- Communication - your teammates need to be on the same page to take advantage of the opportunities that present itself with this setup
- Quick Release- the setup calls for a constrained space where players need to use quick releases and one touch passing to create scoring opportunities
