Wall Play with 2 v 2 Situations
Wall Play with 2 v 2 Situations

Practice Notes
Please Note: The Practice of the Week is designed to bring value across multiple age levels. You can use this to build ideas to develop your own practice. With that being said, we highly encourage you to adjust the drills based on your team's age and skill levels. IHS should always be used as a starting point and you can add/remove constraints to fit your team.
We do not recommend having 7 drills in a practice, but we wanted there to be options for multiple age levels. Please copy the practice into your library and edit for your team.
This practice plan encourages players to develop wall play skills that can be utilized in every area of the ice. The practice starts with low-pressure repetitions on wall retrievals for and then progresses to use the skills in various live game play situations.
Coaching Points
- Encourage players to explore different variations of wall pick-ups and adding in the use of deception in their ability to retrieve pucks along the walls.
- After you pick the puck from the wall, protect it and work to get off the wall and into space to make a play
- This is a great practice for defenders to work on angles, body positioning and stick detail along the wall
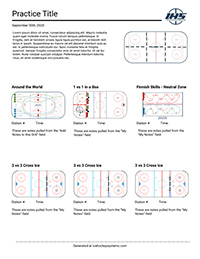
Practice Layout
Billy Purcell Off the Wall
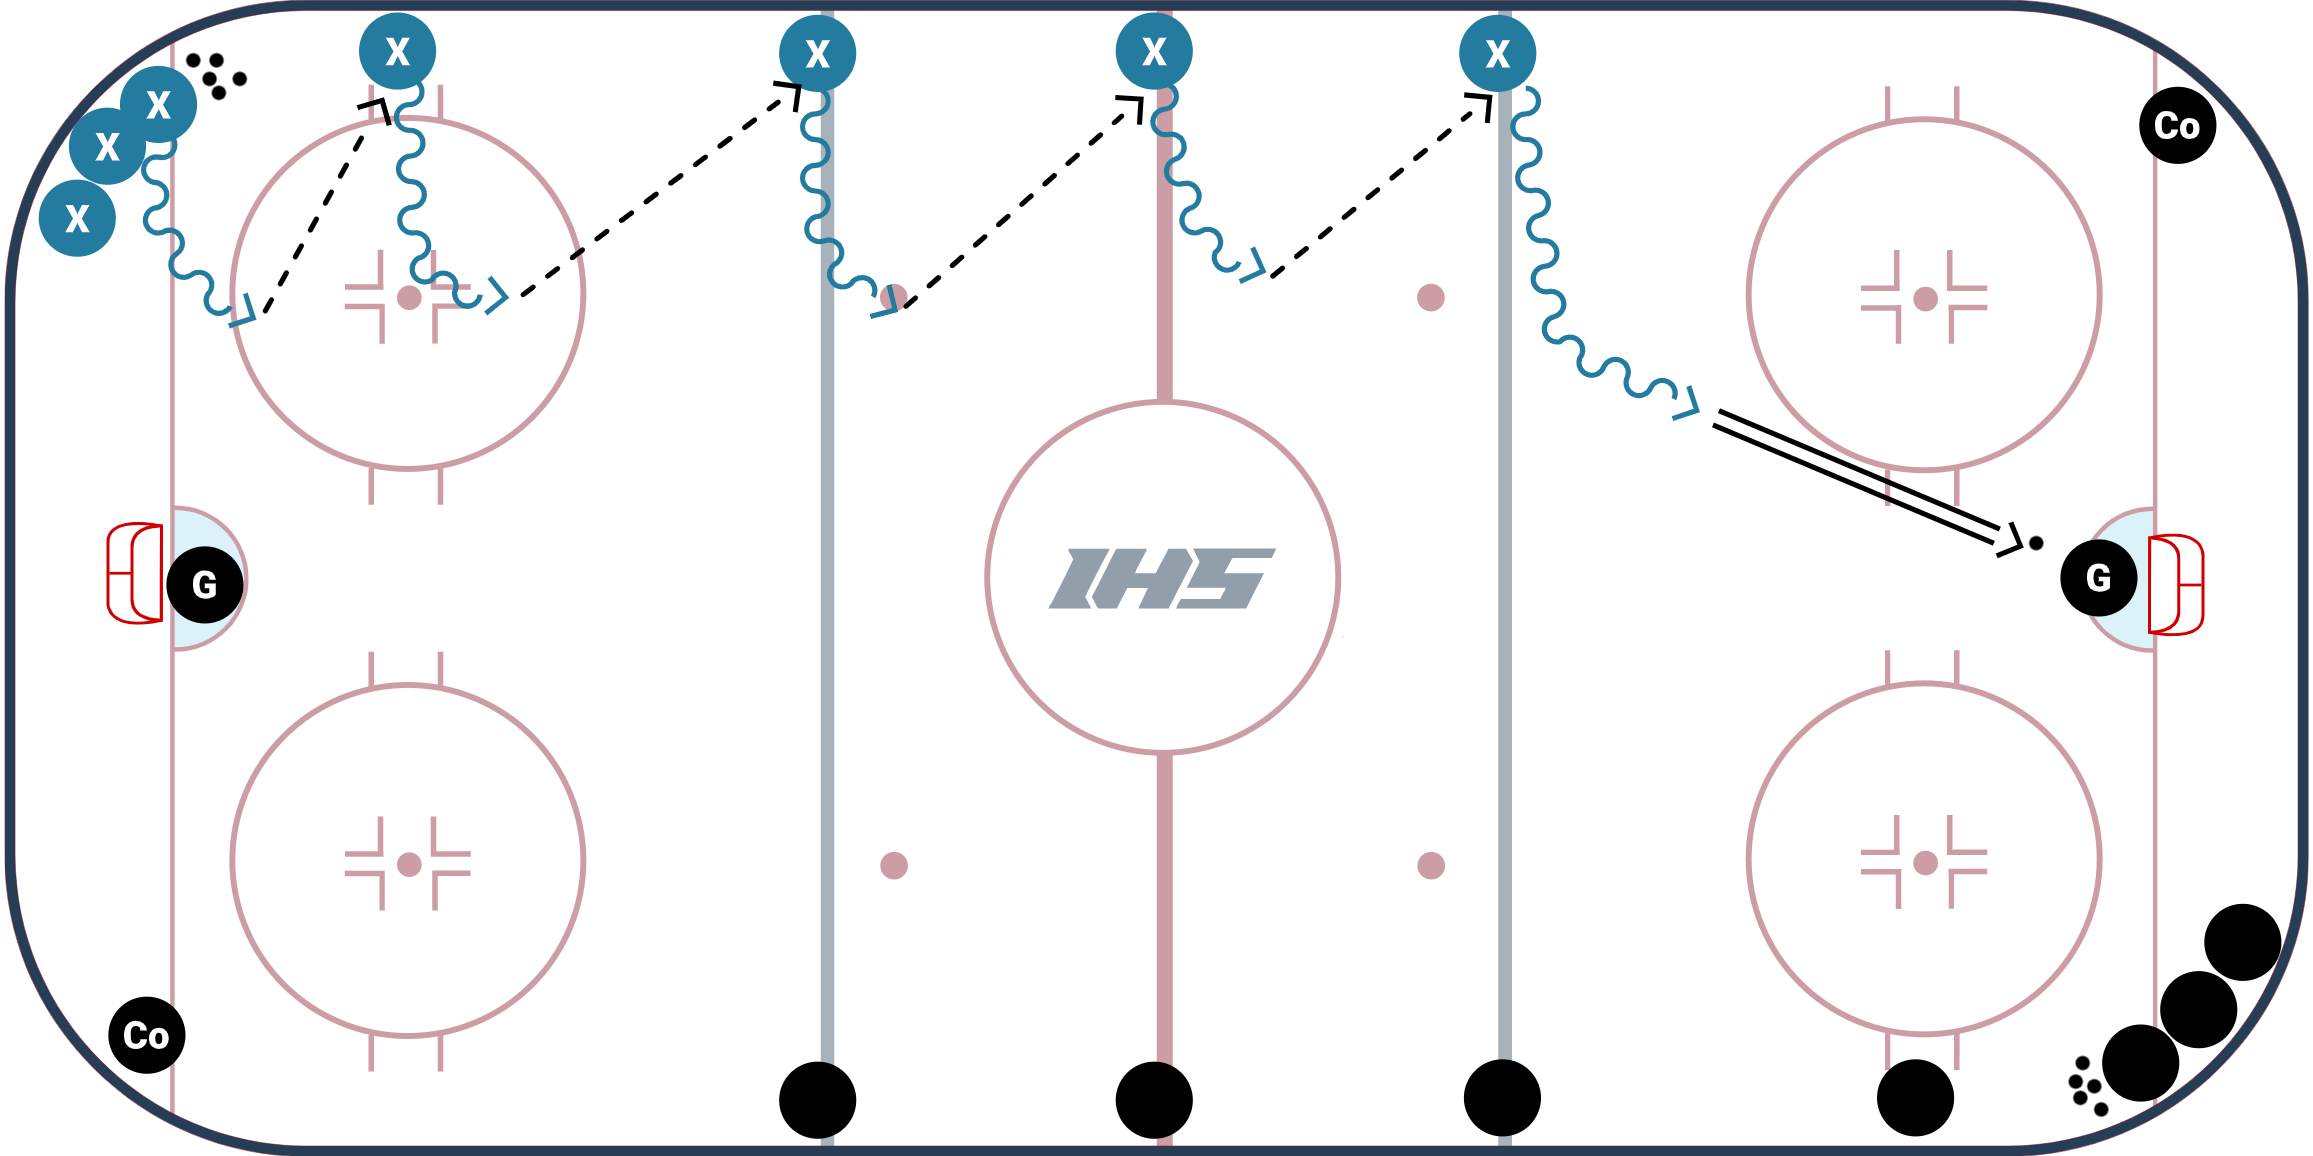
Billy Purcell Off the Wall Drill from Coach TJ Manastersky is a warm up drill that gets shots for goaltenders while working on passing & receiving along with getting off of the wall to create space for yourself.
TJ Manastersky shared this game with the IHS Community while he was an Assistant Coach at Union College. TJ is the Current Head Coach at Brock University in St. Catharines, Ontario.
Setup
- The whole team is split up in opposite corners and sides of the ice (as shown in the diagram).
- On the whistle, the player with the puck in the corner JUMPS off of the wall to the dots of the ice, then passes the puck to the player at the hashmarks.
- The player that receives the puck, jumps off of the wall, gets to the dots on the middle of the ice, then passes the puck to the player at the blue line.
- The player that made the pass then takes the space of the position of the player they passed the puck to.
- When the puck gets to the blue line, the next player in the corner begins the pass & follow movement.
- This drill continues down the ice until the player on the far blue line takes a shot on net.
Coaching Points
- Use your forehand and backhand to catch passes and make passes.
- Get your head up and practice getting off of the wall to create space for yourself.
Drill Variation: After the player gets off the wall, have him/her curl back towards the boards to provide a rim/bank to the next player so they can work on picking the puck up off the wall.
Wrap Puck Protection Progression
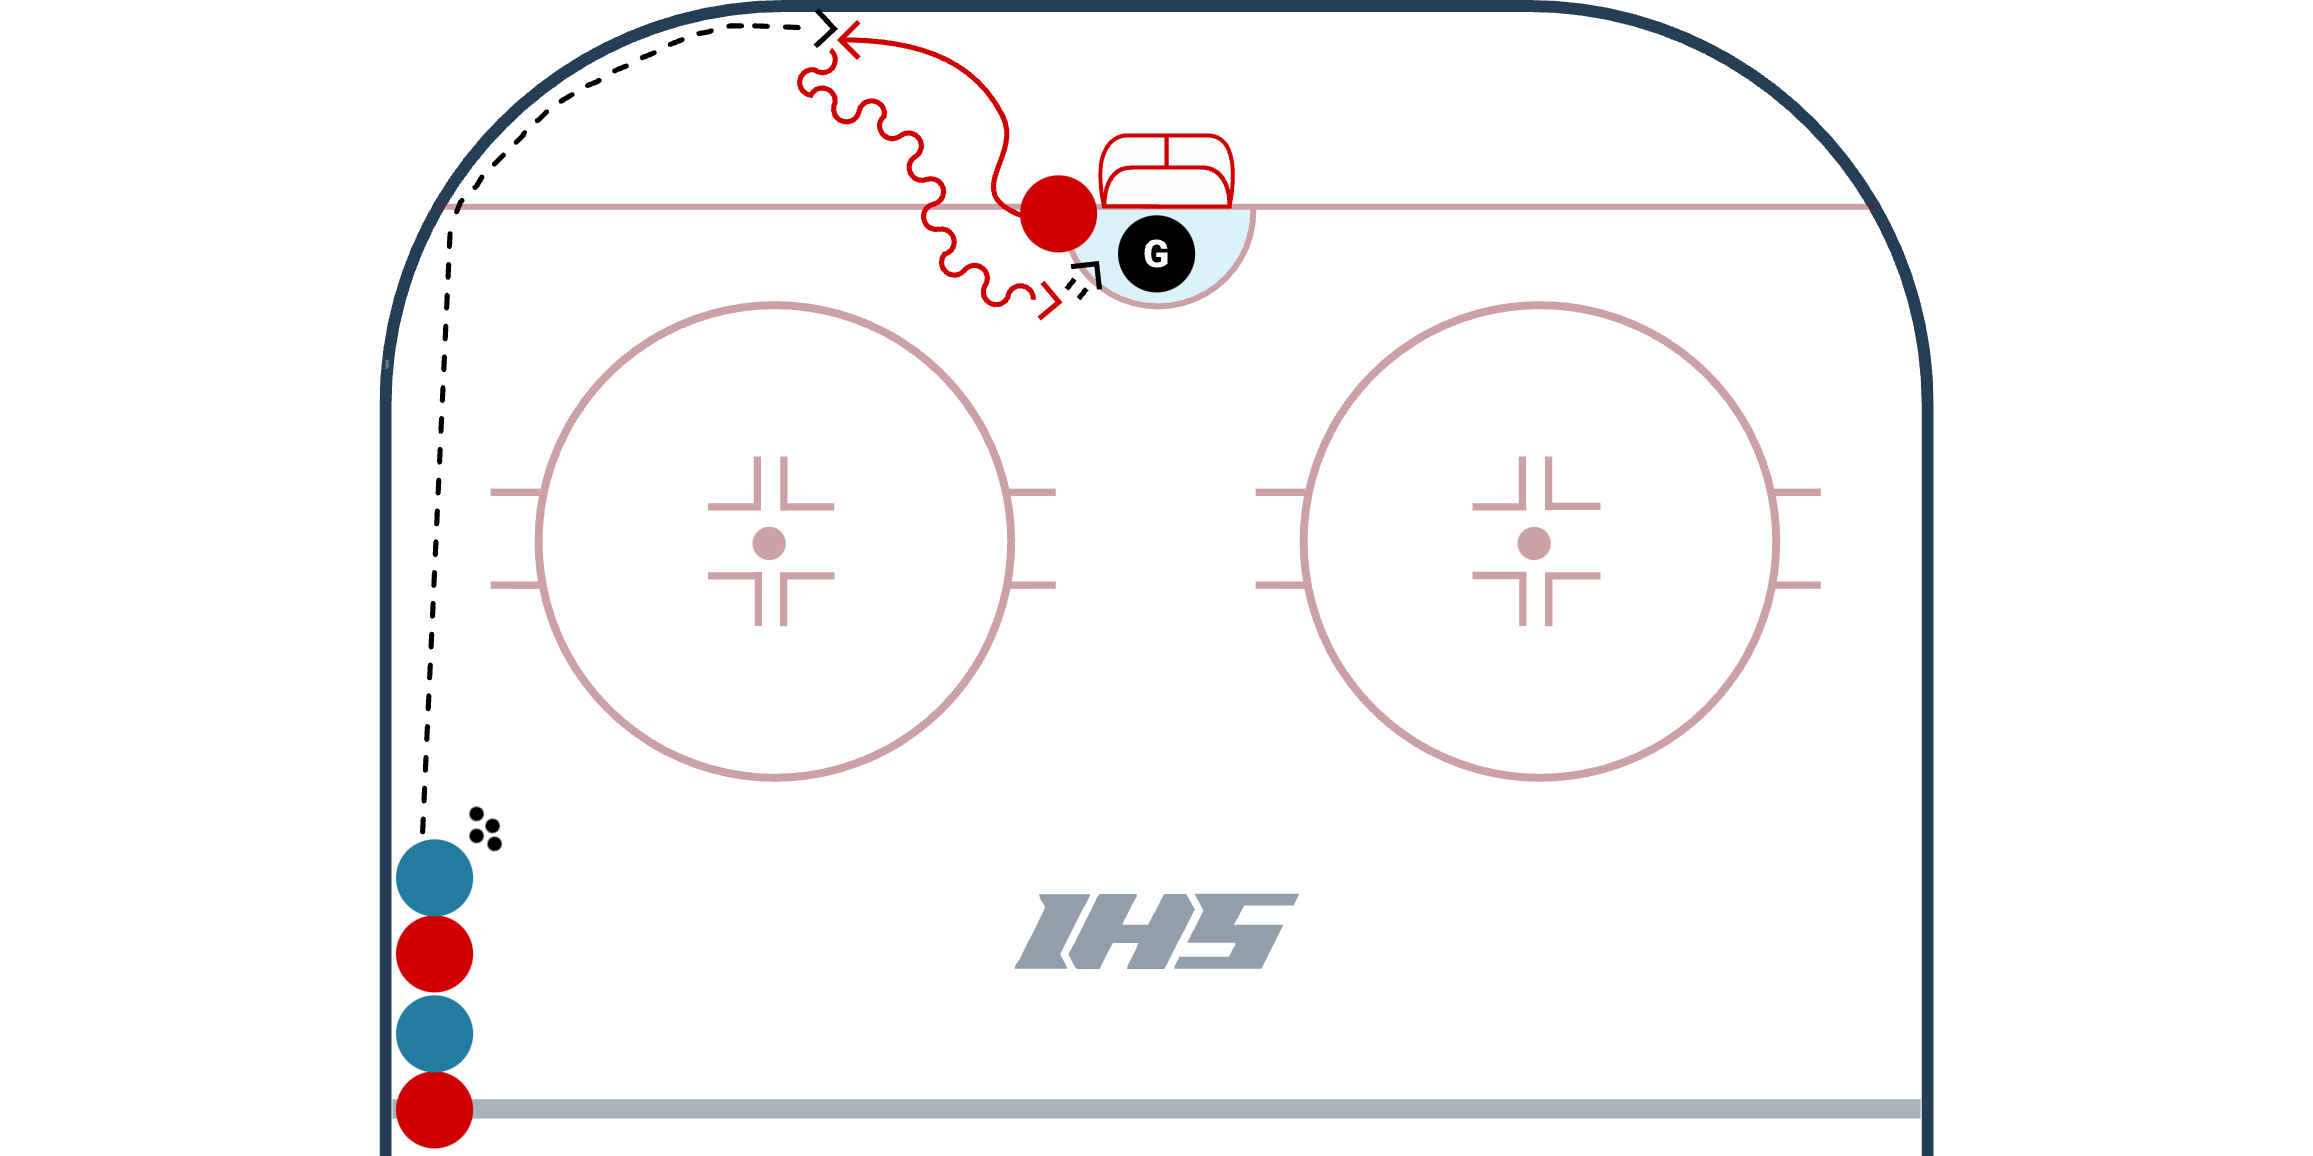
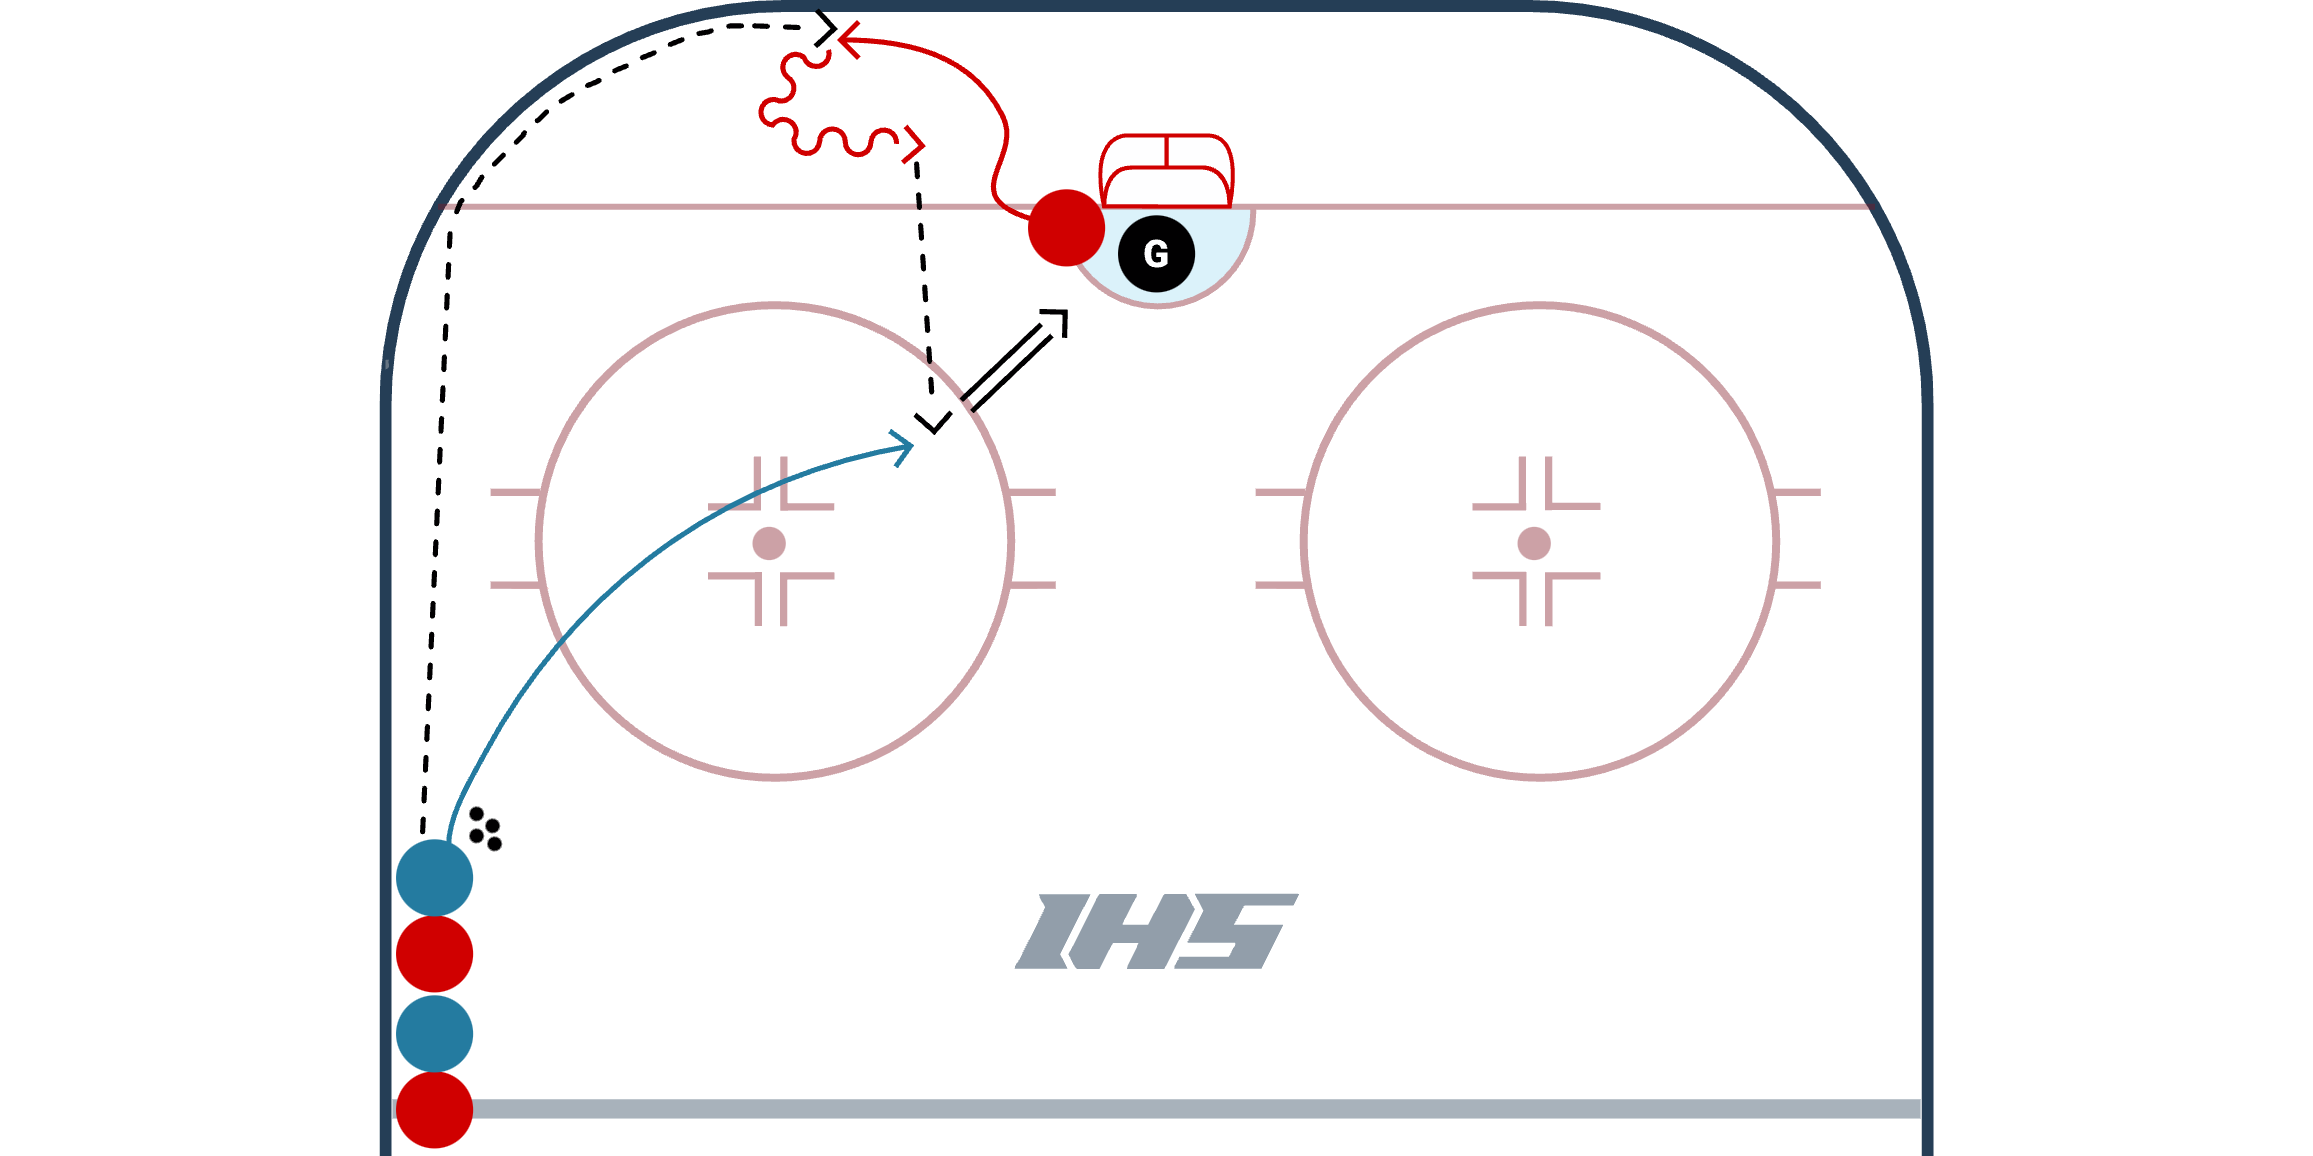
The Wrap Puck Protection Drill helps players practice picking pucks off of the boards in the offensive zone and attacking the net. The drill progresses to a 2 person passing drill.
Setup
- Line up players at the blue line along the boards with puck.
- Start with one player on the near post.
- On the whistle, a player at the blue line dumps the puck into the corner.
- The player in front of the net jumps to the puck, shoulder checks, collects the puck and attacks the net to get a shot on net. After the shot, the player that dumped the puck rotates to the front of the net, while the player that just shot rotates out.
- Progression 1: The drill progresses to a passing play, where the player in front of the net collects the puck, and then picks their head up to hit the player that dumped the puck with a pass. The player that gets the pass should work to get a quick shot off.
- Progression 2: Add a coach or a player to give light pressure so that the player picking the puck up along the boards needs to keep their head up and look to where they should pass to. This also forces the player streaking in from the point to jump to an area that is open.
Coaching Points
- The player retrieving the pucks from the boards should shoulder check and keep their head up (add a coach or player to give light pressure to make this drill more game like).
- The player jumping in from the point needs to communicate and let their teammate know where they are. They should work to get a quick shot off.
Variations
- The drill can be 1/2 ice as shown above or 1/4 as shown below.
- Can add in an extra player or a coach to provide light pressure and require the players to keep their heads up to make the pass.
2 v 2 Rim Game
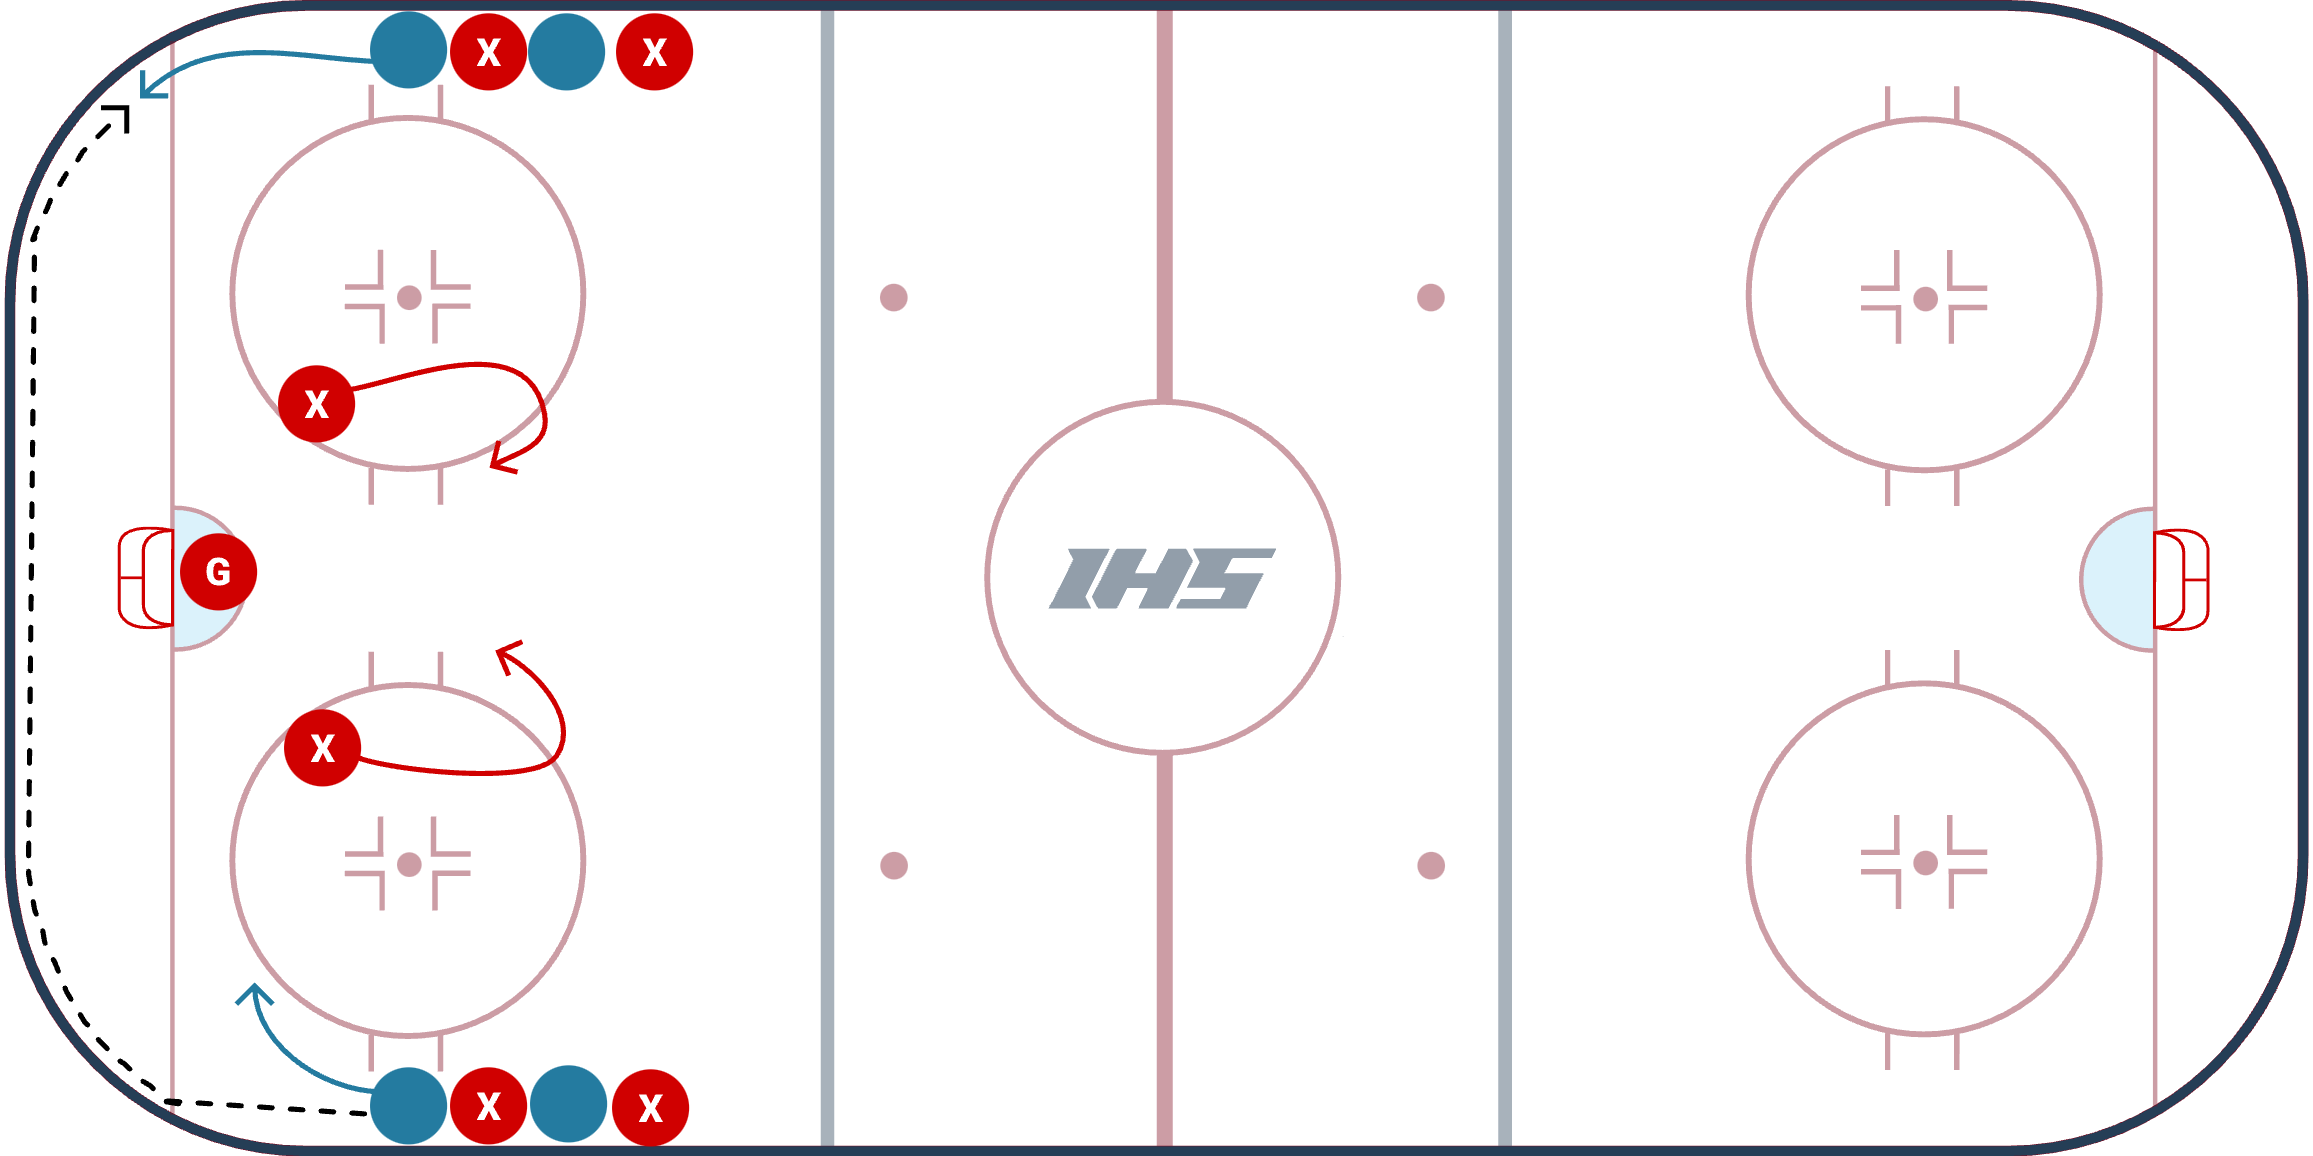
The 2 v 2 Rim Game from Jeff Meredith is a competitive battle game that allows players to practice rimming the puck along the boards and picking up pucks from the boards.
Setup
- Start with 2 defenders at the bottom of each of the face-off dots.
- On the whistle, one player rims the puck around the boards to their teammate on the other side. The teammate collects the puck to begin a 2 v 2.
- The defenders must skate to the top of the face-off circle before they can start to defend.
- Offense is trying to score, while defense is trying to collect the puck and get it to their teammates in line. They can directly pass it to their teammtes, or they can rim the puck to them.
- Once the puck is to the next players in line, a new game begins. The players that were playing defense rotate out, the players playing offense rotate to defense, and the two players in line start by rimming and collecting the puck to begin the 2 on 2 game. The game is continuous.
Coaching Points
- Defense: keep sticks on the ice to block passing lanes and angle players to the outside. Communicate with each other.
- Offense: be deliberate on your rims. Utilize the angle of the boards to work with you, not against you. Make sure the rim does not get past you. Stop the puck, collect it, and make a pass or a play to buy yourself more time.
Variations
- Can set this game up at the hashmarks (as shown in the diagram) or set it up at the blue line to practice longer rims.
Go Go
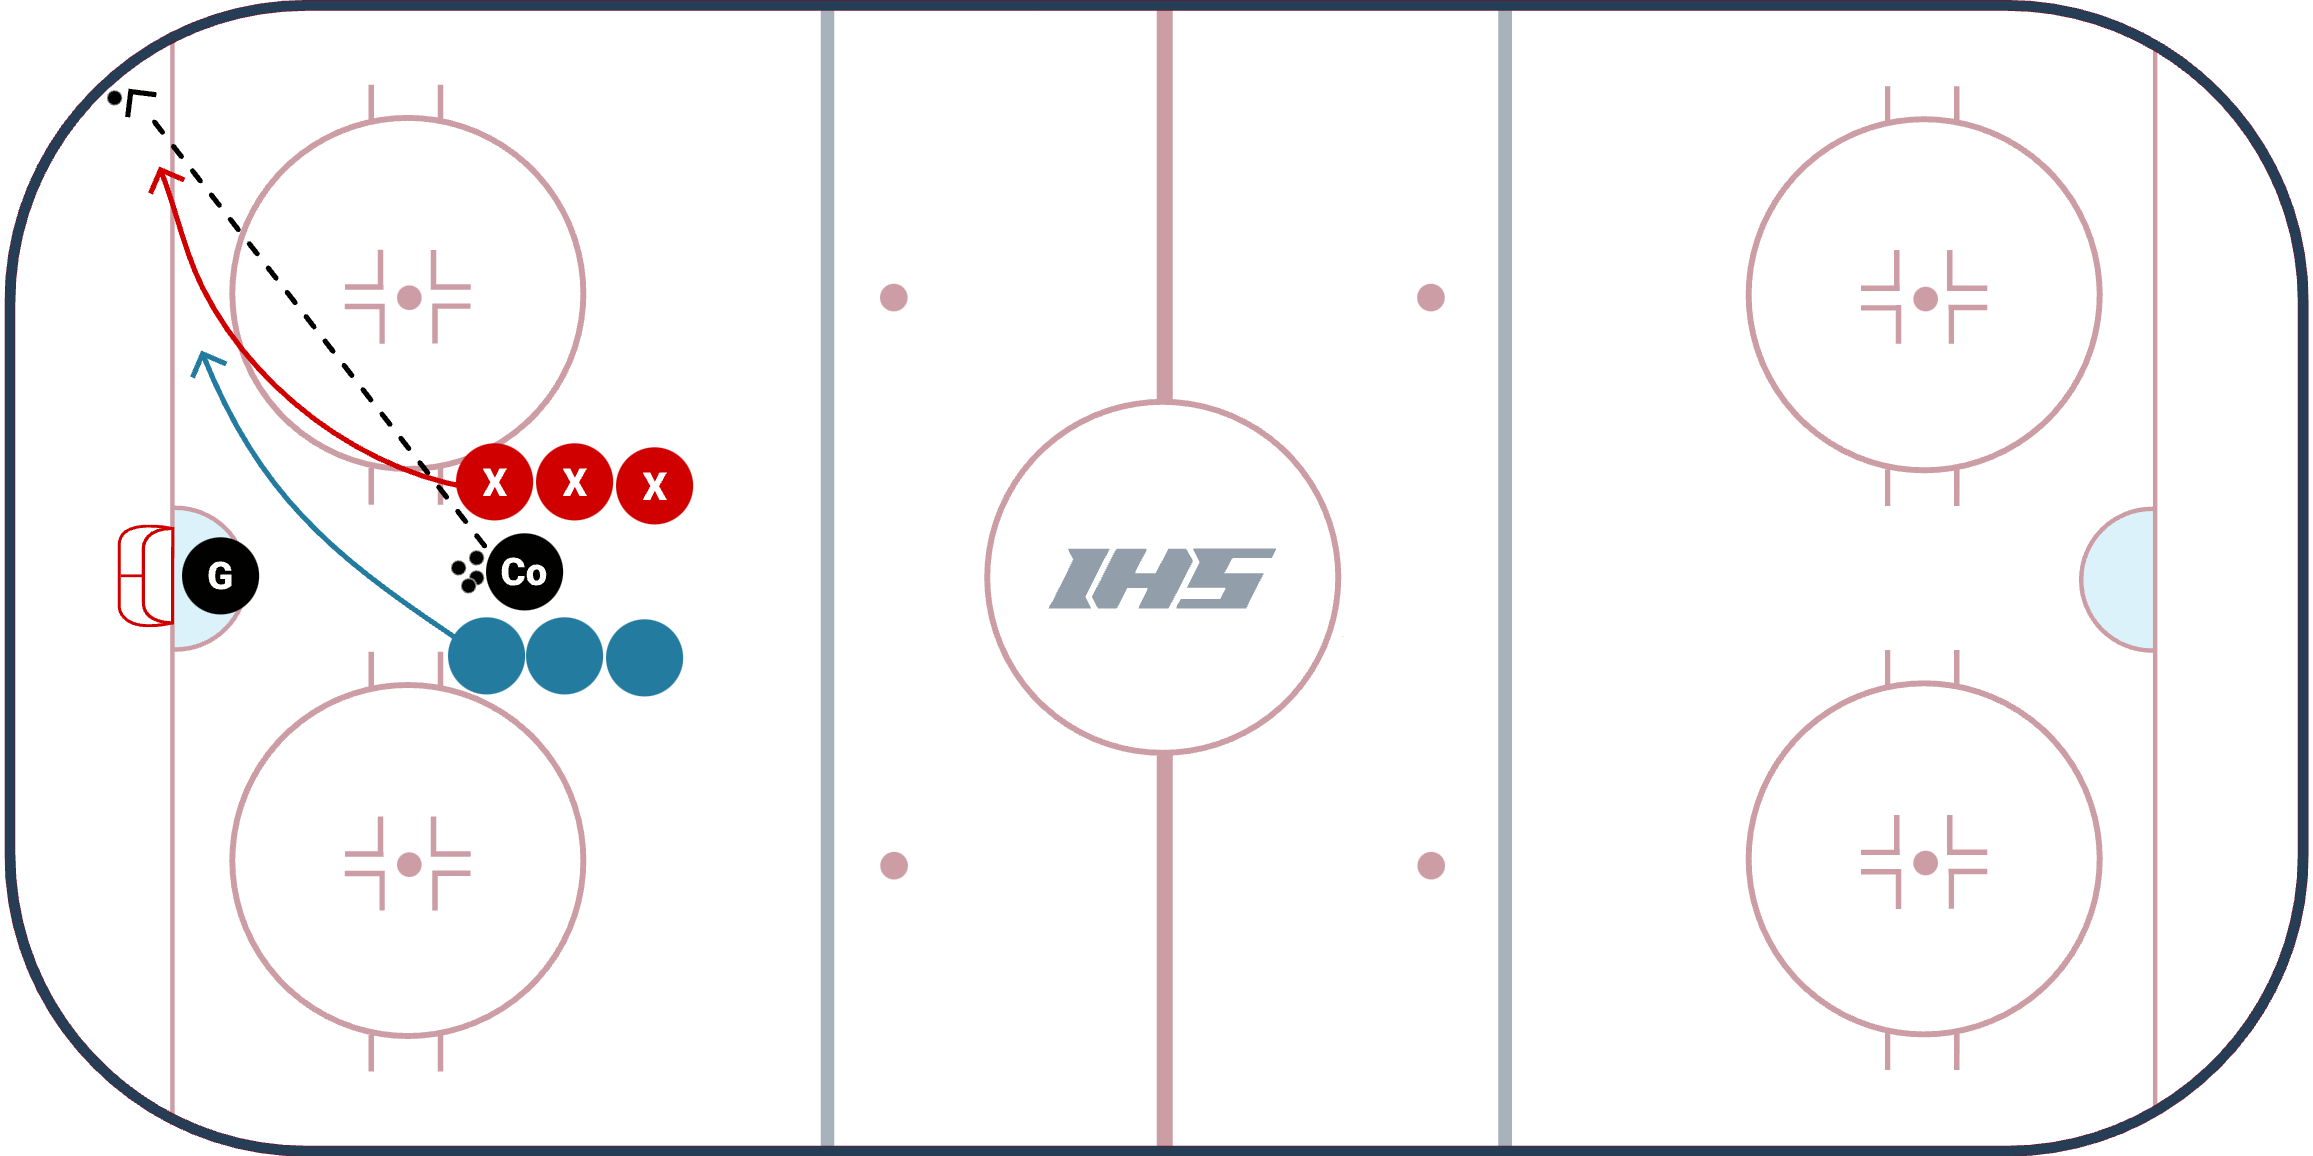
The Go Go from TJ Manastersky, the Head Coach of Brock University, is a high tempo small area game turns into various situations: 1v1, 2v1, 2v2, 3v2, and 3v3. The game practices down low defending along with puck protection, puck support and attacking down low. Players in line need to be ready to jump into the game when the coach yells go!
Setup
- On the whistle, the coach chips the puck into the corner to start a 1 v 1.Whichever side the coach chips the puck into, that team will be on offense.
- Every time coach yells "Go" the first offensive player in line jumps into the play. The next "Go" will have the next defending player in line go. Alternate lines with each "Go."
- This game turns into various situations: 1v1, 2v1, 2v2, 3v2, 3v3, 4v3, etc.
- The offense tries to score while the defending team tries to skate the puck over top of the circle to end the rep.
Coaching Points
- Offensive players first to the puck should practice puck protection and cutting the hands of the defender.
- Players in line that are called into the game need to jump to support their teammates and communicate to let them know where they are.
Have the coach go to the end of the boards if possible to start each rep with a wrap.
Davos Game
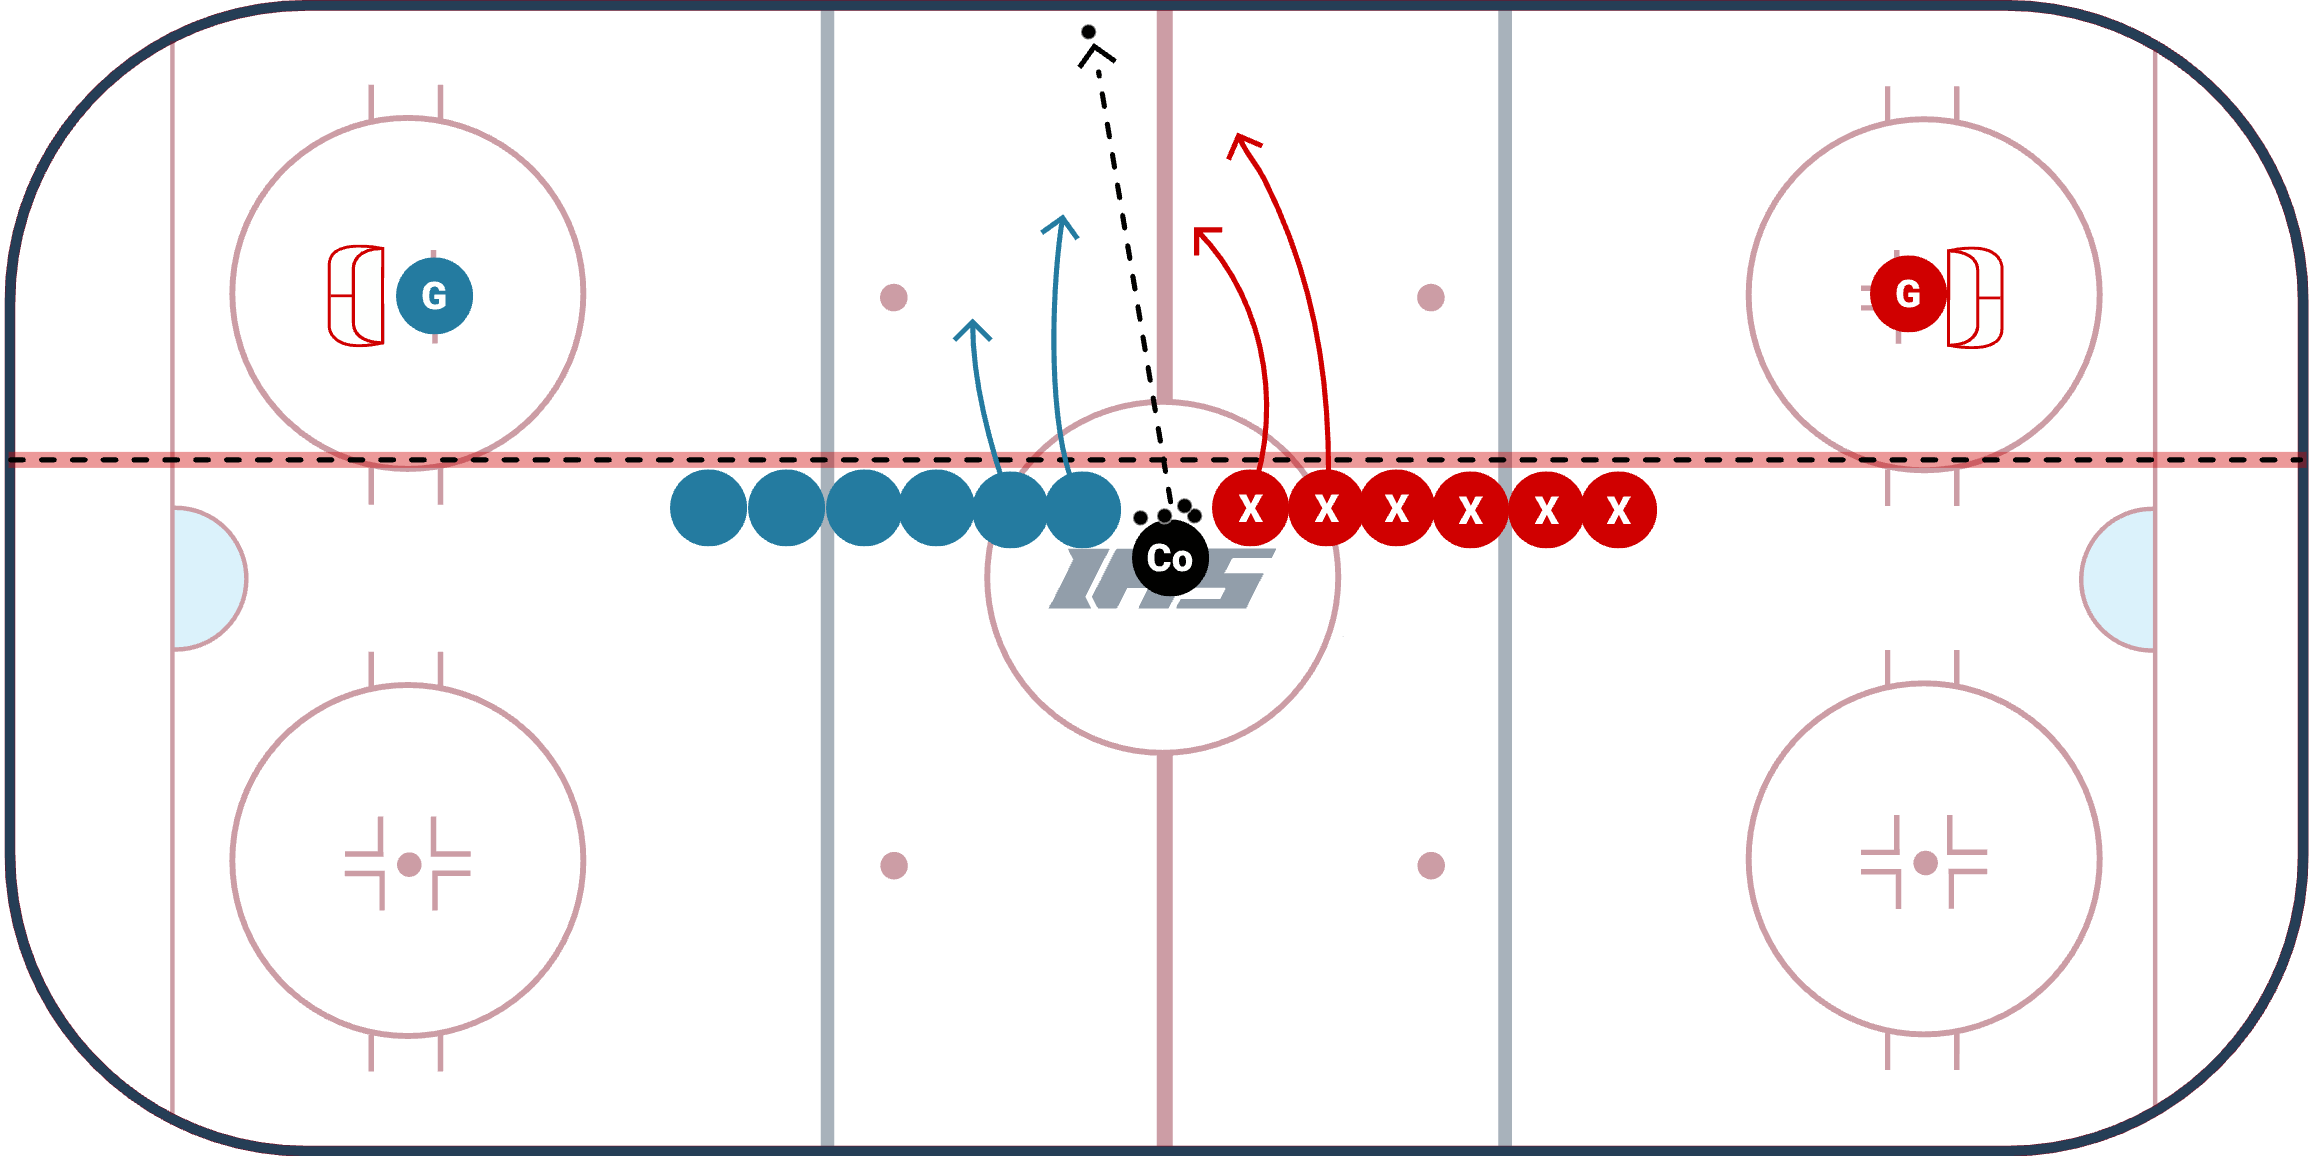
The Davos Game shared by Wes Wolfe is a fresh take on small area games. Instead of playing cross ice, the playing area is set up to be full length, 1/3 ice. There are no rules other than each team is trying to score. The setup and game allows players to think creatively and also use the full length of the ice to skate and pass.
Setup
- Divide the rink up into 1/3 and have players separate and line up at center ice along the boundary (to help keep pucks in).
- On the whistle, a coach chips a puck into the playing area and 2 players from each team race to get the puck, this starts a 2 on 2 game.
- There are NO RULES and no offsides. Players need to work together and think creatively on how they can defend and score.
- If the puck goes out of play, the coach chips in a new puck.
- On the whistle, 2 new players from each team jump in.
Coaching Points
- Plan ahead - coaches should encourage teams to come up with a game plan while they are waiting in line.
- Communicate! With no rules and the ability to go anywhere on the ice, teams need to work together to communicate when they are on the ice.
- Offensive team - try using passes off other boards and area passes to spring a fast break.
- Defensive team - keep sticks on the ice to angle and block passing lanes.
- Goalies - play the puck and look to make passes to your teammates.
Variations
- Can play 2v2, or 3v3.
- Can play with or without offsides.
Start each game with a rim/wrap from the coach, encourage using the wall for passes to teammates.
3 vs. 3 Split Zone Game
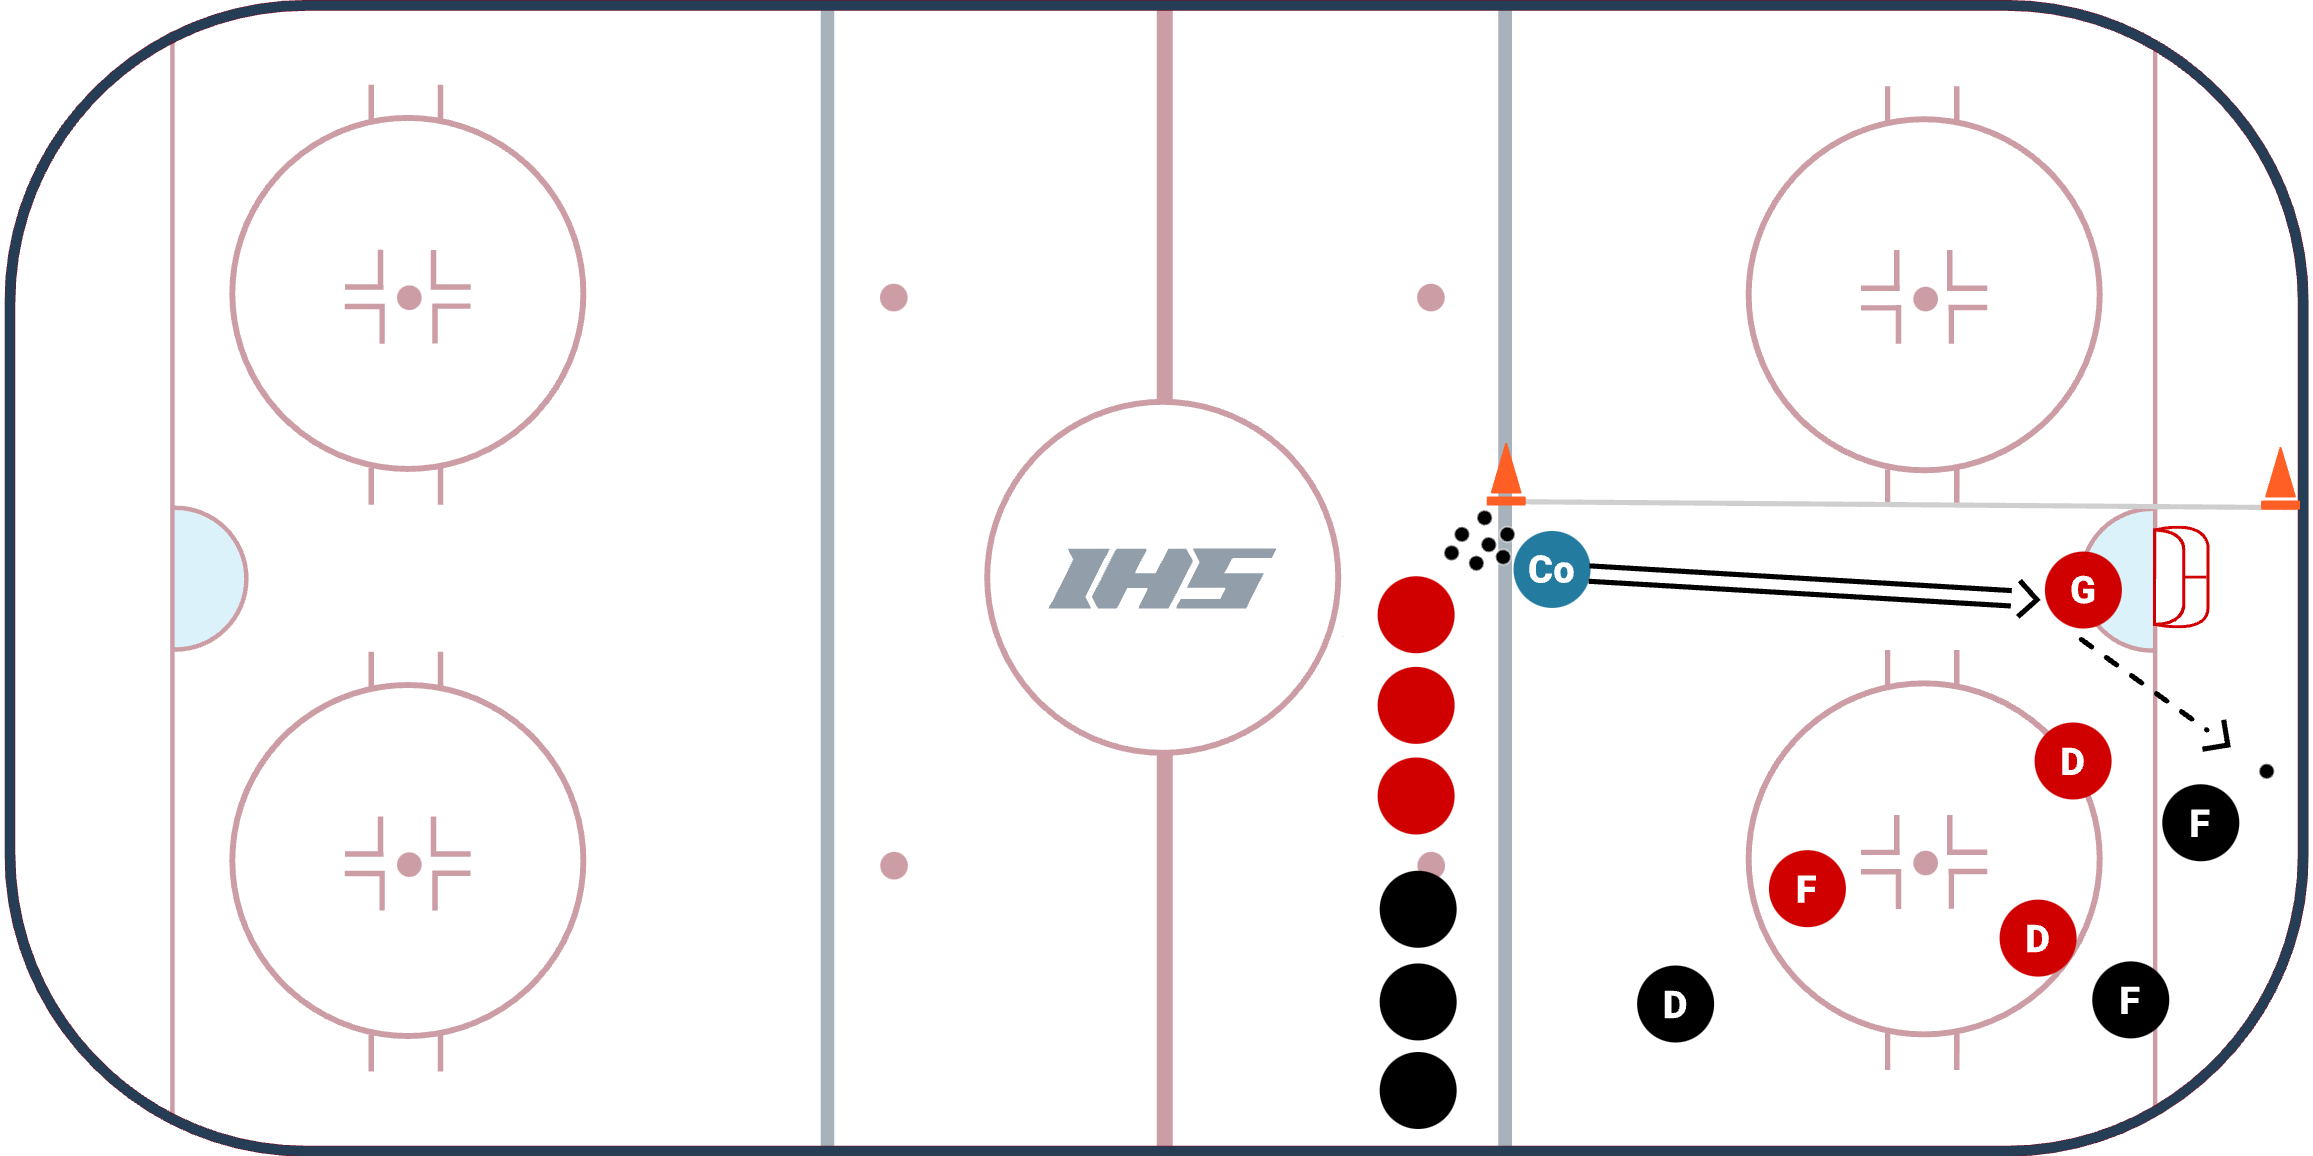
3 vs. 3 Split Zone Game is a great small area hockey game to practice offensive and defensive principles that occur during the course of a game. The zone is split in half (as shown in the diagram and video) and the forwards are trying to score a goal, while the defense is defending and trying to exit the zone. The defense must complete one pass before exiting the zone.
Setup
- Split the zone in half (like it is shown in the diagram and whiteboard video)
- 3 offensive players vs. 3 defensive players. One goalie.
- The coach chips the puck to the goalie, who deflects the puck into the corner of the ice. This begins the 3 vs. 3.
- Forwards work to score a goal (which is 2 points) and the defenders work to defend and exit the zone. Defenders must complete one pass before they exit the zone (which is 1 point).
- The game ends when a goal is scored, the defense exits the zone after a pass, the goalie freezes the puck or the coach blows the whistle.
Coaching Points
- Offense:
- Protect the puck.
- Create time and space.
- Use the boards to protect the puck and make bank passes.
- Be a passing outlet for your teammate.
- Defense:
- Sticks on the ice (to angle and block passing lanes).
- Communicate with each other.
Emphasize switches and exchanges down low in 2 v 2 before working to the high player.
2 vs 2 Corner Battle Tag Up
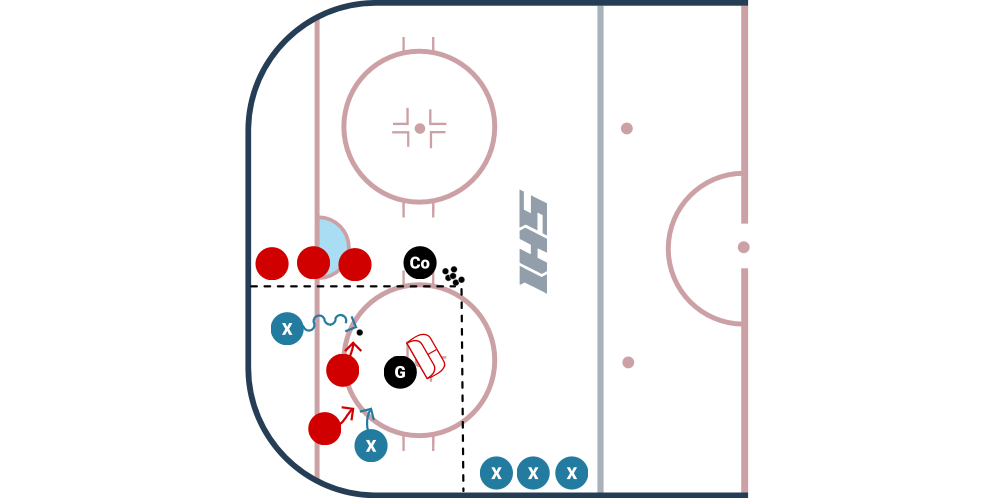
The 2 vs. 2 Corner Battle Tag up is a competitive game that requires to players protect the puck and utilize their teammates in a small area. This game has one major item to remember, during a change of possession, the team that got the puck must tag up at the goal line before they can try to score. Below we will discuss the setup, coaching points & variations.
Setup
- Place the net by the corner face-off dot and have it face the corner (as shown in the video & diagram).
- Start the game by having a coach chip the puck into the corner while 2 players from each line jump into the playing area.
- Both teams are trying to score a goal and if the defensive team gets the puck, they MUST tag up at the red line before they can shoot on net.
- Have players that are not participating be on the lookout for loose pucks (they can push pucks back into the playing area) and be aware of shots.
- Let players battle for 15 - 45 seconds before switching to next group.
- Keep score so teams are more competitive!
Coaching Points
- Get low to be strong on your skates.
- Protect the puck with your body.
- Communicate with your teammates.
- Defenders need to keep sticks on the ice at all time.
- Forwards without the puck need to jump to open space to be an outlet for their teammates.
Variations
- This setup can be 1 v 1 or 2 v 2. View a 1 on 1 example.
- Can move the net in other areas to give the players more or less space.
Start each new puck with a rim/wrap.
Puck Retrieval Along The Boards
Retrieving the puck along the boards happens countless times throughout the course of the game and it is where many 1 on 1 battles are won or lost. When players collect the puck off of the boards is not usually a highlight-reel play, but if they are able to learn a few simple concepts, they will be able to impact the flow of the game. These concepts will allow players to create space so they have time to make a play. Plus, with an evasive move, they will be much harder to hit!
In the video above, Coach Ben Eaves discusses two major concepts when retrieving a puck:
- Look Over Your Shoulder: This is concept # 1 because it is most important. Looking over your shoulder will allow you to know if you have time, or need to make an evasive move to create time.
- Retrieve The Puck At An Angle: This will allow you to keep your speed up while you are going to get the puck. Plus it is much safer than going head-on into the boards.
The video gives you three options to practice:
- Option 1: If you look over your shoulder and see you have time, continue skating full speed at an angle to pick up the puck and bring it up ice.
- Option 2: If you look over your shoulder and you see you have pressure, skate at an angle but use your upper body to deceive the defending team and quickly turn up ice.
- Option 3: If you look over your shoulder and you see someone right on you, point your feet (which will point your body) one way and quickly move your hips and move your feet in the opposite direction to evade the defender. This is usually the most effective but will take time and good edgework to get comfortable with. Note: When you get comfortable with Option 3, combine the lower body fakes with upper body fakes to really throw off a defender!
Bonus: Watch the Toronto Maple Leafs practice their puck retrievals and forchecking in this fun 1 on 1 battle.
