U16+ Breakout Practice
U16+ Breakout Practice

Practice Notes
Please Note: The Practice of the Week is usually designed to be utilized across multiple age levels. With that being said, we highly encourage you to adjust the drills based on your team's age and skill levels. These drills and practices can be modified to become more basic or more advanced.
The drills and games in this practice are designed to help your players work on breakout principles
Focus Points
Below are the main focus points for each position that we want to work on for this practice
Defensive Retrievals
- Scan the ice - you need to make it a habit to shoulder check to be aware of your surroundings when retrieving pucks
- Retrieve at an angle - if time permits, work on retrieving the puck at an angle so that you can accelerate off the wall or out of the corner to create time and space to make a play instead of just wrapping the puck around the wall
- Support your partner - be in a position to support your partner by providing an easy bump/reverse or outlet
Also encourage your defensemen to not just wrap the puck around the boards. Make a tape to tape pass and work to get up ice to join the rush.
Wingers
- Scan the ice - before the puck arrives, look up ice to see what the defensemen is doing to read the pressure
- Get to the wall - before the puck gets to your spot
- Get off the wall - get separation from the wall once you control the puck so you have more options for a clean exit
Centers
- Stay low and slow - you need to provide an outlet for your defense and wingers. It's important to time your route so that you make for an easy outlet
- Look up ice - this will help you read the pressure and give a passing target for your winger either directly or by skating up ice for an easy chip
- Communication - your defense and wingers can be under a lot of pressure when trying to breakout - communicate when you are open to help relieve that pressure
Additional Resources
55+ Breakout Drills
- Puck Retrieval Along the boards
- Breakout Tips (strong side winger)
- Breakout Tips (off-side wingers)
- Breakout Tips for Centers
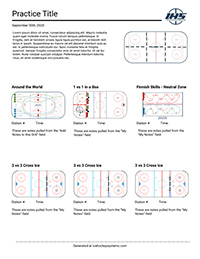
IHS Members can create their own practice plans that look like this. Learn how here
Billy Purcell Off the Wall
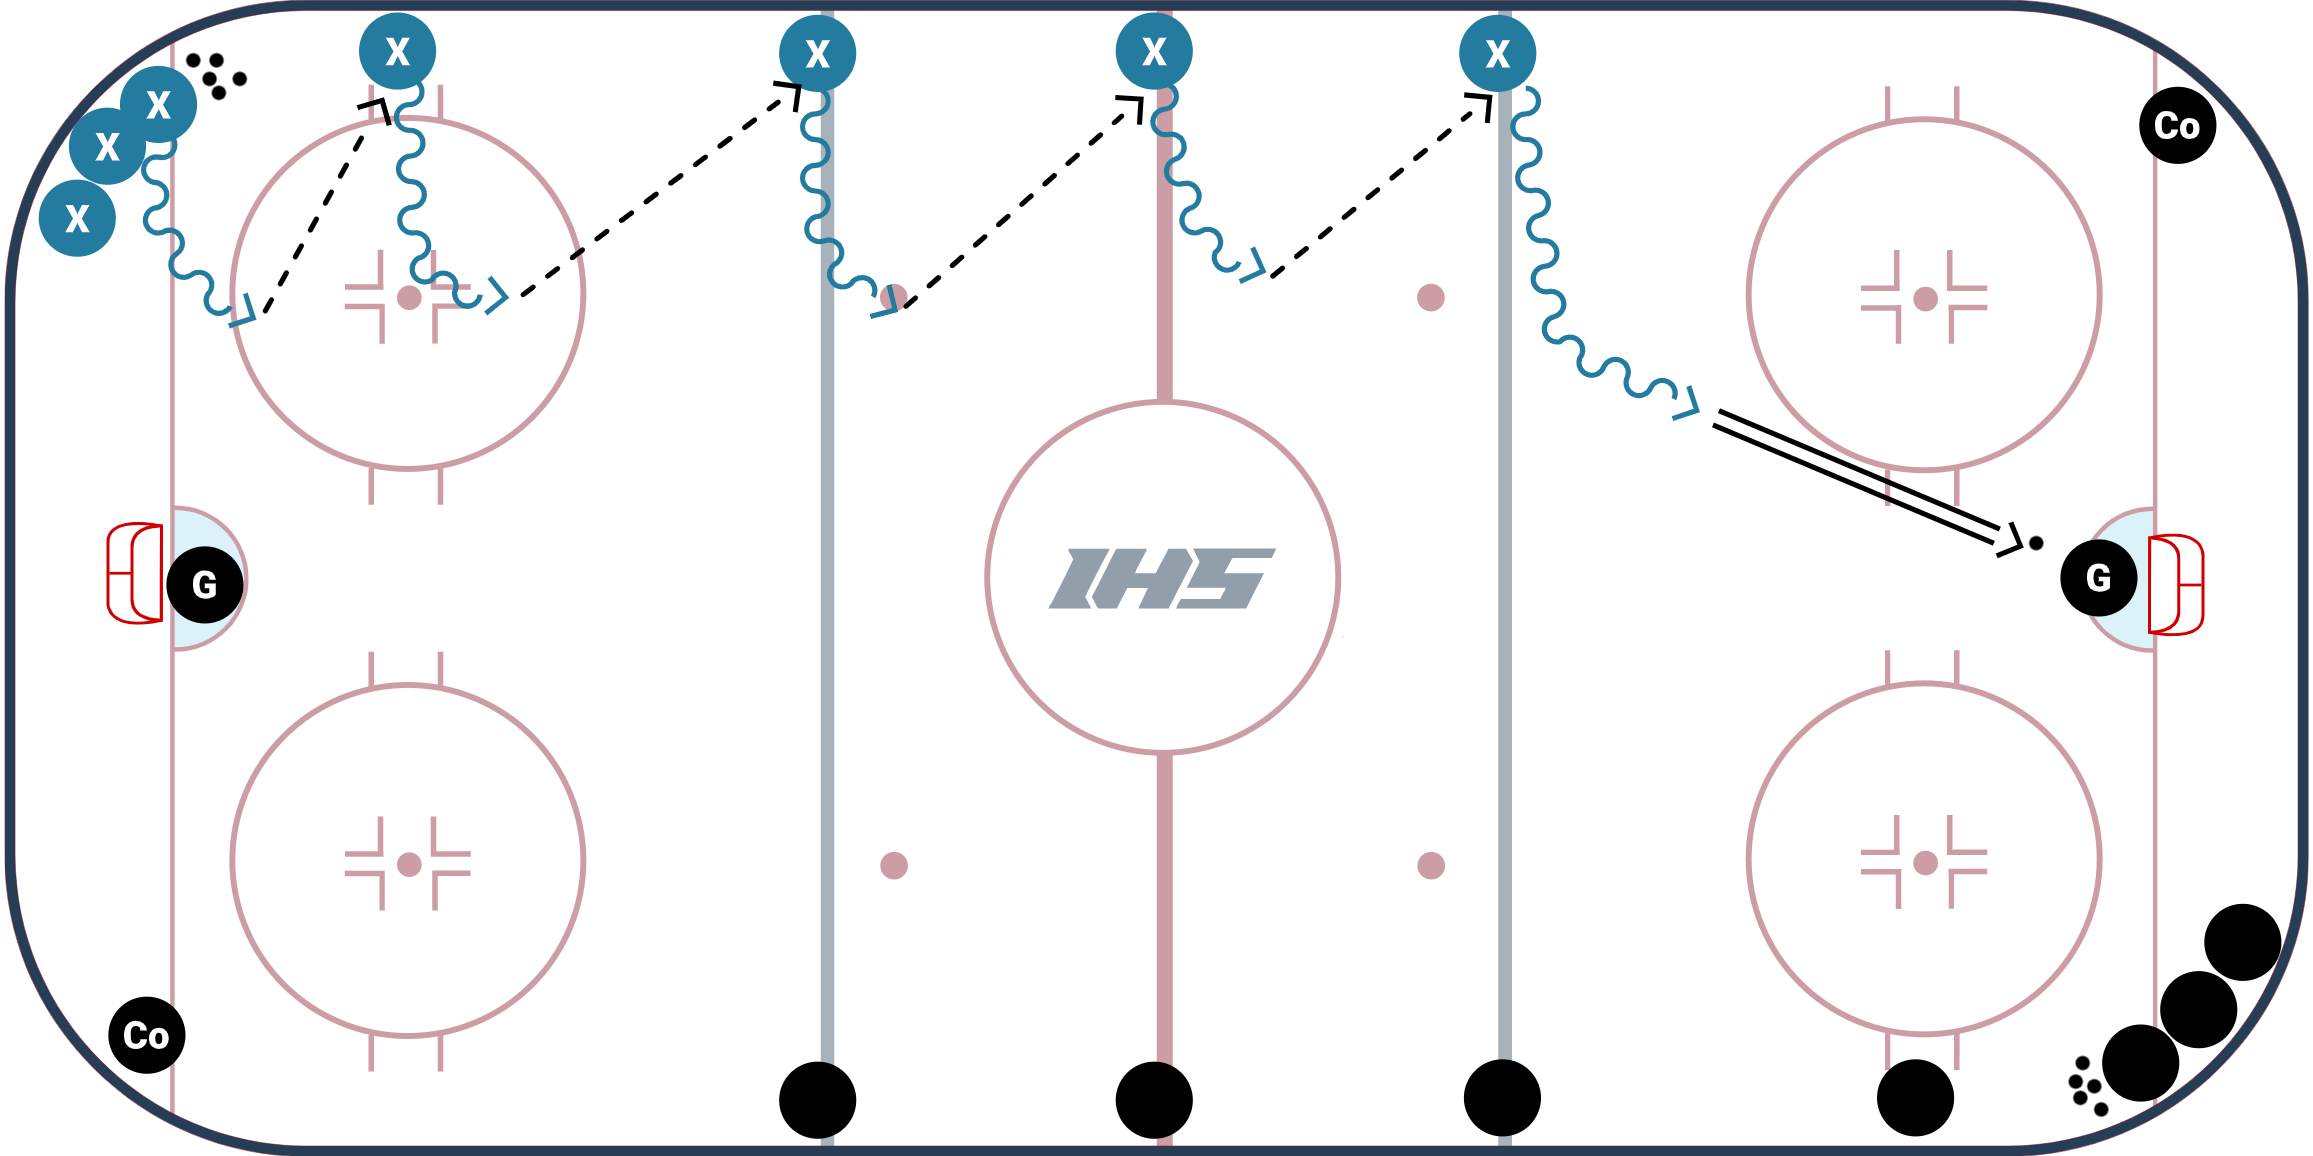
Billy Purcell Off the Wall Drill from Coach TJ Manastersky is a warm up drill that gets shots for goaltenders while working on passing & receiving along with getting off of the wall to create space for yourself.
TJ Manastersky shared this game with the IHS Community while he was an Assistant Coach at Union College. TJ is the Current Head Coach at Brock University in St. Catharines, Ontario.
Setup
- The whole team is split up in opposite corners and sides of the ice (as shown in the diagram).
- On the whistle, the player with the puck in the corner JUMPS off of the wall to the dots of the ice, then passes the puck to the player at the hashmarks.
- The player that receives the puck, jumps off of the wall, gets to the dots on the middle of the ice, then passes the puck to the player at the blue line.
- The player that made the pass then takes the space of the position of the player they passed the puck to.
- When the puck gets to the blue line, the next player in the corner begins the pass & follow movement.
- This drill continues down the ice until the player on the far blue line takes a shot on net.
Coaching Points
- Use your forehand and backhand to catch passes and make passes.
- Get your head up and practice getting off of the wall to create space for yourself.
Mid Pair Wall Retrievals

This is a great warm-up drill for defensemen from NewEdge Hockey that can be used all of the time. This setup offers tons of repetitions for common defenseman movements. Deception is a critical, must-have skill for defensemen, and sending false signals takes work to do well. Lots of versions from toes and head left to right take, fan at puck, and so on. Puck on hip, eyes up, and superior passing are skills and habits that defenseman need to make a difference in today's game.
Setup
- Each player has a partner. Player 1 chips the puck to the boards, retrieves it, and passes it to Player 2. Player two then chips the puck and continues the drill.
- Progression # 1: Fake forehand to reverse curl.
- Progression # 2: Head up quick pass.
- Progression # 3: Any variation you want! This setup can allow defenders to reinforce retrieval movements. Use deception and keep your head up!
Coaching Points
- Head up!
- Look over your shoulder as you are skating to the puck (make sure to practice this habit!)
- Practice deception in retrievals with your toes, hips, stick, head & eyes!
Whole team including goalies
NEHDA Continuous Retrieval Outlet
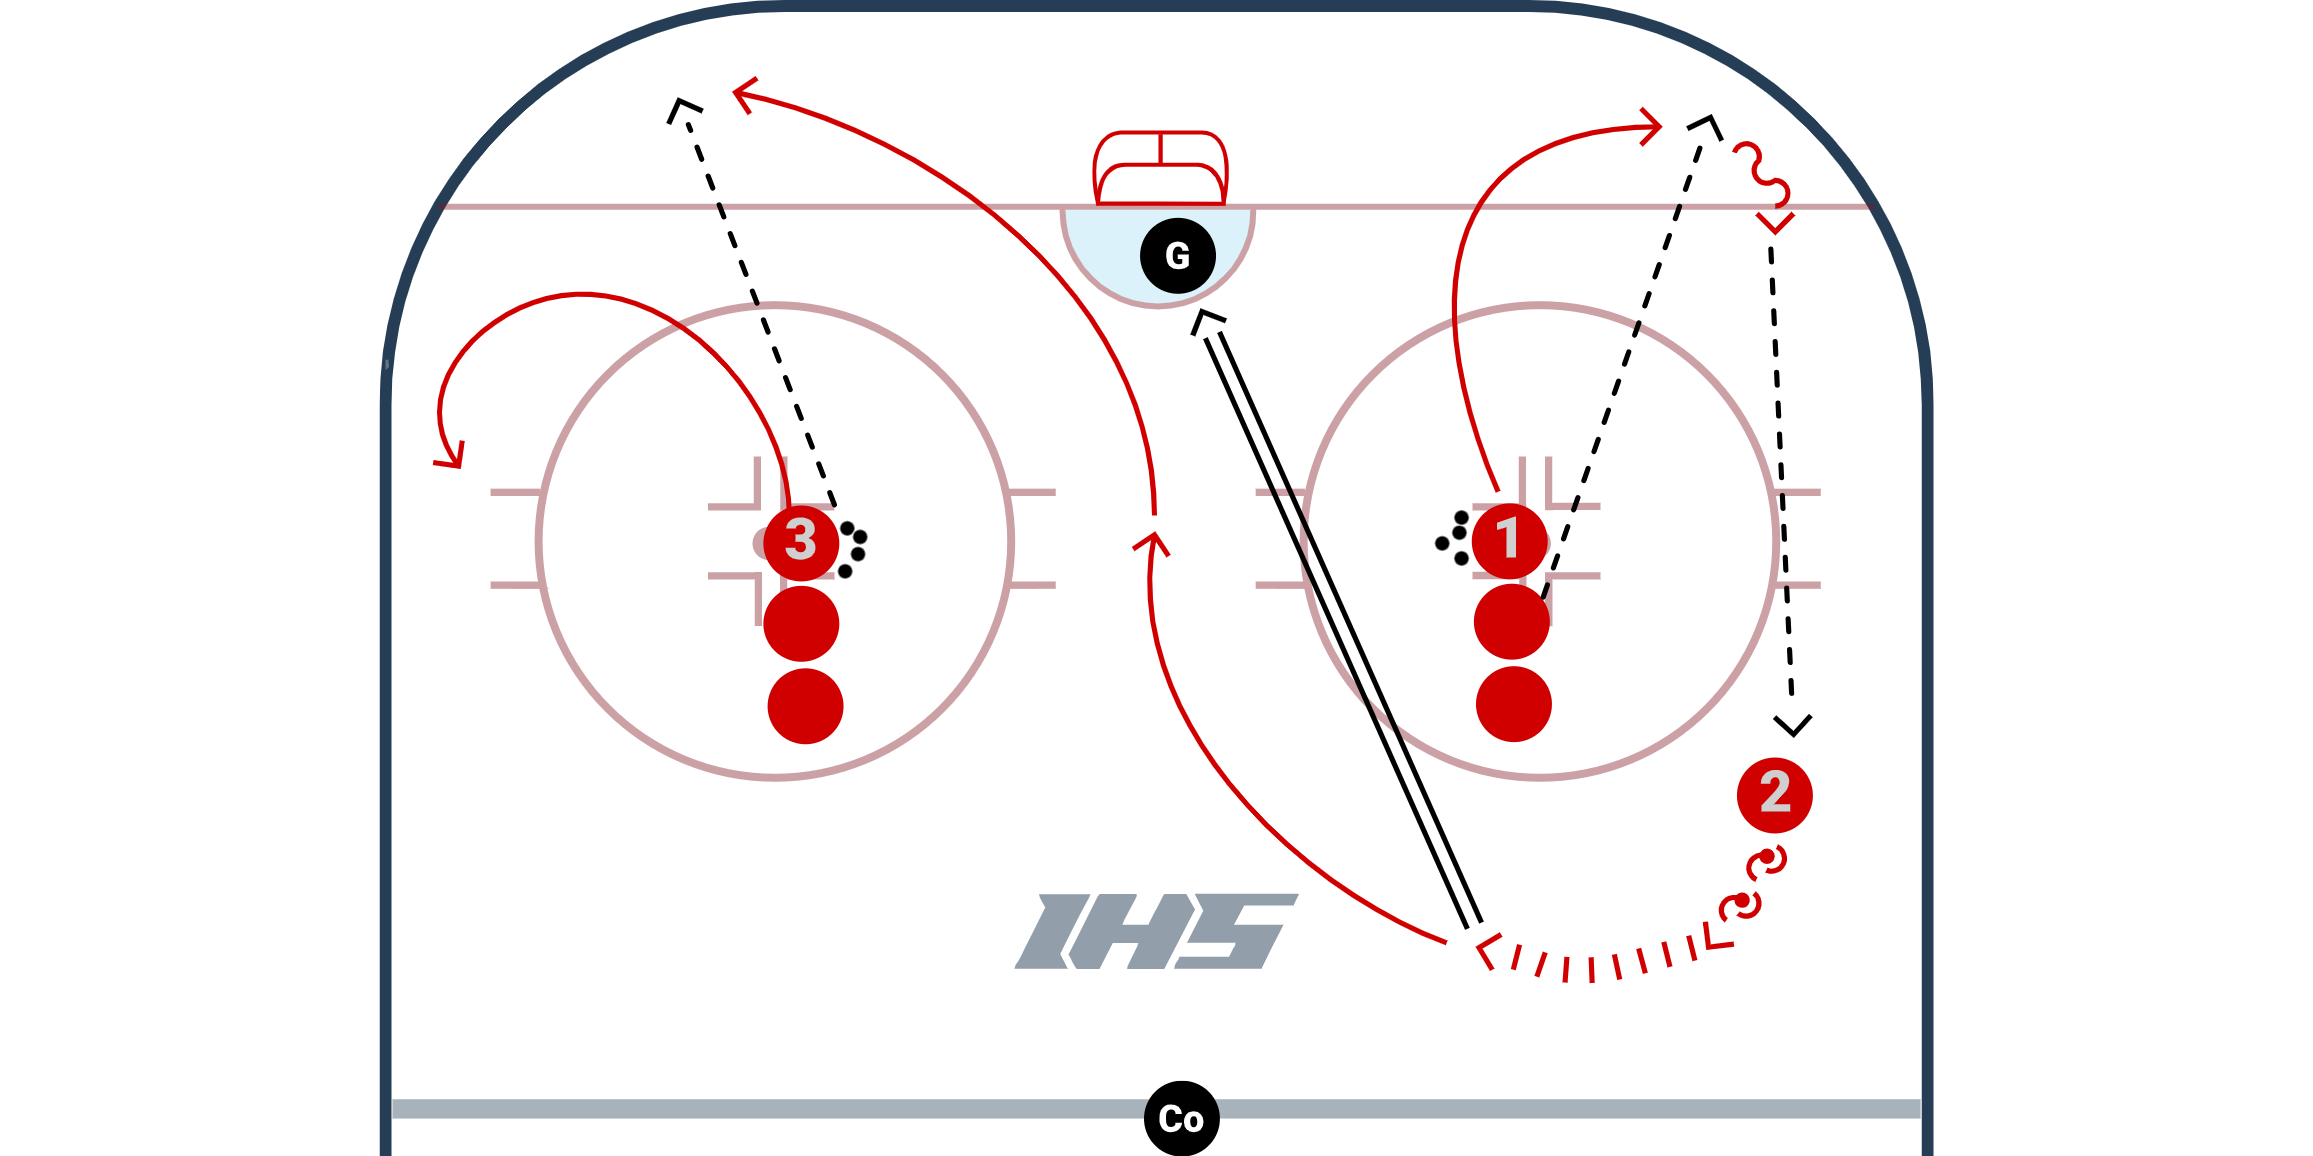
NEHDA Continuous Retrieval Outlet is an excellent drill from NewEdge Hockey that helps players practice puck retrievals, scanning the ice, passing, shooting, and more.
Setup
- Spilt up the players into two groups and have each group on a face-off dot.
- To start the drill, a player chips a puck into the corner, P1 retrieves the puck and passes it to P2 at the point. P2 walks the blue line, takes a shot, and then jumps to retrieve a puck in the opposite corner. The next player in the opposite line, P3, chips a puck into the corner for P2 to retrieve.
- The drill is continuous and there are a variety of retrievals techniques that can be practiced. A few that are shown in the video are:
- Part # 1 Face Up Ice: Retrieve the puck and get it up ice as quickly as possible.
- Part # 2 Puck Protection & Shot: Retrieve the puck and perform to puck protection cutbacks along the boards before passing the puck up.
- Part # 3 Puck Protection & Shot With Tip: Retrieve the puck and perform to puck protection cutbacks along the boards before passing the puck up. After a player passes the puck to the point, they go to the front of the net for a tip.
- Variation: Players can throw puck off the boards instead of a direct pass to the point, so the defenseman works on collecting the puck at the blueline before they take a shot.
Coaching Points
- Head up: Focus on strong surveys / scans before retrieval.
- Deception: Be deceptive and decisive and get the puck on your hip, eyes up and make an excellent pass.
- Shooting: Get shot off quickly.
Billy Purcell Breakout
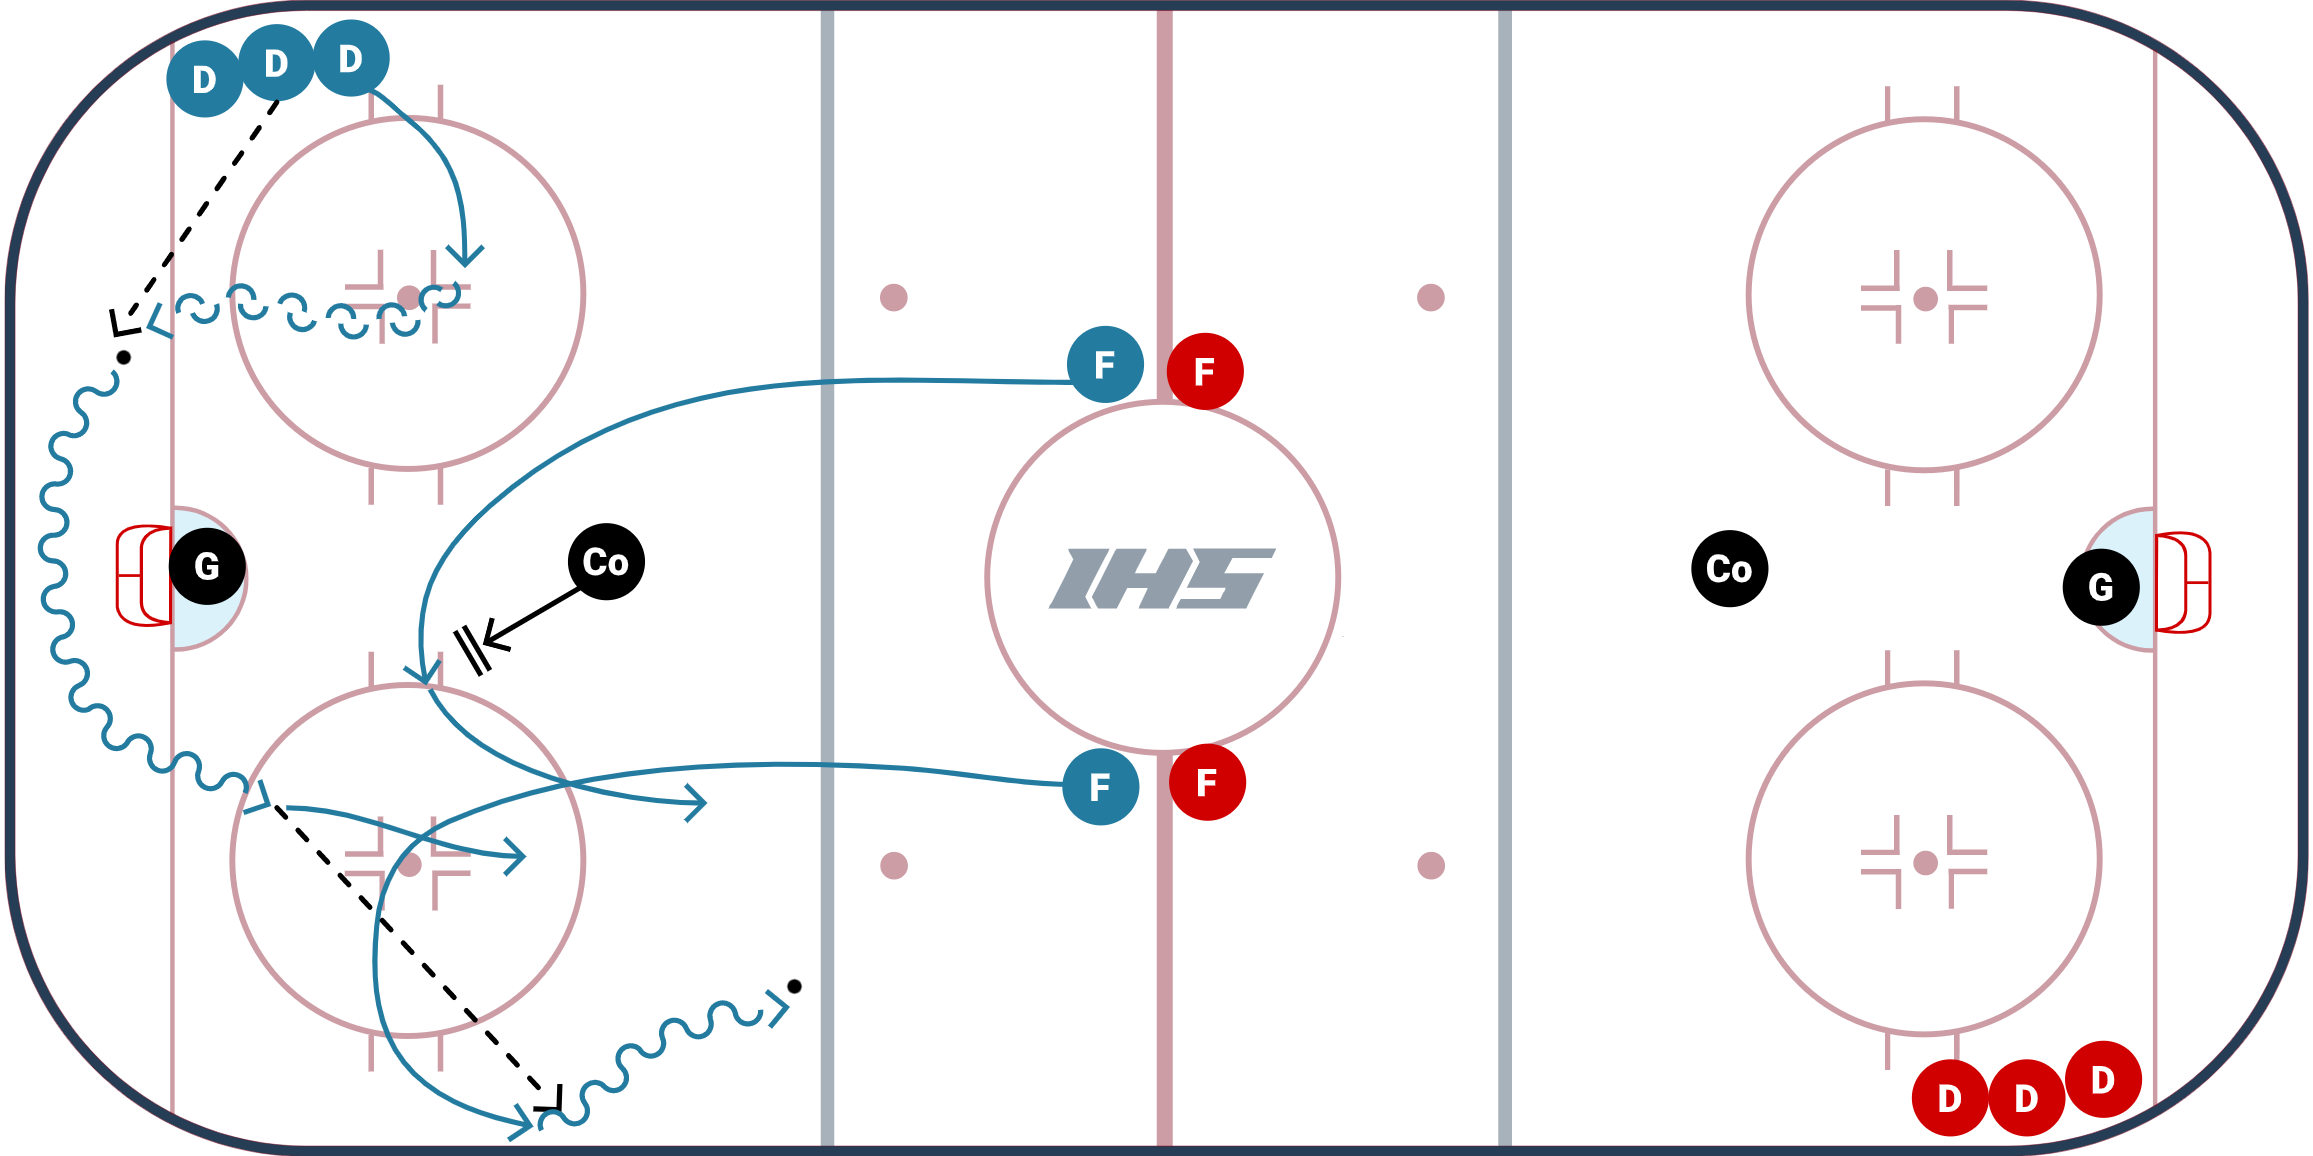
The Billy Purcell Breakout Drill from Coach TJ Manastersky works on fundamentals of breakouts, such as passing, support, communication, and it leads into zone entry concepts.
TJ Manastersky shared this game with the IHS Community while he was an Assistant Coach at Union College. TJ is the Current Head Coach at Brock University in St. Catharines, Ontario.
Setup
- Forwards are at center ice.
- Defenders are at opposite corners.
- Coaches are set up in each zone.
- On the whistle, the first D will skate and pivot forwards to backwards around the first dot.
- The second D chips a puck behind the goal line for the first D to pick up and wheel around the net.
- The forwards at center ice come down into their defensive zone and help with the breakout.
- One forward goes to the boards as a breakout option and the other forward acts as a center and swings low in the middle of the ice for support.
- The coach in the zone will take one of the forward options away. This makes the D keep their head up so they can select the appropriate passing option.
- After the D makes the pass, this begins a 3 on 0 rush. Coaches can be an obstacle in the offensive zone and teams can work on various zone entry options before they attack the net.
Coaching Points
- Defensemen need to pick their head up coming around the net to be aware of the opposition and where their forwards are.
- Forwards need to work hard to get back and support their defenseman.
Continuous 2 on 2 Tag Up

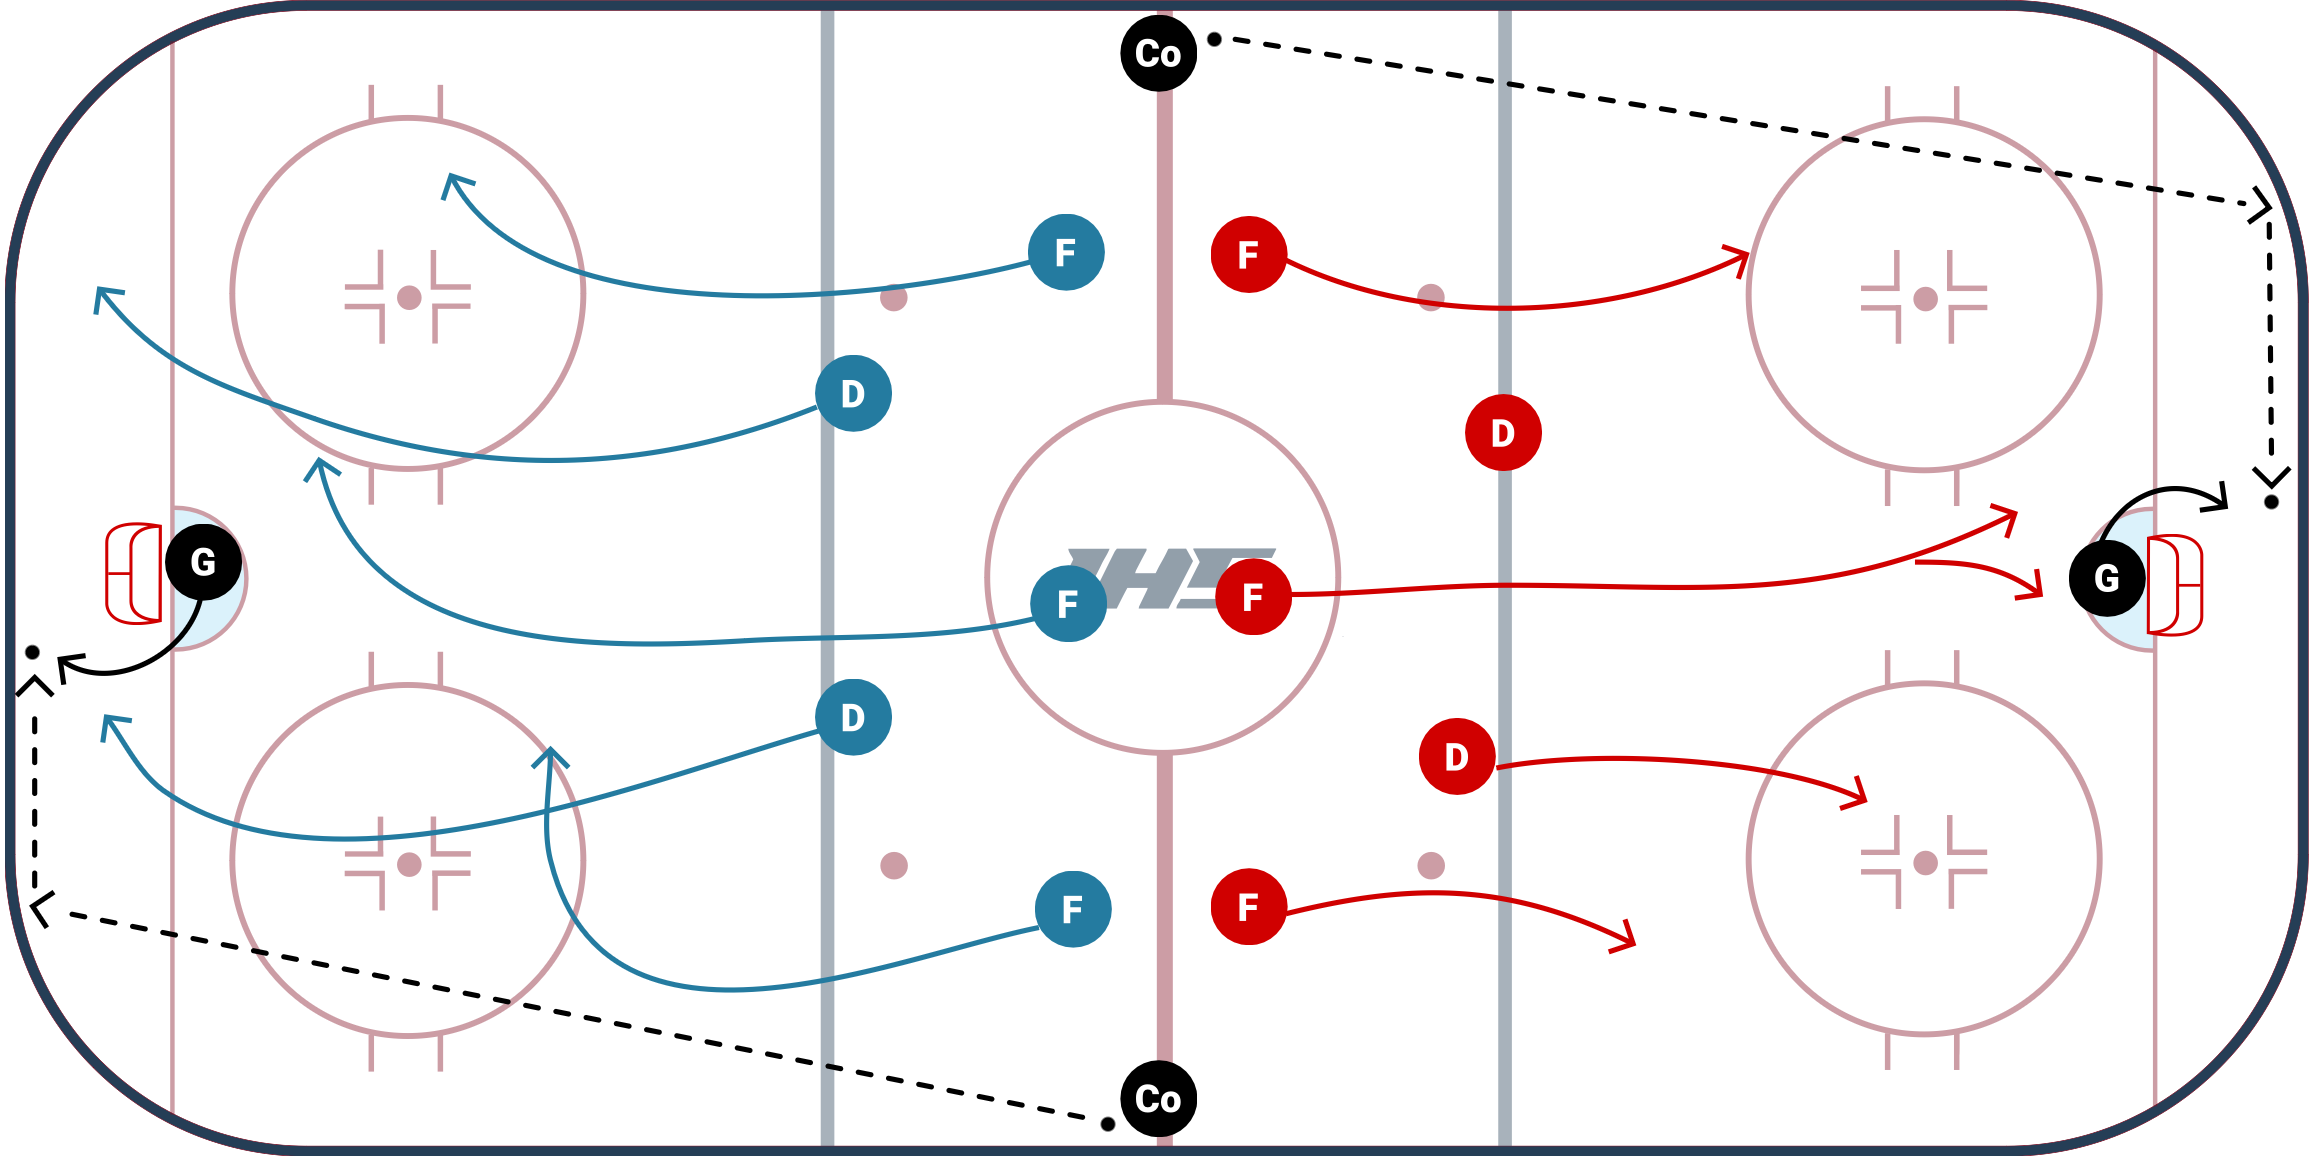
Coach Jeff Hill shares the Continuous 2 on 2 Tag Up drill while he was at the University of Vermont. Jeff is currently coaching at SC Bern in Switzerland. The Continuous 2 on 2 Tag Up drill helps players and teams work on transition, breakouts, and forechecks. Its Continuous setup makes this a high-tempo drill where players will get a lot of reps. Below we discuss setup & coaching points.
Setup
- To start, set up 4 forwards and 4 defenders on the ice. Follow the video & the diagram above to see where F1, F2, F3, F4 & D1, D2, D3, D4 start.
- On the whistle, F1 & F2 cross each other and begin a full ice 2 on 2 against D1 & D2.
- Once F1 & F2 cross the far blueline, a coach steps out to get ready to dump a second puck.
- After the 2 on 2 is played out for a little bit (or a goal is scored, the goalie freezes the puck, or the defenders break up the play), the coach blows the whistle to simulate a turnover. F1, F2, D1, & D2 all start to transition back up ice towards the coach.
- The coach dumps the puck down into the zone, which also activates F3, F4, D3 & D4.
- D1 & D2 now try to break the puck out to F3 & F4, while the F1 & F2 forecheck.
- Once the puck is broken out to F3 & F4, they go down the ice 2 on 2 against D3 & D4. F1, F2, D1, D2 go to the bench.
- D5, D6 & F5 & F6 step on the ice and get ready to go down the ice. This drill is continuous.
Coaching Points
- Communicate! All players need to communicate with their teammates.
- Head-Up: All players should practice playing with their heads up so they can identify opportunities & threats.
- Transition: Players should transition hard up the center of their ice with their stick on the ice.
- Breakout: Defenders should use their partners on the breakout. Defenders should also practice deceptive retrievals to throw off the forecheck. View the video below to learn more about retrievals.
Stop Drop Roll
Coach rims puck for goalie to set or pass to D in corner. 5v0 breakout. When both teams get to neutral zone, Coach blows whistle. All 10 guys must stop, drop, and roll over then get back up. Coach will dump anoother puck in and one team will be breakout out and the other will be forechecking.
Puck Retrieval Along The Boards
Retrieving the puck along the boards happens countless times throughout the course of the game and it is where many 1 on 1 battles are won or lost. When players collect the puck off of the boards is not usually a highlight-reel play, but if they are able to learn a few simple concepts, they will be able to impact the flow of the game. These concepts will allow players to create space so they have time to make a play. Plus, with an evasive move, they will be much harder to hit!
In the video above, Coach Ben Eaves discusses two major concepts when retrieving a puck:
- Look Over Your Shoulder: This is concept # 1 because it is most important. Looking over your shoulder will allow you to know if you have time, or need to make an evasive move to create time.
- Retrieve The Puck At An Angle: This will allow you to keep your speed up while you are going to get the puck. Plus it is much safer than going head-on into the boards.
The video gives you three options to practice:
- Option 1: If you look over your shoulder and see you have time, continue skating full speed at an angle to pick up the puck and bring it up ice.
- Option 2: If you look over your shoulder and you see you have pressure, skate at an angle but use your upper body to deceive the defending team and quickly turn up ice.
- Option 3: If you look over your shoulder and you see someone right on you, point your feet (which will point your body) one way and quickly move your hips and move your feet in the opposite direction to evade the defender. This is usually the most effective but will take time and good edgework to get comfortable with. Note: When you get comfortable with Option 3, combine the lower body fakes with upper body fakes to really throw off a defender!
Bonus: Watch the Toronto Maple Leafs practice their puck retrievals and forchecking in this fun 1 on 1 battle.
Breakout Tips for Centers
One of the hardest things to teach centers on the breakout is the timing. It is critical that the centers have a good sense of timing so they can support the defense and wingers when they have the puck. If they get too far ahead of the play they create a bad angle for a pass and put themselves in a bad position to receive a pass. By staying low and below the puck then they give their teammates better options.
Tips for the Centers on Breakouts
- Stay low and slow.
- Support your defense and wingers.
- Be ready to skate into the puck.
- Communicate with your defense and wingers.
Breakout Tips (Strong Side Wingers)
Here are some breakout tips for wingers on their strong side when the puck is rimmed along the wall. There are three situations listed below but on all situations the wingers should do the following three things:
- look up ice to see what the defense is doing.
- get to the wall before the puck gets to your spot.
- get separation from the wall so you have more options.
Option #1 - No Pressure
- Skate with direction of the puck.
- Let puck come to you as you are headed up ice.
- Get separation from the wall.
Option #2 - Hard Pressure
- Stop the puck with backhand.
- Protect puck with body.
- Get separation from the wall.
- Chip high off the glass.
Option #3 - Hard Pressure
- Get to the wall and stop puck with skates.
- Angle skates to get puck off wall and to your stick.
- Protect puck with body if needed.
- Get separation off of the wall.
- Use forehand to chip puck high off the glass.
Breakout Tips (Off-Hand Wingers)
Here are a few options for wingers on their off-hand (weak) side when the puck is rimmed around the wall. First and foremost you always want to check what the opposing defense is doing. Are they allowing you time and space to gather the puck or are they applying pressure?
Option #1
- Get to the wall and gather puck at the wall.
- Use forehand to collect the puck faceing your own net.
- Get off the wall and look to make a play to the center or high off the wall and out of the zone.
Option #2 - No Pressure from Defense
- Get to the wall and face up ice skating with the direction of the rimmed puck.
- Once you collect puck get head up and try ot get off the wall as you head up ice.
Option #3 - Heavy Pressure
- Get to the wall and trap puck using skates.
- Use your body to protect the puck from the defense.
- If possible use the angle of your skates to get puck off the wall.
- Once off the wall look to make a play or chip the puck into the neutral zone.
