21211122
21211122

Breakout Tips (Off-Hand Wingers)
Here are a few options for wingers on their off-hand (weak) side when the puck is rimmed around the wall. First and foremost you always want to check what the opposing defense is doing. Are they allowing you time and space to gather the puck or are they applying pressure?
Option #1
- Get to the wall and gather puck at the wall.
- Use forehand to collect the puck faceing your own net.
- Get off the wall and look to make a play to the center or high off the wall and out of the zone.
Option #2 - No Pressure from Defense
- Get to the wall and face up ice skating with the direction of the rimmed puck.
- Once you collect puck get head up and try ot get off the wall as you head up ice.
Option #3 - Heavy Pressure
- Get to the wall and trap puck using skates.
- Use your body to protect the puck from the defense.
- If possible use the angle of your skates to get puck off the wall.
- Once off the wall look to make a play or chip the puck into the neutral zone.
Breakout Tips for Centers
One of the hardest things to teach centers on the breakout is the timing. It is critical that the centers have a good sense of timing so they can support the defense and wingers when they have the puck. If they get too far ahead of the play they create a bad angle for a pass and put themselves in a bad position to receive a pass. By staying low and below the puck then they give their teammates better options.
Tips for the Centers on Breakouts
- Stay low and slow.
- Support your defense and wingers.
- Be ready to skate into the puck.
- Communicate with your defense and wingers.
Breakout Tips (Strong Side Wingers)
Here are some breakout tips for wingers on their strong side when the puck is rimmed along the wall. There are three situations listed below but on all situations the wingers should do the following three things:
- look up ice to see what the defense is doing.
- get to the wall before the puck gets to your spot.
- get separation from the wall so you have more options.
Option #1 - No Pressure
- Skate with direction of the puck.
- Let puck come to you as you are headed up ice.
- Get separation from the wall.
Option #2 - Hard Pressure
- Stop the puck with backhand.
- Protect puck with body.
- Get separation from the wall.
- Chip high off the glass.
Option #3 - Hard Pressure
- Get to the wall and stop puck with skates.
- Angle skates to get puck off wall and to your stick.
- Protect puck with body if needed.
- Get separation off of the wall.
- Use forehand to chip puck high off the glass.
Russian Circles
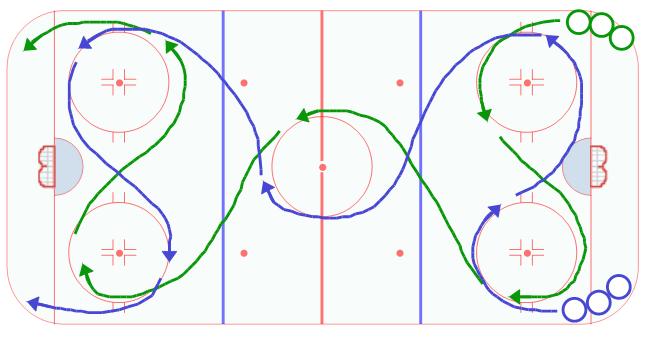
The focus of this drill is SPEED! This drill allows players to move their feet much faster than going all the way around the circle. It is a good drill for Warm-Ups, Skating Drills, or Conditioning Drills. If players are advanced enough, you can try incorporating pucks and going backwards.
Iron Cross #1
This is a great drill for the days you work on penalty killing. Not only is this a conditioning drill, but it is a drill that focuses on one of the best habits, Stopping and Starting. The stopping and starting habit is critical to having a great penalty kill. In this drill the players are always facing forwards. The skate to the center dot, stop, and side step while facing forwards to the outside hash marks, stop, side step back to the center dot, stop, skate forward to the top of the circle, stop, skate backwards to the center dot, stop, side step to the other hash marks, stop, side step back to the center dot, stop, and skate backwards to the start of the line. The next player goes when the player ahead of them completed the entire rep.
Continuous Breakouts with Designated Forechecker
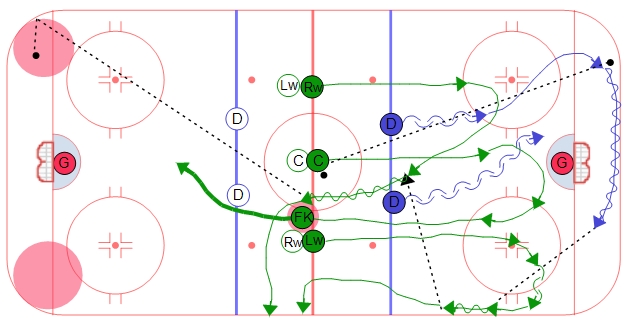
This variation of the Continuous Backcheck drill includes a designated forechecker. The coach will designate one of the forward positions to become the forechecker. This is also a good drill to simulate changing on the fly with one player applying pressure while the other two change. If the coach designates the Center to be the forechecker, then after the dump, the center will stay out and forecheck against the next breakout group.
Bump Back
Set Up
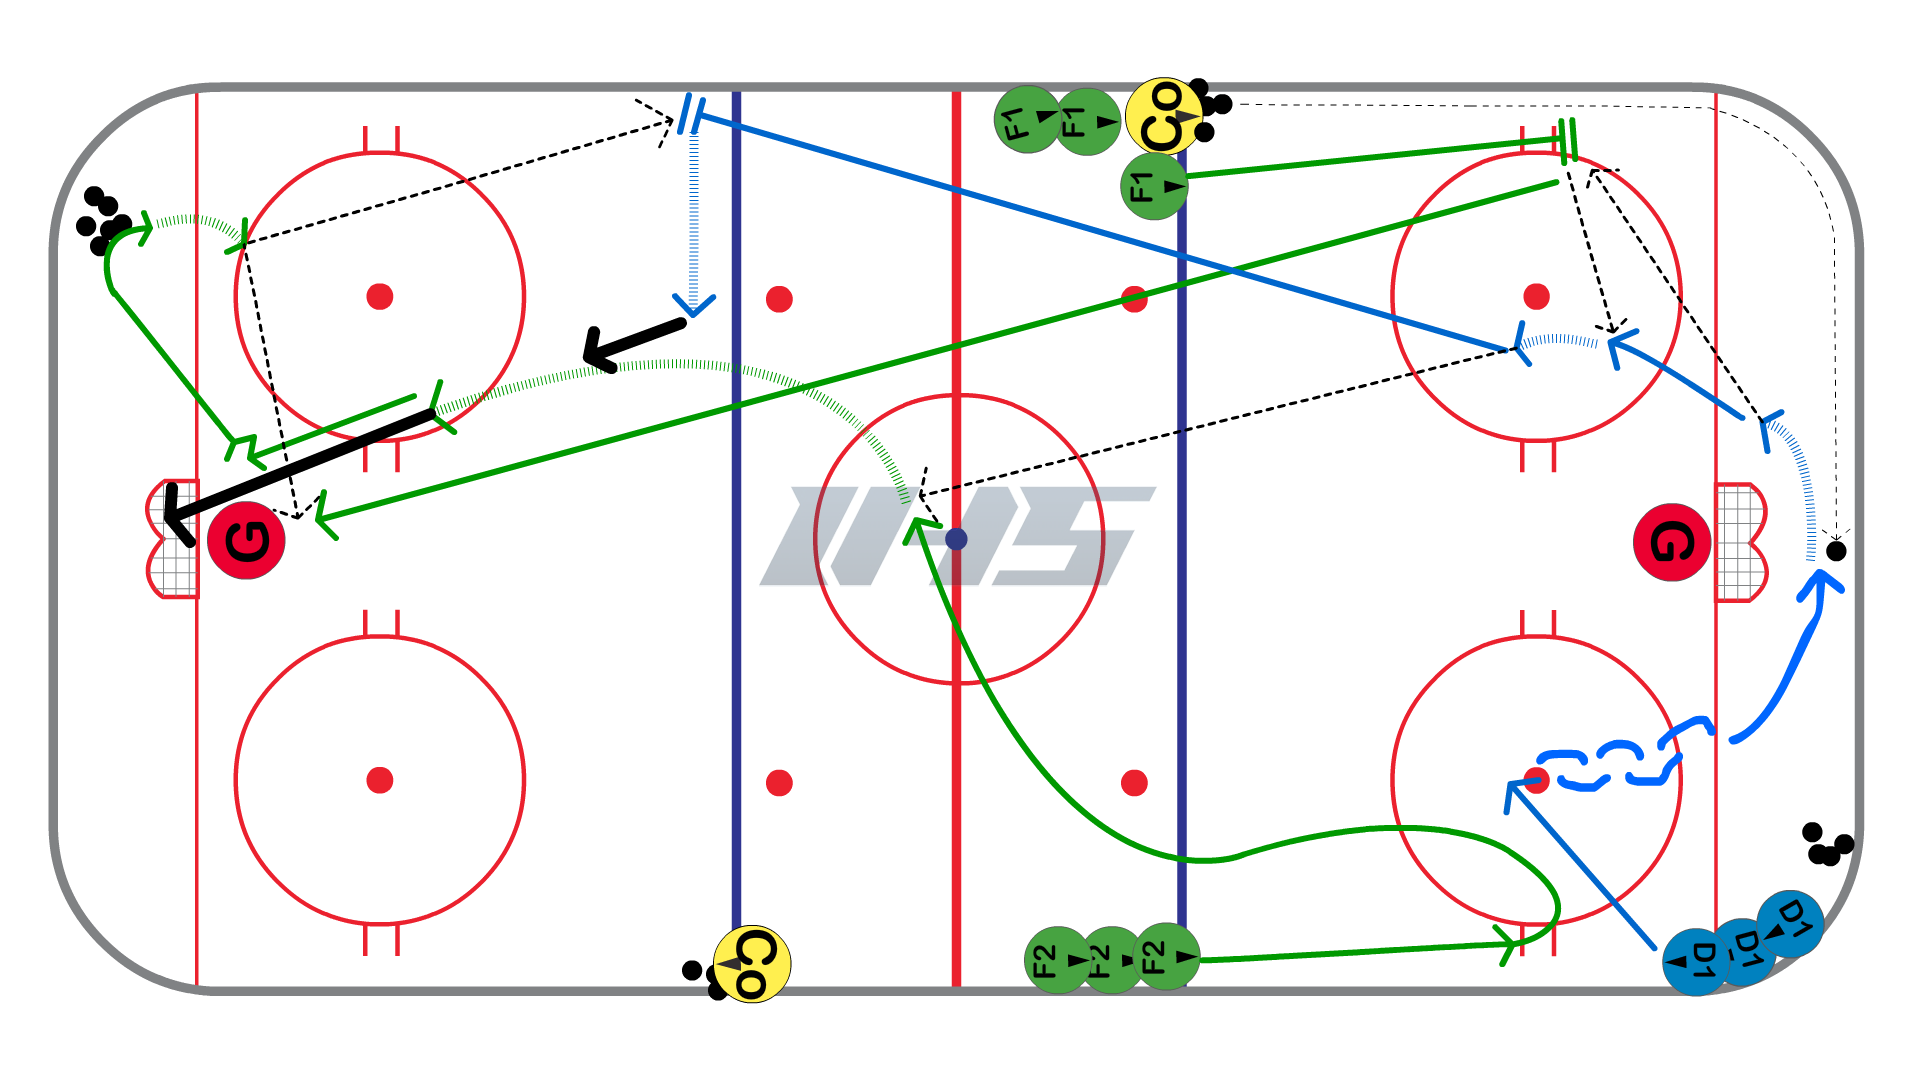
This drill runs out of both ends at the same time.
- Place four equal lines of forwards at the blue lines.
- Opposite lines have pucks with coach as shown in diagram.
- Place pucks at opposite corners.
- Two lines of defense in opposite corners as shown in diagram.
Execution
- On the whistle the coach dumps a puck behind the net.
- D1 skates forward to the dot, transitions backwards, pivots, and retrieves the puck behind the net.
- F1 skates down the wall into breakout position receives a pass from D1 and give a pass right back to D1.
- D1 receives the puck back from F1 and makes a stretch pass to F2 in the neutral zone.
- F2 takes a shot on net, stops for any rebound, and then skates to the corner to retrieve puck #2.
- F2 carries puck up wall and makes a back door pass to F1 as they drive the net.
- F1 stop in front after receiving pass from F2 and then goes to retreive puck #3 from the corner.
- F1 makes a pass to D1 at the blue line and then goes to the net for a screen or tip.
Coaching Points
- Defense work on good footwork on transitions and pivots.
- Stay inside the dots for "Bump Back" from F1.
- F2 needs to control speed and have good timing for stretch pass from D1.
- F1 needs to have good net drive (stick on ice, strong bottom hand)
- F1 needs to take away goalies eyes on D1's shot
Point to Half Wall 2 vs 1
The Point to Half Wall is an excellent small area game that helps players practice a 2 vs 1 in a small space along the boards. The game also reinforces important skills like keeping your head up, moving to open spaces, protecting the puck and communication.
The goal of the game is for the offense is to connect on 4 consecutive passes in a row. If they do so, they win and are allowed to shoot on net. If the defense takes the puck away, or the puck goes out of bounds 2 times during the game the defense wins and is awarded a shot on net.
Setup
- Playing Area: Use 4 cones or tires that create a triangle from the half wall to the middle of the blue line.
- Goalie Setup: This can be set up as a station with a goalie, or without. If you use a goalie it can be placed in the crease or the net can be moved so the drill is a station.
- Players: Alternate players. It is beneficial for players to get reps on both offense and defense sides.
- Passes: You can require 4 (or a different amount) of consecutive passes to win.
- Defense: If the defense is taking the puck away too much, you can tell the defense to flip their stick over.
- Winner: The winning side gets a shot on net. Other winning options are:
- If the offense wins:
- The last person with the puck gets a shot on net.
- Both players are given a puck and can shoot on different goalies.
- The game moves to a 2 vs 1 in front of the net and offense is allowed one shot if they can get it off.
- If the defense wins:
- They get a shot on net.
- The game moves to a 1 on 1 in front of the net and the defense is allowed one shot if they can get it off. The losing offense team needs to communicate with each other as to who is going to go after the defense.
- If the offense wins:
Coaching Points
- Use the boards! They are your friend!
- If used properly, the boards can be used as an extra player out there and are helpful for bank passes and puck protection.
- Offensive players need to protect the puck until they can make a play and then expose the puck to make a pass.
- Offensive players have to move without the puck. Think "Give & Go!"
- Defensive players are most successful with active sticks and stop and starts. There are no short cuts!
Progressions
- Have one of the offensive players be a "Point Player" who has to stay up around the blueline.
- This progression can be great for defenceman working on their puckhandling at the point & forwards becoming outlet passes.
- Create a smaller "playing area" to make it tougher on the offense.
- Play the Corner to Half Wall 2 vs 1.
