Extra träning
Extra träning

Paint Scoring
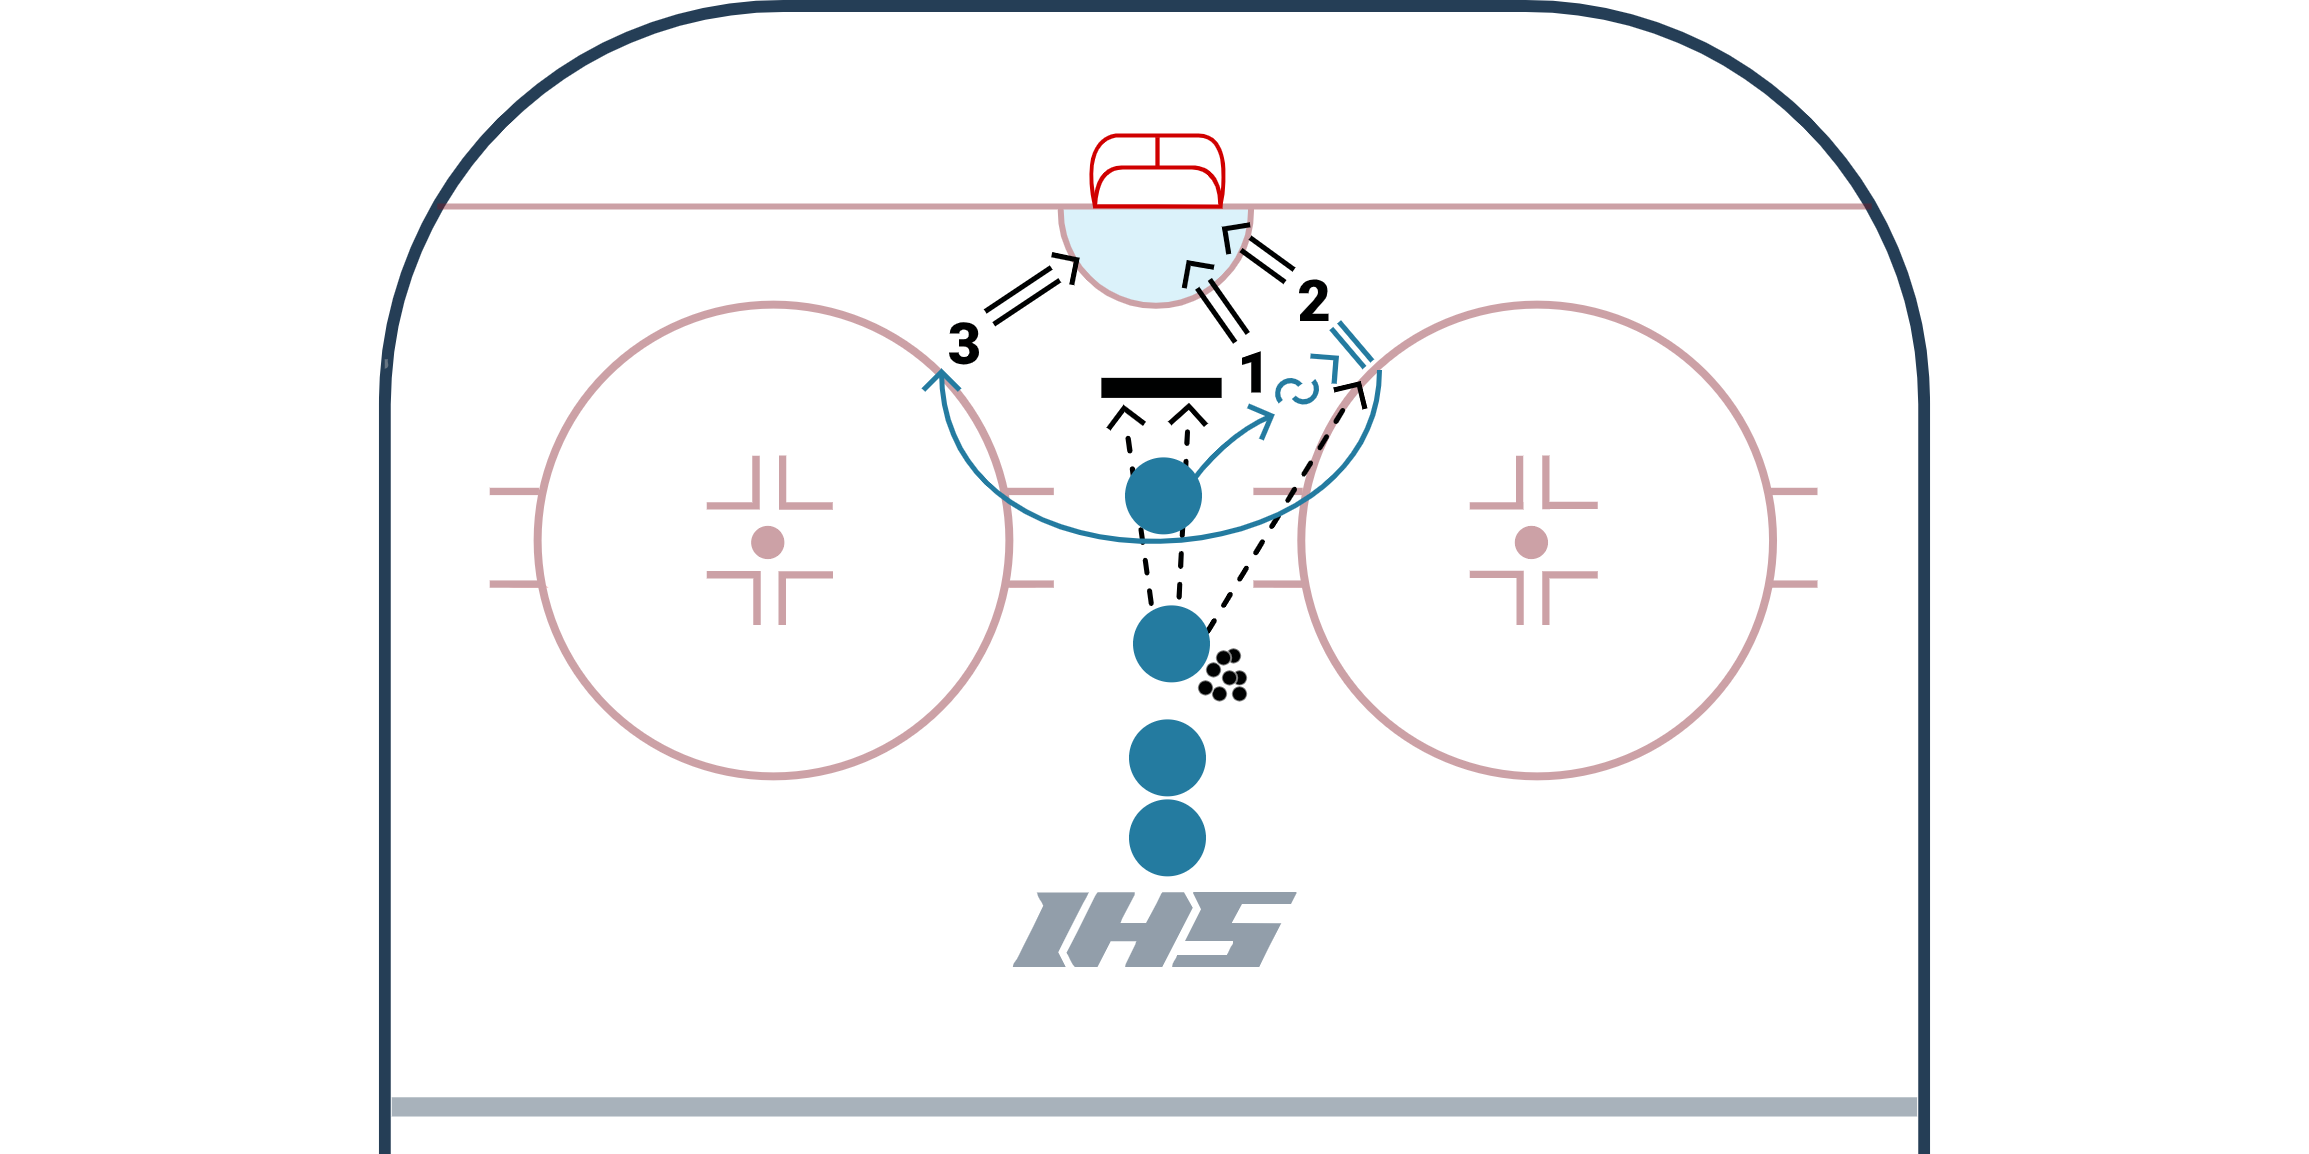
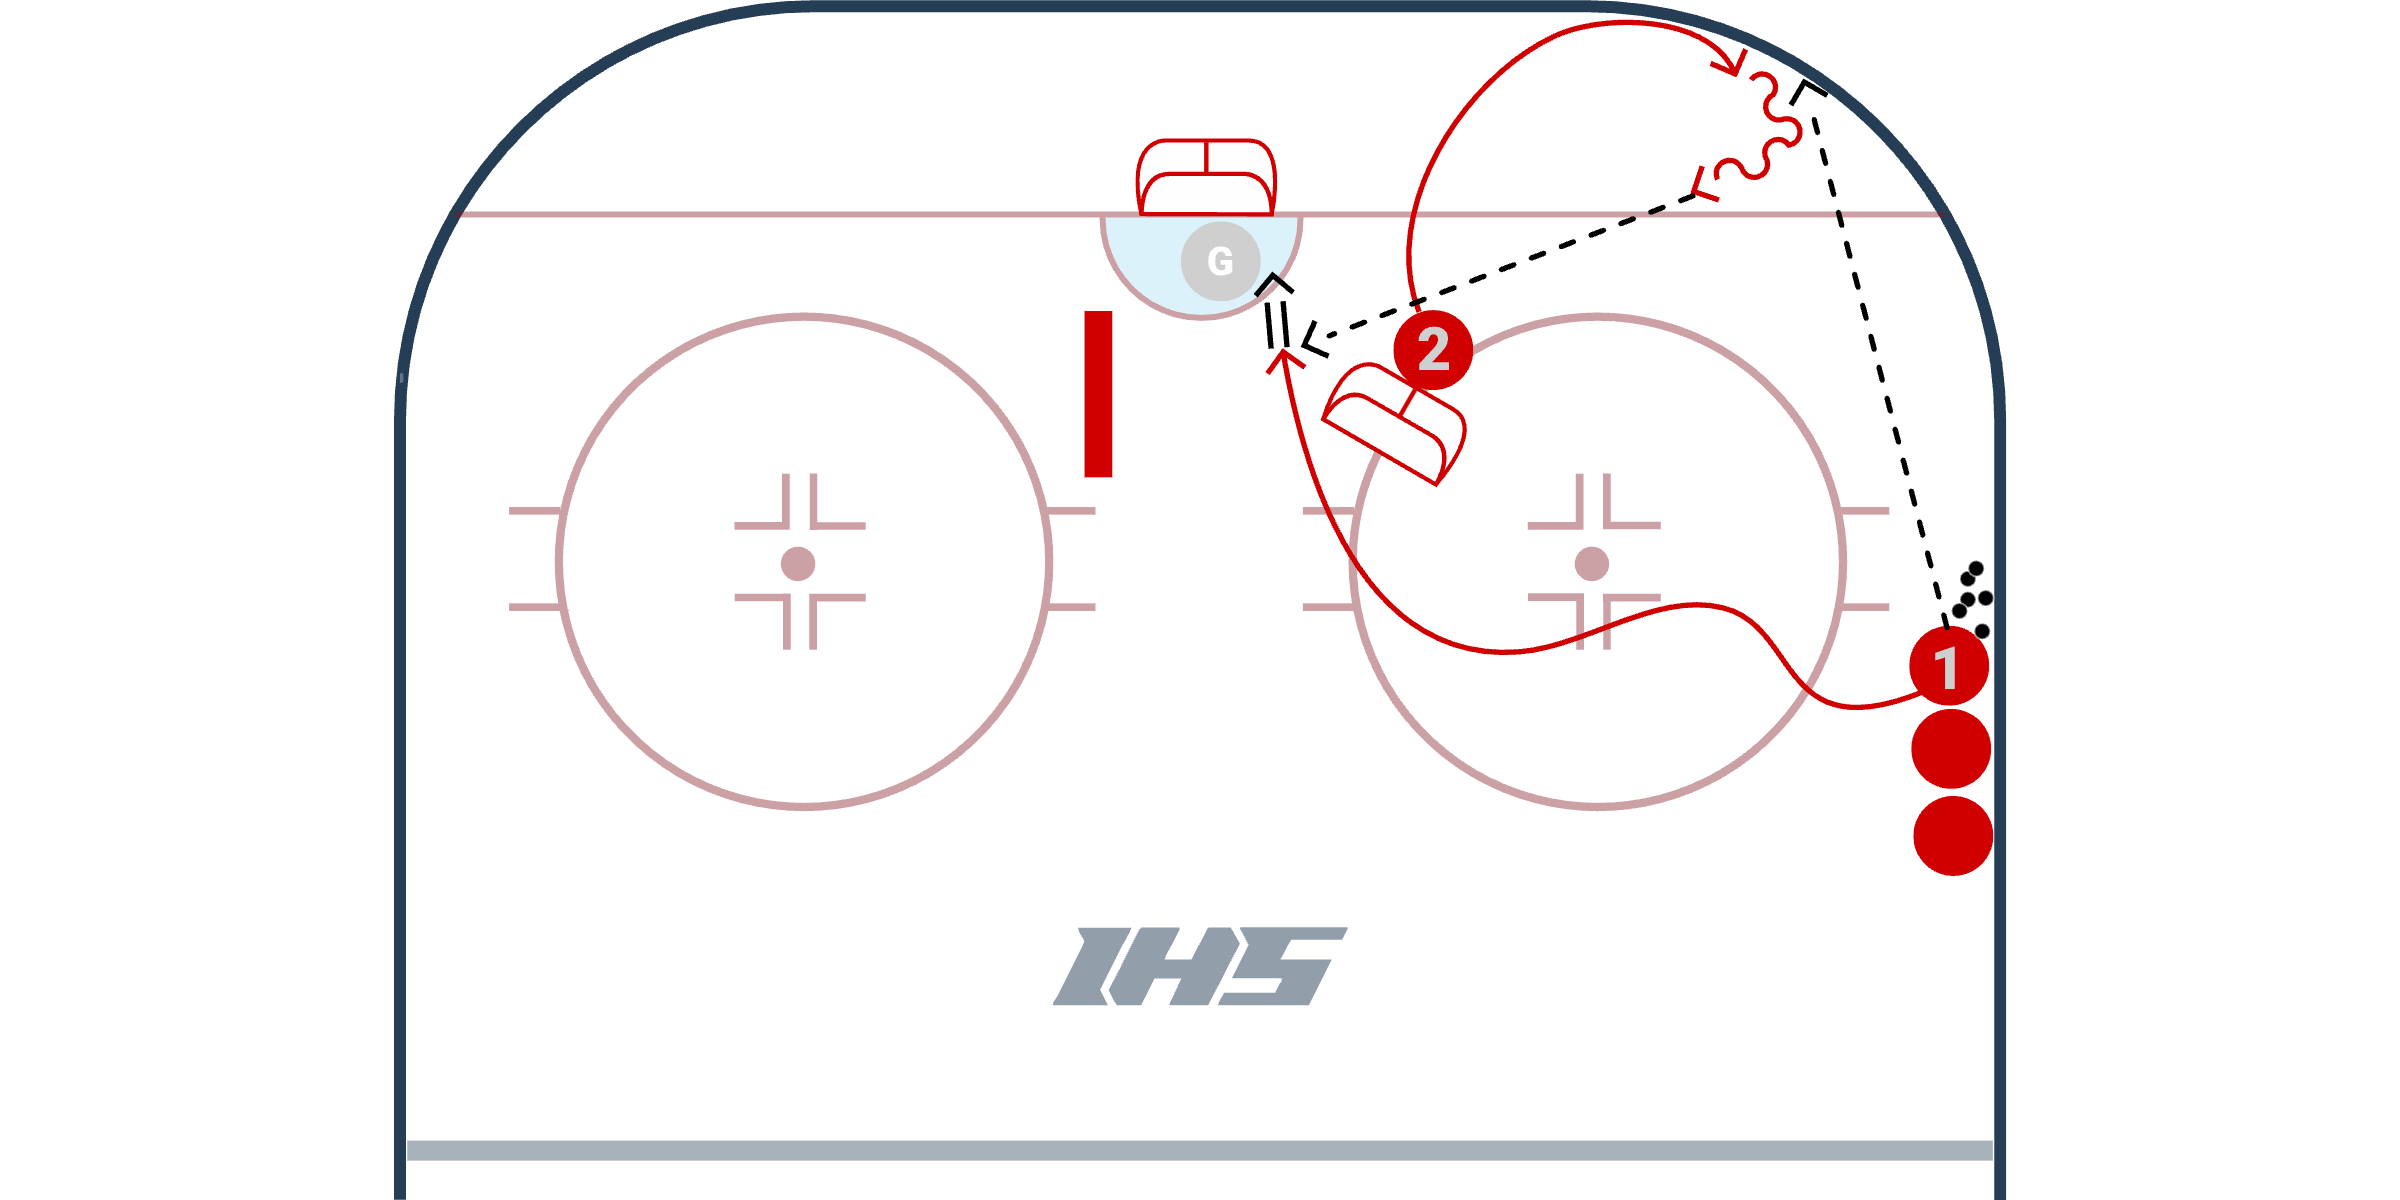
The Paint Scoring Drill is one where players will see how fast they can score three pucks. Players will be able to work on finishing using backhands, one timers, and wrist/snap shots. To set up the drill place a couple barriers stacked on top of each other in front of the net. Another net placed face down (or another type of object that you can use to bounce pucks off of) at about the hash marks directly in front of the net. The first player starts about a sticl length away from the face down net and the drill operates as follows:
- Next player passes a puck off the face down net from behind player 1.
- Player 1 reacts to the puck, gathers it to their backhand as they move around the face down net and shoot a backhand shot.
- They immediately open up to face player 2 who gives them a pass and they receive and shoot again trying to elevate the puck over the two barriers.
- Player 2 passes another puck off of the face down net
- Player 1 stops after their 2nd shot and retrieves this third puck on their forehand.
- Player 1 takes another shot as they move around the face down net on their forehand.
Royal Road Drill
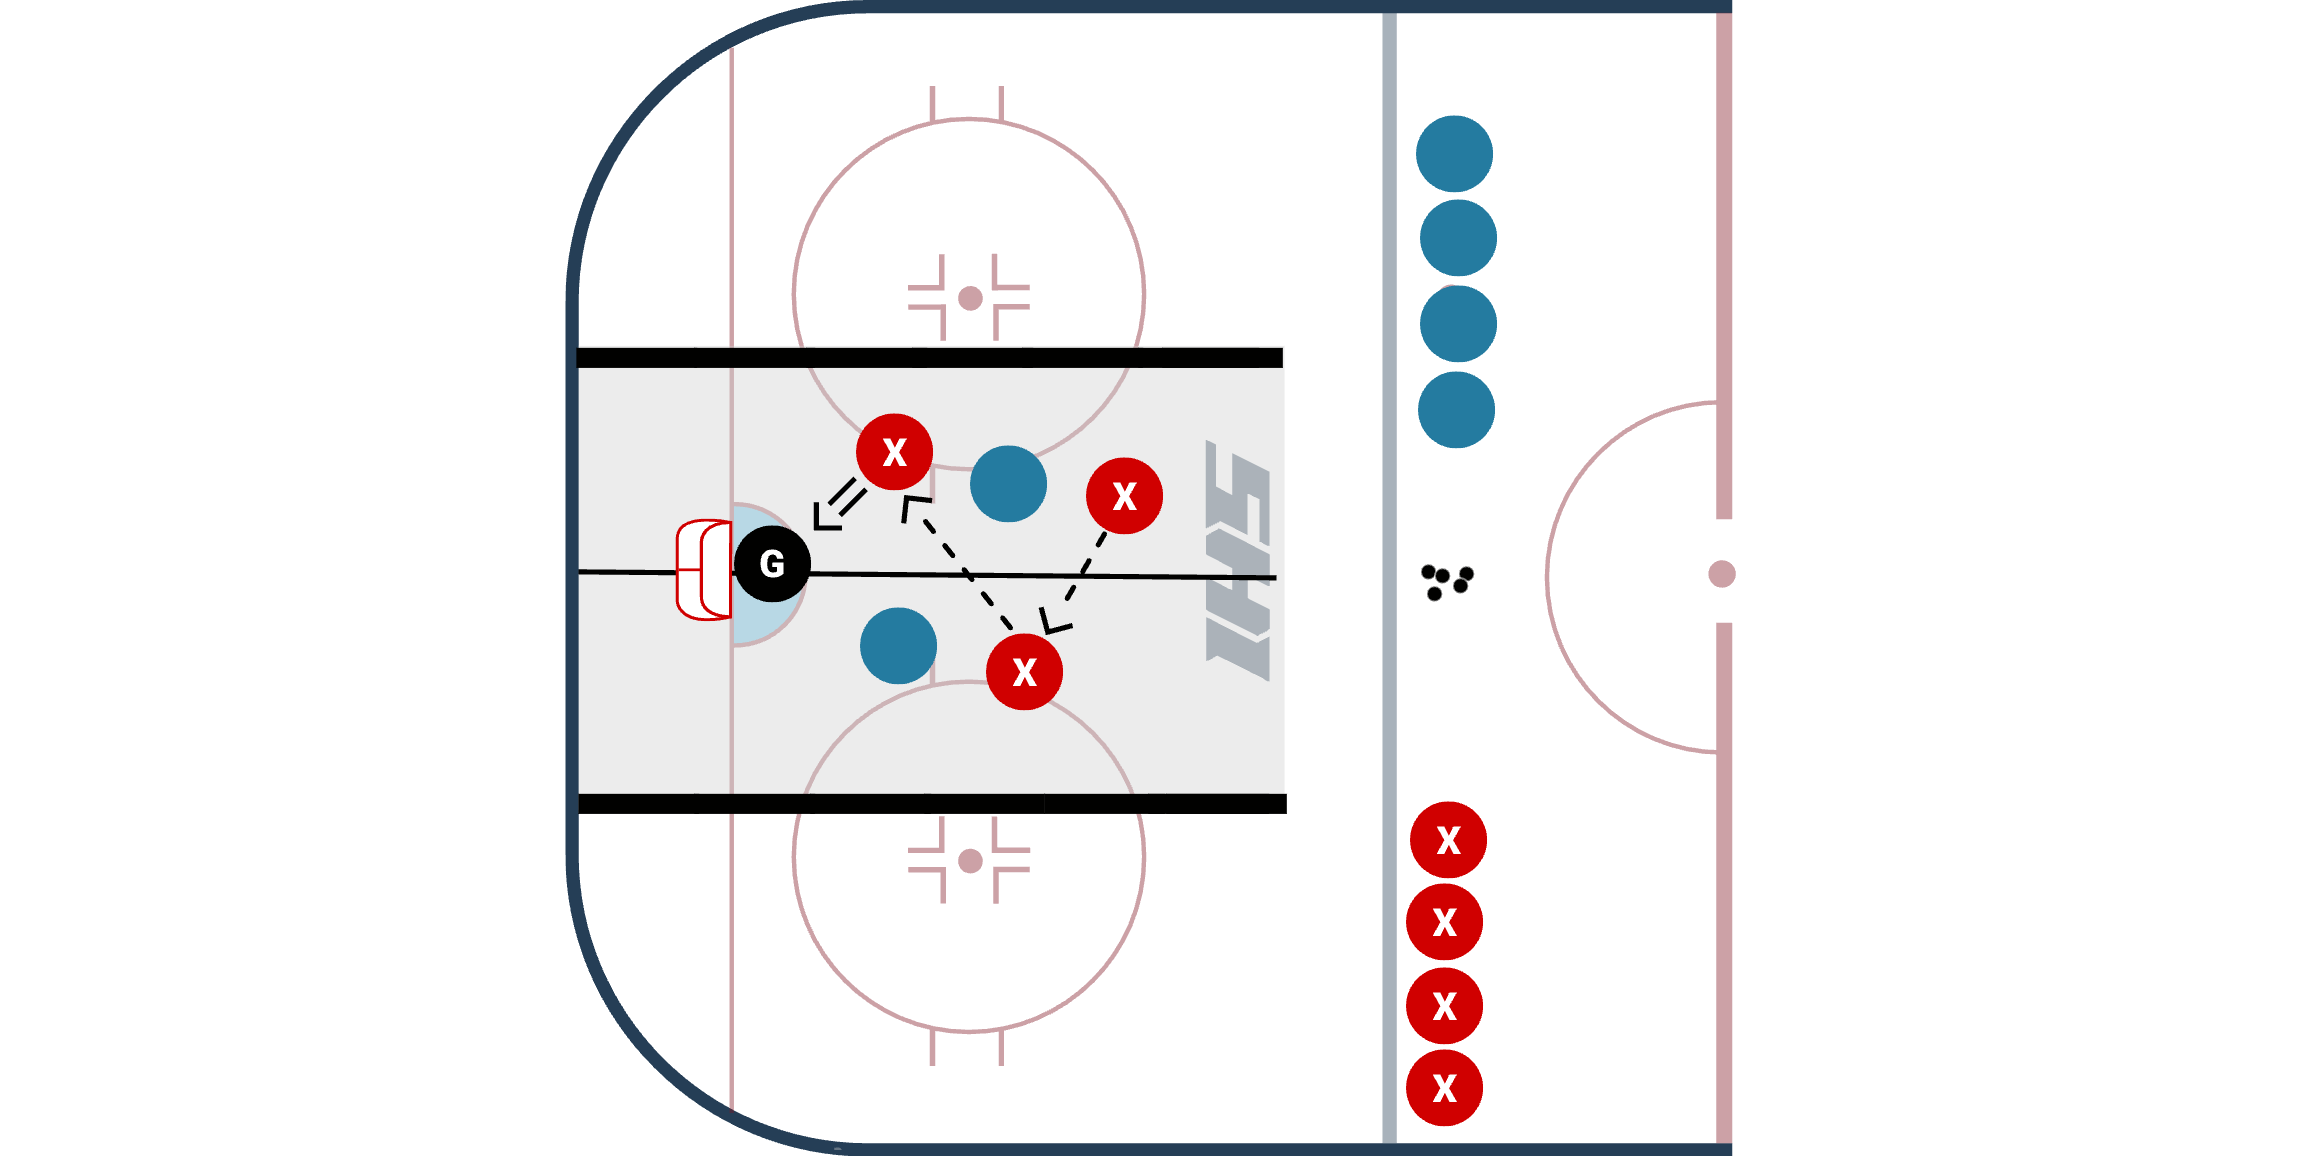
The Royal Road Drill is a very competitive 2 v 2 battle drill that starts with a face-off and only awards goals that are scored off of a pass that crosses the royal road (the royal road is the middle of the ice).
Setup
- Coaches add boundaries and can draw a line down the middle of the crease up to the blue line that designates where the Royal Road is. If you are unable to mark up the ice, coaches can use cones or tires.
- The game starts with a face-off and both teams are trying to score.
- The only goals that are counted are when players make a pass to their teammate across the royal road, and their teammate scores off of a quick release (one timer, two touch, or quick release shot).
- Shifts should be no more than 30 seconds.
Coaching Points
- Players on both sides of the ice should compete and work hard to gain puck possession.
- Offensive team: puck carrier should work on puck protection concepts, and the player without the puck needs to work to jump to get open to support their teammate as an outlet or put themselves in a position for a one timer.
- Defensive team: keep sticks on the ice to block passing lanes. Keep your head on a swivel to make sure you do not leave a player open for a one time shot. Tie up sticks when in tight.
Yellow Attack Timing - V1
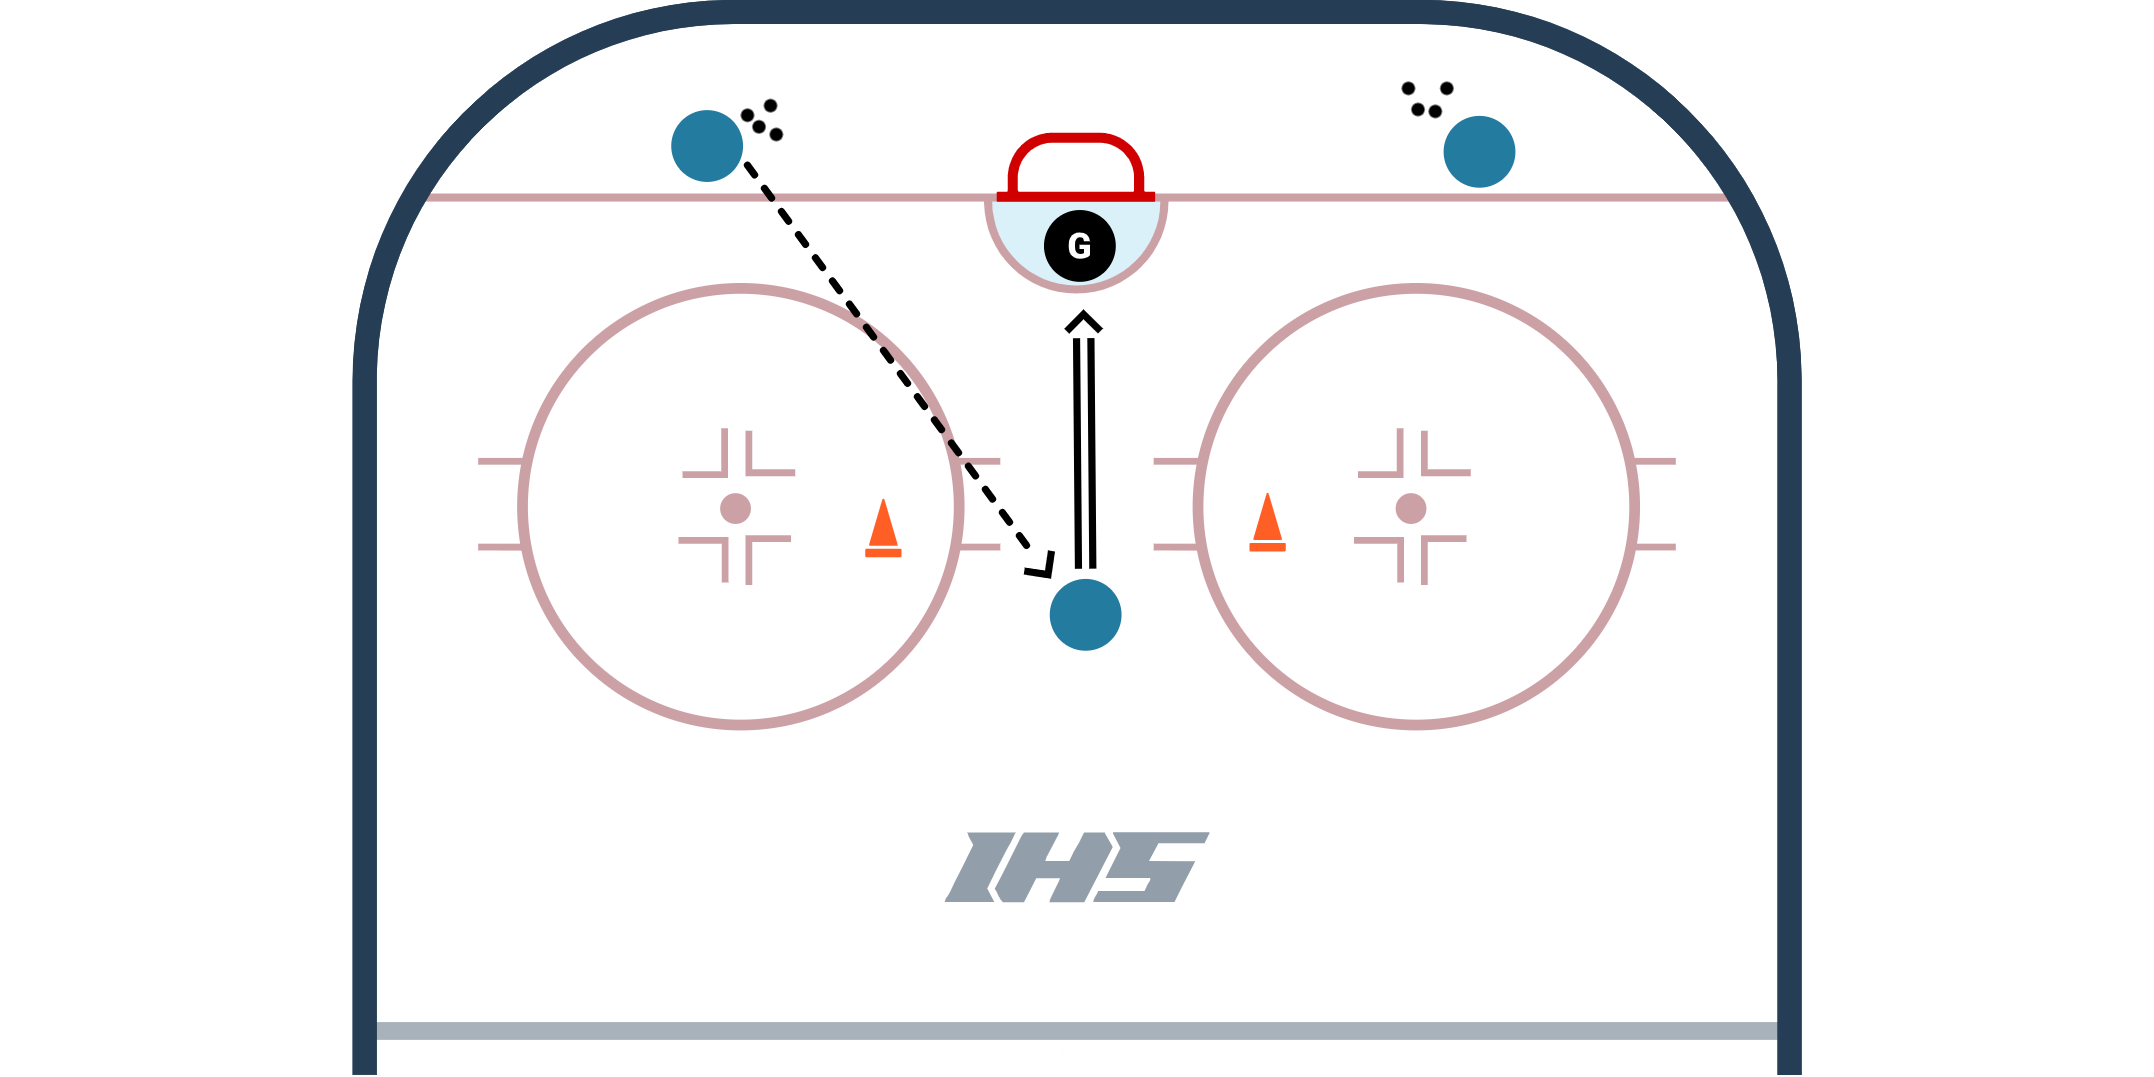
Yellow Attack Timing - V1 from Rob Sedia of NewEdge Hockey helps players work on retrievals, passing, timing, communication, and quick release shots. The reason "Yellow Attack" is in the name of the drill, is to reinforce the concept that players should attack the puck along the yellow bumper of the boards.
Setup
- Place a net (or a stationary defender) just below the hashmarks in front of the net.
- Set up one player next to the net, as pictured in the diagram.
- Players line up at the hashmarks against the boards.
- On the whistle, Player 1, chips the puck into the corner for Player 2 to retrieve.
- Player 2 shoulder checks, gathers the puck, and looks to pass the puck to Player 1.
- Player 1 times the play, and can jump in front of the net, or behind the net to get a quick shot on goal.
- Player 1 now goes behind the net to get ready for the next rep. Player 2 goes to the back of the line.
- Note: adding the additional pad on the far side of the net (that is pictured in the diagram) makes the player practice passing & receiving passes in a tighter space. Coaches can use any object, or can exchange any object for a static player or coach.
Coaching Points
- The player retrieving the puck should shoulder check, and come out of the corner with their head up.
- The player jumping to the slot for a shot, should time the play and communicate.
- Both players can practice deception, to create additional time and space for themselves.
Variations
- Can exchange the net in the slot for a static defender that can only move their stick. If the static defender is stopping the puck too often you can have them flip their stick.
- Can add light pressure to the player that is retrieving the puck.
- Can add a goalie.
- Can set up in other areas of the ice. View Yellow Attack V2 to see this setup where players retrieve the puck along the boards on the half wall.
Continuous One Touch Shooting Drill
This is a good half ice hockey drill that works on one-touch passing, transitions, quick shots, and following shots to the net. To set up the drill place one player along the goal line in-line with the dots. Place two lines just inside the blue line also in-line with the dots, these two lines have the pucks. The first player (Player 1) in line will make a pass to the player on the goal line (Player 2) and skate directly at them. The two players on-touch the puck back and forth as many times as possible. Once Player 1 gets below the dot they transition towards the wall and facing Player 2. The players continue to one-touch the puck as Player 1 skates up the wall, around the top of the circle, and into the slot. When Player 1 receives the puck in the slot they take a quick shot and follow their shot to the net. After the last pass Player 2 will also go to the net looking for a rebound. Player 1 then continues to the other side along the goal line and becomes Player 2 as the drill now starts from the other side. The original Player 2 now goes to the end of the line.
Coaching Points
- Players should make flat passes with soft hands.
- Slapping the puck results in in-accurate passes and wobly pucks.
- Players should transition while facing the puck at all times.
- Receive and shoot in one motion when in the slot.
- Make sure both players follow shots to the net.
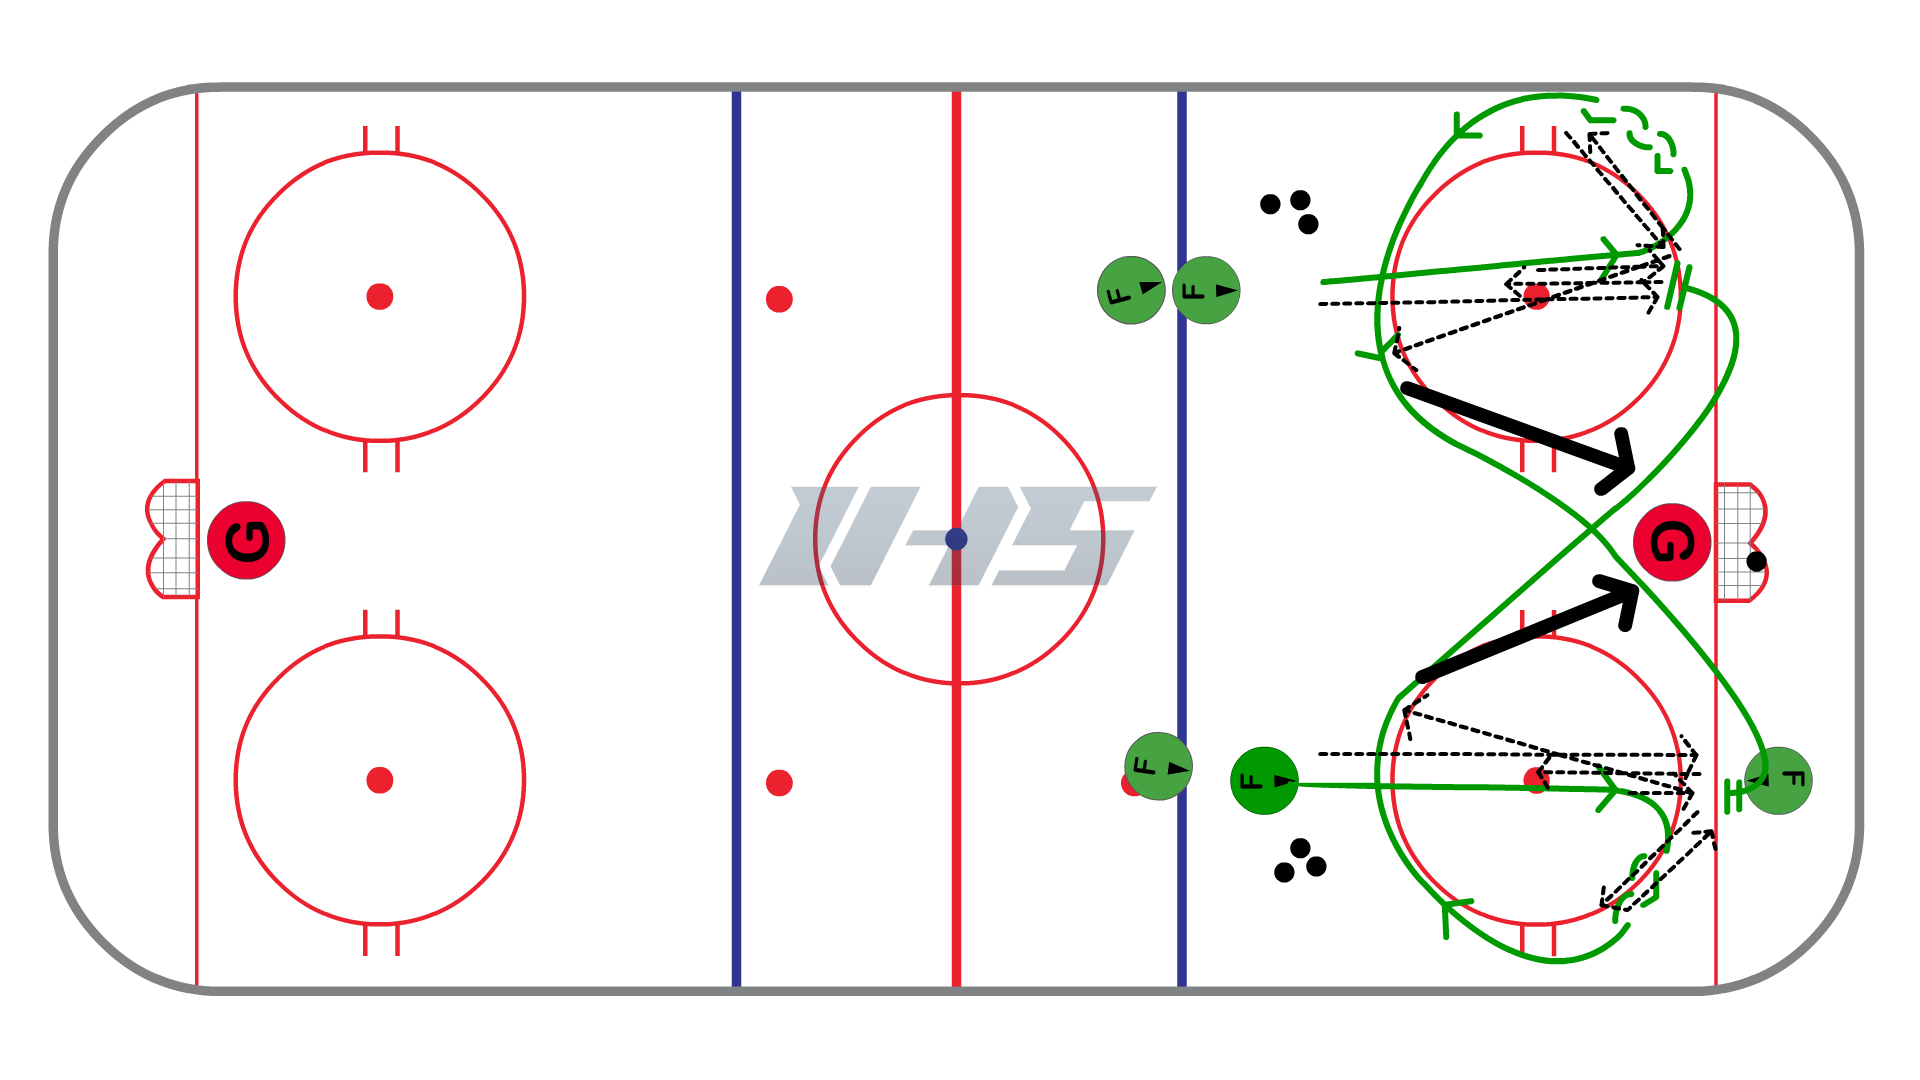
Battery Hockey Figure 8 Shooting Drill
A shooting exercise demonstrated by Cam Atkinson and Kole Sherwood of the Columbus Blue Jackets at The Battery Hockey Academy. The drill allows for 6 shots on net and helps players work on shooting off of the pass in 3 different setups while they receive pucks on two sides of the ice.
Setup:
- The shooter receives a pass from each corner and they shoot in a stationary setting.
- After their second shot, they head to a cone and pivot facing the passer in the corner. They receive a pass and quickly fire a puck on net. After the shot they look to the opposite corner, pivot facing them and then receive a puck and shoot on net.
- After their fourth shot they perform a controlled turn around the cone, and receive a pass from the opposite corner. They take a quick shot and then receive a final pass after a controlled turn from the opposite corner.
- After the player shoots, they become a passer and one of the passers becomes the next shooter.
Coaching Points:
- The shooter must keep their stick on the ice and provide the passer a clear target as to where they want the puck.
- The shooter should keep both hands away from the body so they can easily pull back with the top hand and push with the bottom hand for a quick release.
Variations:
- The passers can be set up in different areas of the ice.
- The shooter can work on different shooting techniques (snap shot, wrist shot, change shot angle).
- The cones can be set up in different areas.
- Can be a station with short passes or a half ice drill with longer passes.
