Skills Practice - (Separating Offense & Defense)
Skills Practice - (Separating Offense & Defense)

Please Note: The Practice of the Week is usually designed to be utilized across multiple age levels. With that being said, we highly encourage you to adjust the drills based on your team's age and skill levels. These drills and practices can be modified to become more basic or more advanced.
This practice setup is intended to split up defense and forwards to work on specific positional skills.
The practice focus for defense is to work on the following skills:
- Retrievals
- Footwork
- Deception at the blue line
The practice focus for offense is to work on the following skills:
- Shooting in stride
- Quick releases
- Deception
Practice Coaching Points:
- Use Deception: Deception can be used in every aspect of the game and can also be implemented into each of these drills (for both forwards and defensemen). Ask your players how you think they can incorporate deception into their reps after explaining the drill
- Quickness: Based on age and skill level, you can push the pace of the drills and encourage them to progress the quickness of their movement in their footwork, passes and releases
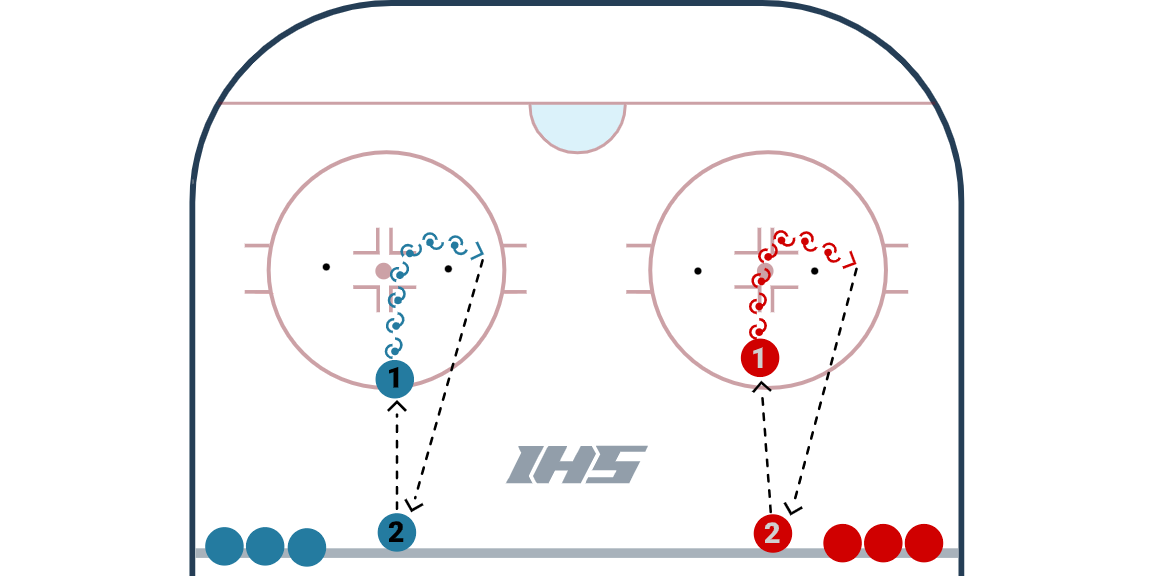
Mid Pair Wall Retrievals
This is a great warm-up drill for defensemen from NewEdge Hockey that can be used all of the time. This setup offers tons of repetitions for common defenseman movements. Deception is a critical, must-have skill for defensemen, and sending false signals takes work to do well. Lots of versions from toes and head left to right take, fan at puck, and so on. Puck on hip, eyes up, and superior passing are skills and habits that defenseman need to make a difference in today's game.
Setup
- Each player has a partner. Player 1 chips the puck to the boards, retrieves it, and passes it to Player 2. Player two then chips the puck and continues the drill.
- Progression # 1: Fake forehand to reverse curl.
- Progression # 2: Head up quick pass.
- Progression # 3: Any variation you want! This setup can allow defenders to reinforce retrieval movements. Use deception and keep your head up!
Coaching Points
- Head up!
- Look over your shoulder as you are skating to the puck (make sure to practice this habit!)
- Practice deception in retrievals with your toes, hips, stick, head & eyes!

NEHDA 2 Puck
The NEHDA 2 Puck is an excellent drill from NewEdge Hockey that helps players practice passing, communication, edgework, deception, and more.
Setup
- Place 2 pucks as shown in the video & diagram.
- Part 1 of Drill - Keep Toe Caps & Body Facing Up Ice: P1 receives a pass from P2 (player in the line), goes around a puck, passes to P2, receives a pass back & skates around the other puck before passing back to P2. P2 now jumps into the drill.
- Part 2 of Drill - Practice Escapes, Deception & Puck Protection: P1 receives a pass from P2 (player in the line), goes around a puck, uses deception to act like they are going to pass & skate up ice but quickly cuts back, performs a mohawk, goes around the puck and passes back to P2. P1 receives a pass back from P2 and P1 goes around the opposite puck, uses deception to act like they are going to pass & skate up ice but quickly cuts back, performs a mohawk, goes around the puck, and passes back to P2. P2 now jumps into the drill.
Coaching Points
- Passing: Coaches should put a strong emphasis on passing quality and communication during this drill.
- Movements: Lateral movements should be crisp and get the puck on your hip and get your eyes up quickly.
- Deception: When in the deception version (Part 2 of the drill), really commit to the look-off, your opponent's stick tends to follow your head and eyes so make it really look like you are going to move the puck in one direction before you cut back.
- Puck Protection: When protecting the puck, be sure to move the puck out in front of your belly when you mohawk, this keeps good distance between the attacker and the puck. Mohawking allows you to maintain speed yet still protect the puck.
Blue Line Shuffles
The Blue Line Shuffles drill from NewEdge Hockey helps defenseman work on moving laterally on the blue line.
Setup
- Set up 4 groups of 2 pucks (as pictured in the diagram) a couple of feet inside of the blue line.
- Progression # 1: players skate laterally across the blueline.
- Progression # 2: players skate laterally across the blueline with a partner so they can pass the puck back and forth.
- Progression # 3: players skate laterally across the blueline and take a shot when going around the last set of pucks.
Coaching Points
- Keep toecaps and chest in zone.
- Practice moving your feet outside of the blue line yet keep the puck on-sides.
- As you shuffle across the blue line and manage the puck, be sure to get your eyes up from time to time.

Deceptive Point Shooting Progression
Getting shots through from the point is extremely important. It can be the difference between a wasted scoring opportunity or breakaway for the other team!
Here are 3 Different Shots for a defenceman to practice with a simple set up. The goal of this progression is to get comfortable with quickly getting the puck to an open shooting lane and not just keeping your head down and shooting right into an attacking player.
Shooting Progression # 1
- Setup: Show the coach your forehand. The coach will slide the puck to your backhand. Collect the puck with your backhand, keep your head up, move the puck to your forehand, explode to create space and get a quick shot off.
- Shot 1: Quick forehand shot.
- Shot 2: Forehand shot but aim to create more space and distance from the coach.
Shooting Progression # 2
- Setup: Coach will pass to your forehand. Collect the puck and keep your head up.
- Shot 1: Quick shot that is pulled around the coach.
- Shot 2: Fake your forehand pull and escape to your forehand side to deliver the shot on net.
Shooting Progression # 3
- Setup: Show the coach your forehand. The coach will slide the puck to your backhand. Collect the puck with your backhand, keep your head up, move the puck to your forehand.
- Shot 1: Quick forehand shot (same as Progression # 1, Shot 1).
- Shot 2: Fake the forehand shot, escape and set up a slapshot.
Progression Variations
- Add additional obstacles that the players need to shoot around.
- If you do not have a player or coach to pass the puck, the defense can retrieve a puck from a pile of pucks and backpedal to the point and then begin the progression.
- You can add a forward breaking to the net that the D must try to pass to for a deflection.
- Add a forward in front of the net that can work on tips.
- Players can also work on learning how to Change Their Shot Angle to add additional deception in their shot.

NEHDA Defenseman Carousel
The NEHDA Defenseman Carousel from NewEdge Hockey helps players practice passing, communication, awareness, timing, and more. This drill should have flow and a very strong focus on quality passing.
Setup
- Pucks and players in the corner (as shown in the diagram and video).
- Drill starts by having Player 1 pass to Player 2 at the point. Player 2 skates laterally, then gives the puck back to Player 2 (who opens up to receive a pass).
- Player 2 takes the puck behind the net to give a breakout pass to Player 3 (who is opening up along the boards). Player 3 heads up ice and gives the puck to Player 1, who has skated across the blue line.
- Player 1 takes a point shot, then jumps down into the slot and receives a pass from the next player in line (Player 4) for a shot.
- Player 3 now jumps over to the other side of the blue line and receives a pass from the next player in line (Player 4). This drill is continuous.
Coaching Points
- Passing: The focus again is pristine passing and communication.
- Timing: There are lots of moving parts in this drill so awareness and timing are critical components. Be on time, be patient yet prepared to move.
- Head up! All players in the rep should position themselves to see as much of the ice (and players) as possible at all times.

Half Ice Shoot In Stride
This is a great drill to practice the concept of shooting in stride. It is a simple half ice drill so players can focus on shooting in stride without anything else to distract them.
Setup
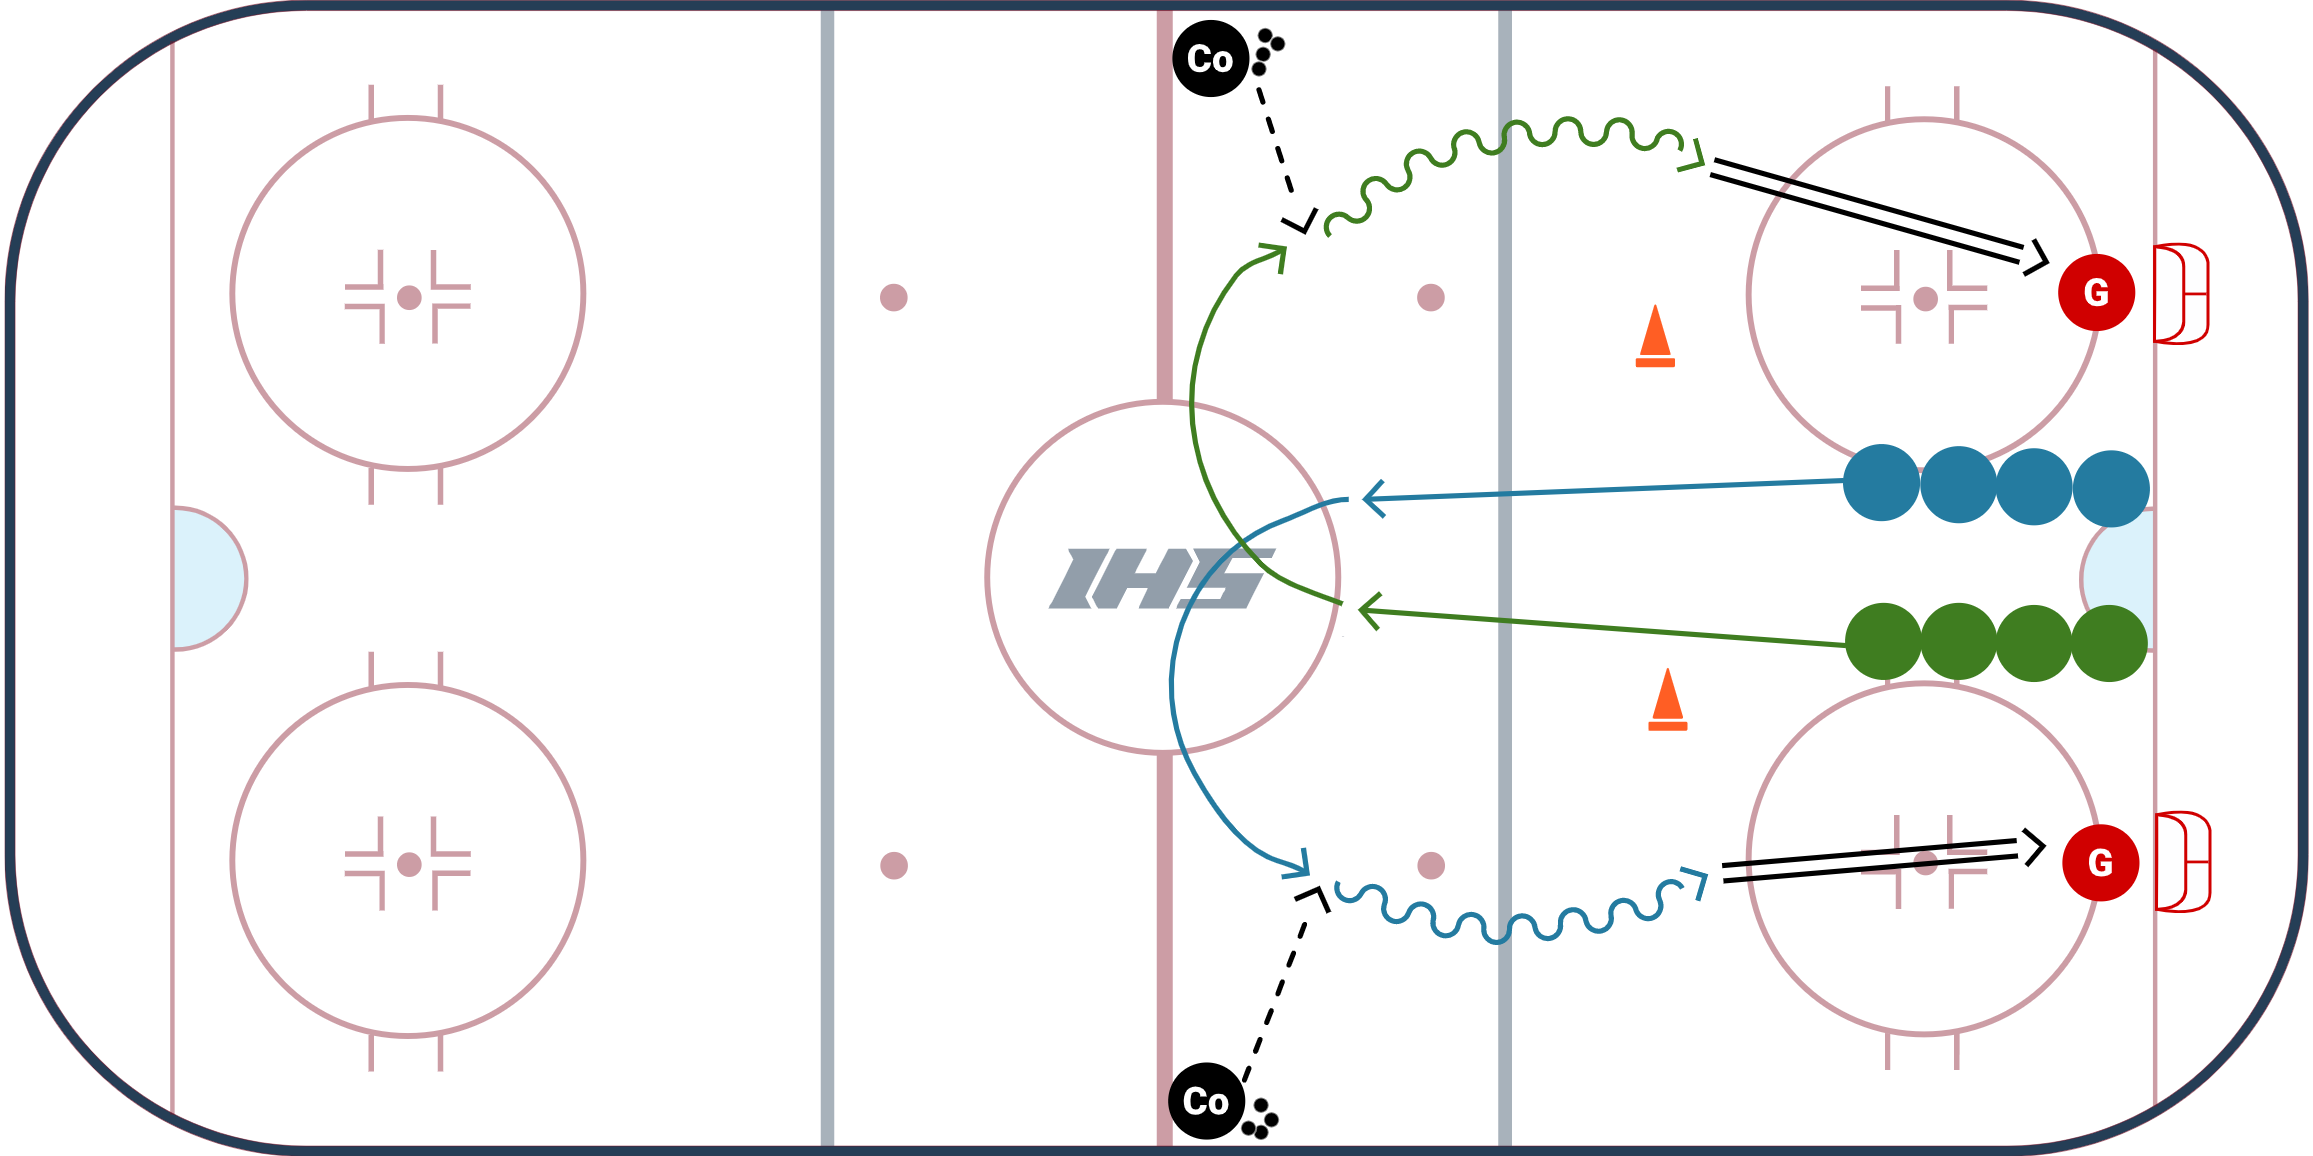
- Players form two lines at the hash marks as shown. The first player skates out to the red line and towards the opposite coach (or player) and calls for a puck. Their feet are moving the entire time.
- Players need to receive the pass and shoot in stride before the cone. It appears to be an easy drill but it is challenging if players are forced to keep their feet moving and shoot before the cone.
Coaching Points
- Communicate! Encourage verbal communication (calling for the puck) and non-verbal communication (player should have their stick on the ice showing where they want the pass).
- Shooting tips: Shoot while your feet are moving so you surprise the goalie.
- Stopping at the net for a rebound.
Wall Retrieval Station
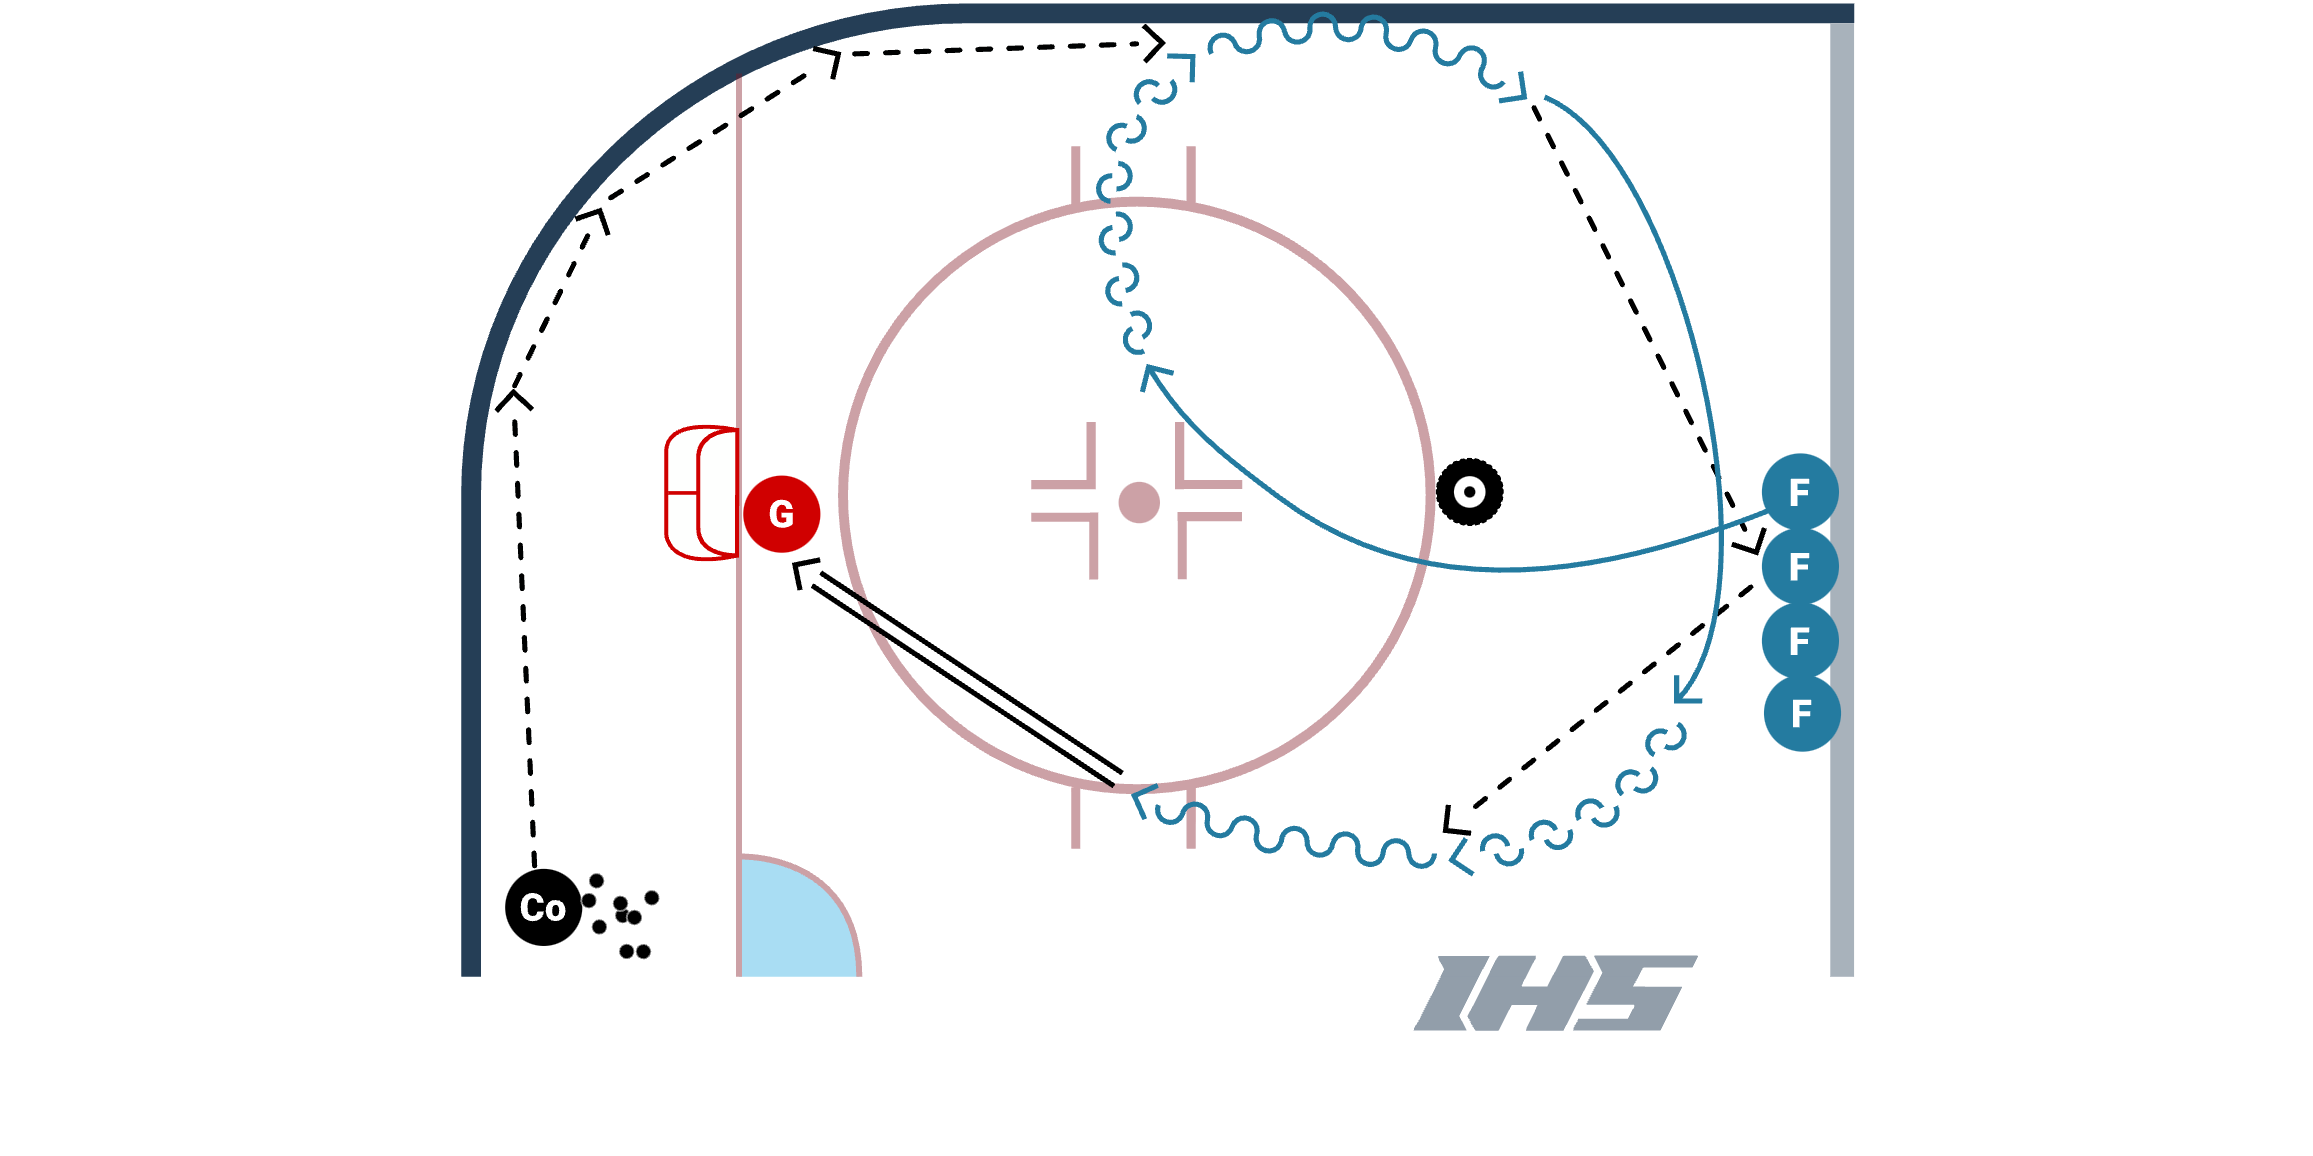
The goal of this drill is to get players a more comfortable handing pucks along the wall and provides a situation you can use to teach them various techniques.
Setup:
- This station can be set up to use half of one of the zones.
- Pucks should be set behind the goal crease in the middle of the ice with the coach or other player. If you are using both sides then two coaches can share the pucks and each will rim the puck to opposite sides.
- A tire or cone can be placed inline with the dots at around the top of the circles.
- Players are lined up along the blue line with the first player inline with the dots.
- Player 1 will skate up around the tire towards the wall, open up to face the puck as it is rimmed around. The players should time it so they are skating up ice as they gather the puck.
- Once they gather the puck they will make a pass to the next player in line, go around the tire, open up and call for the puck, then receive the puck back to take a shot on net.
Coaching Points:
- Encourage players to move their feet and keep their heads up as they gather the puck along the boards.
- Players should look at the point to see where the defense is. You can do this with no defence just to get them in the habit of looking at the point, or you can have the defence add pressure so the drill can be variable.
- Players should get to the wall.
- After they get the puck, they should skate away from the wall so they have space to play to the center or to the boards.
Variations:
- You can add a defender playing the point that occasionally jumps in, which will require the forwards to be more aware of the situation.
- You can add obstacles that the player needs to pass through when they pass to the point.
- You can require the player to shoot in stride, change their shot angle or practice their one-timer when they are shooting on net.
- You can make this drill half ice so more skating and longer passes are required.
- You can have the forward go to the net and have the defense take a shot so the forward has to tip or deflect it.
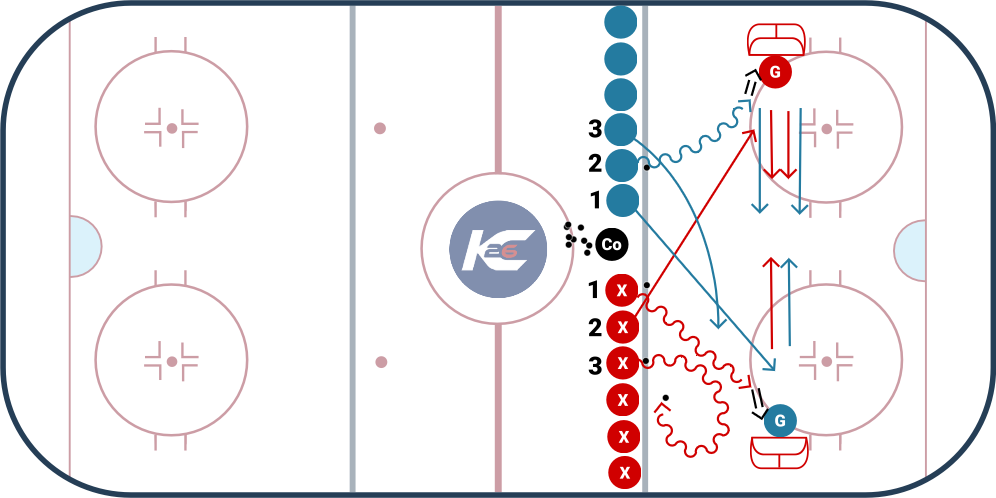
Triangle Scoring Game
Description
The Triangle Scoring game from Kendall Coyne Schofield is a race to score first and involves moving the puck quickly and using deception with your passes and shots. It's a great game to work on quick power play puck movement and for the defensemen/penalty killers to work on pressuring and having their stick in the proper lane.
Set Up
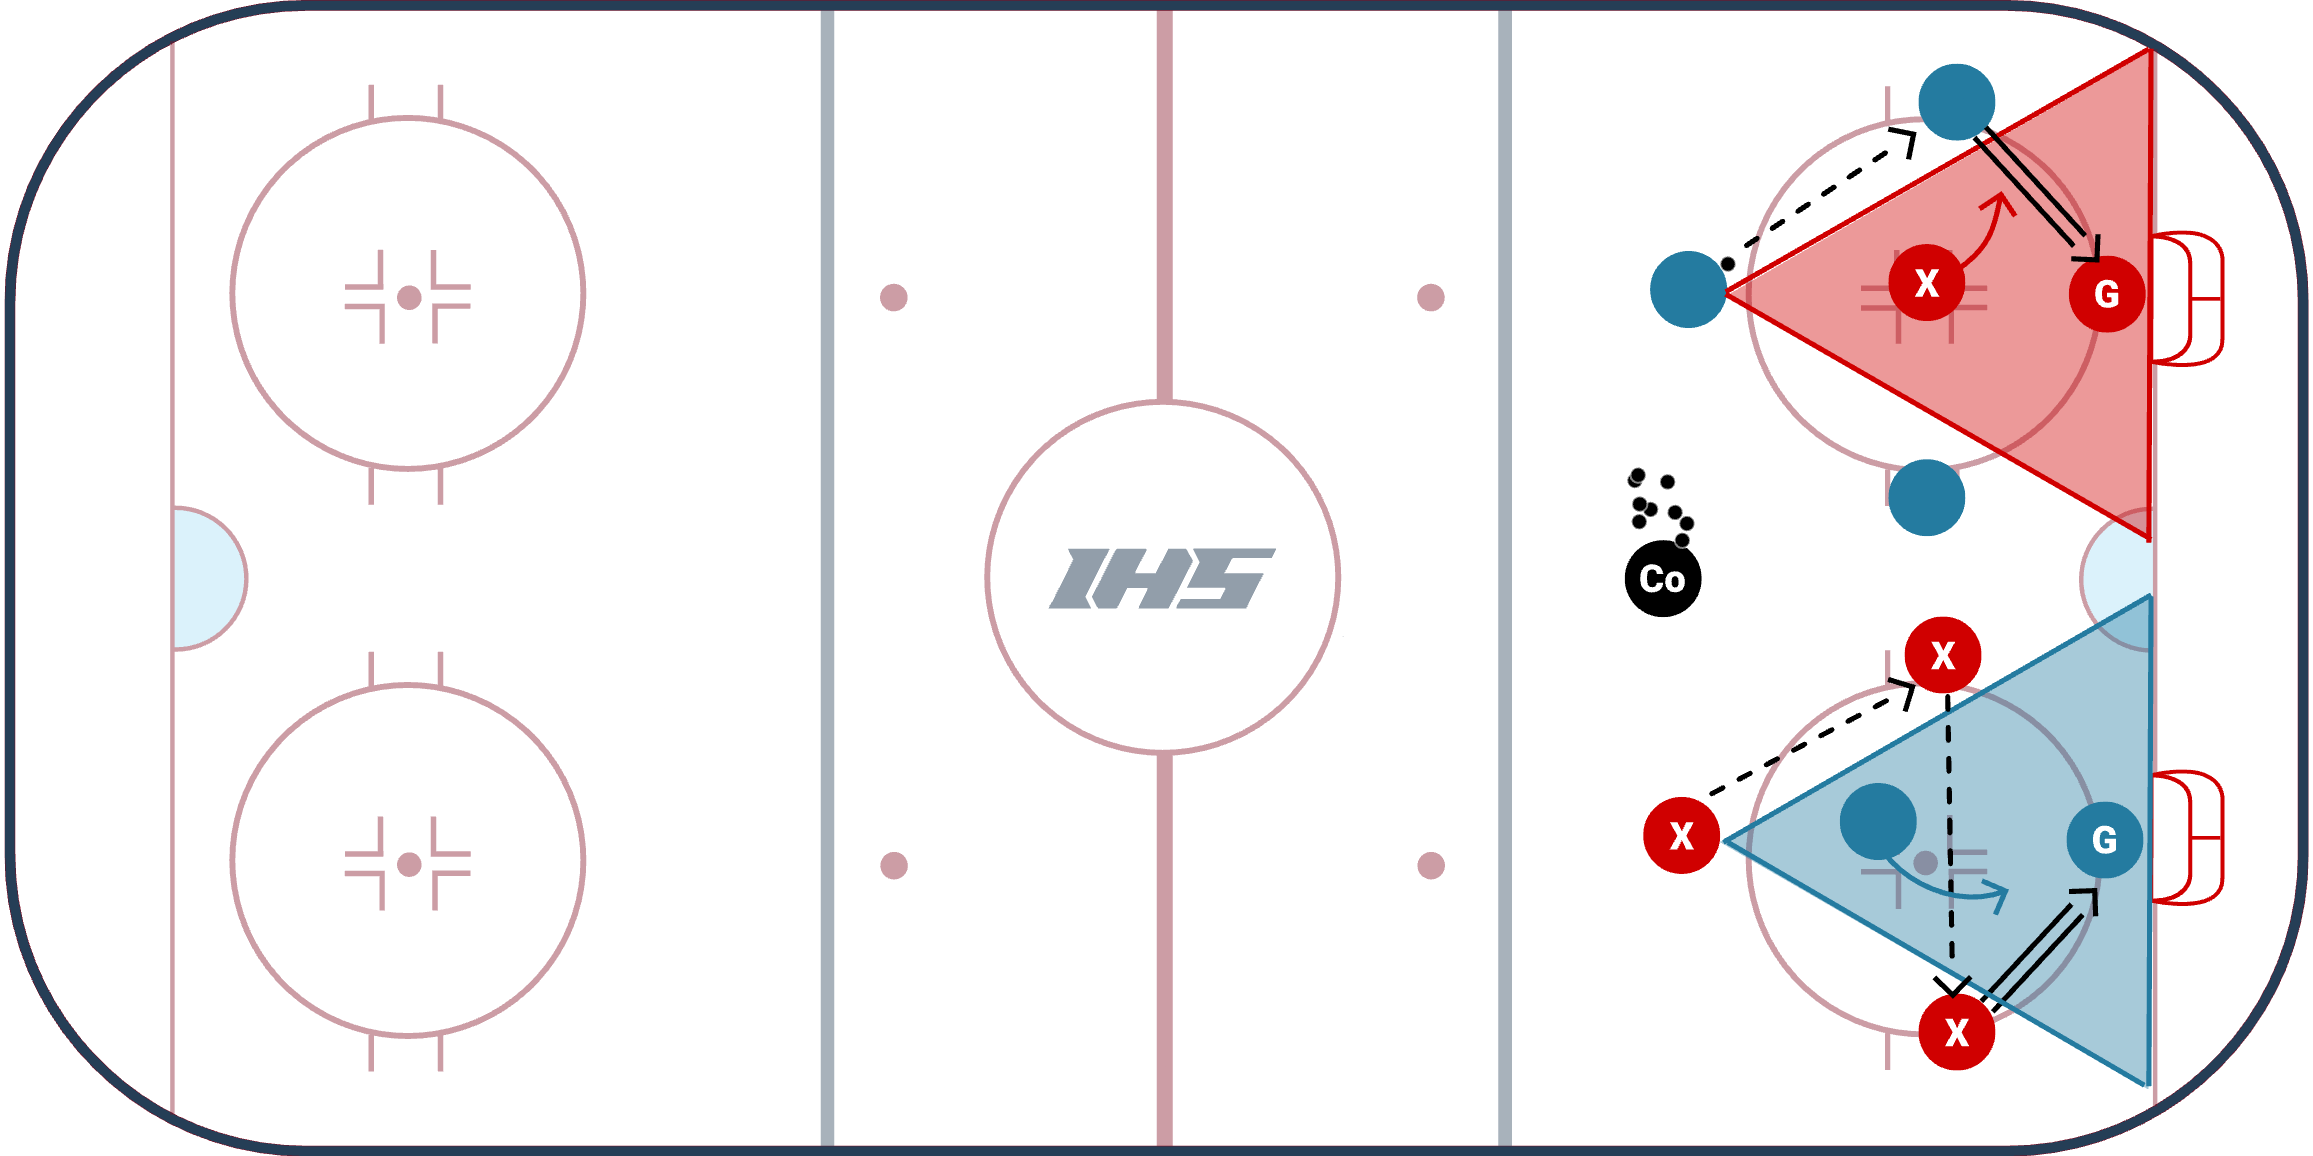
- 2 Nets should be set up on the goal line in an offensive zone in line with the face-off dots
- Draw a triangle from the goal line to the top of the circle - if you don't have a marker use a few cones/tires (they can act as an additional constraint for the team trying to score)
- 1 goalie in each net
- 1 puck per triangle (on the outside)
- 3 players on team "X" on the outside of the triangle
- 1 player from team "O" on the inside of the triangle
- Set up the other triangle with the opposite set of players - 3 "O"'s on the outside and 1 "X" in the middle
- Coach should be ready with a pile of pucks up top
Game
The objective of this game is for the players on the outside of the triangle to score before the opposing team does. Each goal counts as a point and the game can go up to a certain number, with team "X" playing against team "O"
- On the whistle the game starts
- The players on the outside of the triangle are stationary, but can pass the puck through the triangle
- The objective of the players on the outside of the triangle is to score before the outside players of the opposing triangle score
- It's a race to see which team can score first
- The player on the inside of the triangle can move anywhere throughout the triangle, but not leave it
- The objective of the inside player is to clear the puck out of the triangle
- Whichever team scores first is awarded a point
- As soon as 1 side scores, the whistle blows and the next set of players moves in for each triangle
- Keep Score!
Variations
- Coaches can award a point to the team when a player on the inside of the triangle clears the puck
- Coaches can make clearing the puck and scoring different point values
- You can require one or two-touch passing/shooting
- Can allow players to skate through the triangle
- Can use the face-off circles instead of a triangle (see the Circle Scoring Game)
Coaching Points
- Use Deception - deception can be used by using your eyes and body language to be deceptive with passing and shooting to throw off the defender and/or goaltender
- Quick Release - to be successful, this game requires quick puck movement and quick releases when scoring opportunities present themselves
- Active Stick - the player in the triangle needs to have a very active stick as the puck moves around and through the triangle
1 v 1, to 2 v 2 to 3 v 3
Description
This quick paced small area game from Kendall Coyne Schofield gets a lot of players moving and is great to work on goal scoring when there is back pressure.
Set Up
- Set up 2 nets on the half wall in one of the zones
- A goalie is defending each net
- Team "X" and Team "O" should be lined up on the blue line on one side
- Make sure there is at least a 10 ft space between the teams on the blue line
- There should be pucks lined up for each team near the center of the blue line
Game
Play up to a certain amount of goals, team "X" vs team "O"
- On the whistle, player 1 from team O skates in on a mini breakaway
- Player 1 from team X leaves on the same whistle to apply back pressure on the player from team O
- On the second whistle player 2 from team X skates in on a mini breakaway while player 2 from team O applies the back pressure
- On that same second whistle, player 1 from both team X and team O join the rush to make it a 2 v 2
- On the third whistle player 3 from team O skates in on a mini breakaway while player 3 from team X applies the back pressure
- On that same third whistle, players 1 and 2 from both teams join the rush to make it a 3 v 3
- Coach can blow the whistle whenever they see fit
- Make sure the team who starts with the puck switches after every rep to keep it fair
- Keep score!
Coaching Points
- Scoring Under Pressure - players need to control the puck and get to the net and shoot quickly
- Escaping Pressure - when your teammates join the rush you can make the decision to escape pressure and find the players joining the rush
- Applying Pressure - working hard to apply pressure to your opponents trying to score
5 v 5 Scrimmage

Tips To Develop A Quick Release Shot
Professional Hockey Skills Coach Dwayne Blais explains how to develop a quick release shot. The better a player can get at catching and quickly releasing a puck, the more opportunities they will have to score. After you watch the video, scroll below to see drills and small area games that can help you practice a quick release shot on the ice.
Tips to Develop A Quick Release Shot
- Good Hand Position: Keeping your hands hip-width apart is a good distance for any type of shot.
- Keep Hands Away From Body: Keep top hand up and keeping your hands away from body will allow you to take a shot with greater force. If your hands are close to your body it is hard to push and pull with your top and bottom hands.
- Get Puck In Shooting Box Quickly: The quicker you can get your puck into your shooting box, the quicker you will be able to shoot. Your shooting box is usually about a blade length away from your skates.
- Push Down With Bottom Hand (Power Hand): Pushing down with your bottom hand will help generate flex on your stick which will produce additional power on your shot.
- Drive Shoulders To Net: Driving your shoulders to the net will help you generate additional force with your shot.
- Generate Power With Legs: Transfering weight from one leg to your other leg will help with your backhand and forehand shots.
Shooting in Stride
Shooting in stride is a great skill for all players to add to their skill set. The exceptional goal scorers are typically very good at this. The reason it is so effective is that it catches the defense and goalie by surprise. Therefore the shot does not have to have perfect accuracy or be the hardest shot. The quickness of the release is why it is so effective.
Key Point to Shooting in Stride
- Keep puck slightly in front.
- Keep feet moving.
- Shoot mid-stride with weight transferring to front foot.
