U14 - U16 Battle Day Example Practice
U14 - U16 Battle Day Example Practice
Please Note: This U14 - U16 Battle Practice Example is designed to be utilized across multiple age levels. With that being said, we encourage you to adjust the drills & games based on your team's age and skill levels. These drills and practices can be modified to become more basic or more advanced.
Practice Setup:
- Divide up teams evenly (2 color jerseys)
- Tally up the points scored in each game. The team with the most points at the end of a game is awarded 1 point.
- Depending on the amount of ice-time you have, you can play 3 to 7 games.
- Below we show examples of 7 games that can be used, with links to view 150+ other games.
Coaching Points:
- Have fun!
- Encourage teammates to communicate, and cheer for each other throughout the practice!
- Each drill and game will have different constraints that may work on different concepts & skills, let players know of the the concepts & skills they should focus on to be successful in each game.
- Coaches can view our 8 Hockey Habits webinar to get ideas on general habits that should be reinforced at every practice.
Battle Day Practice Overview
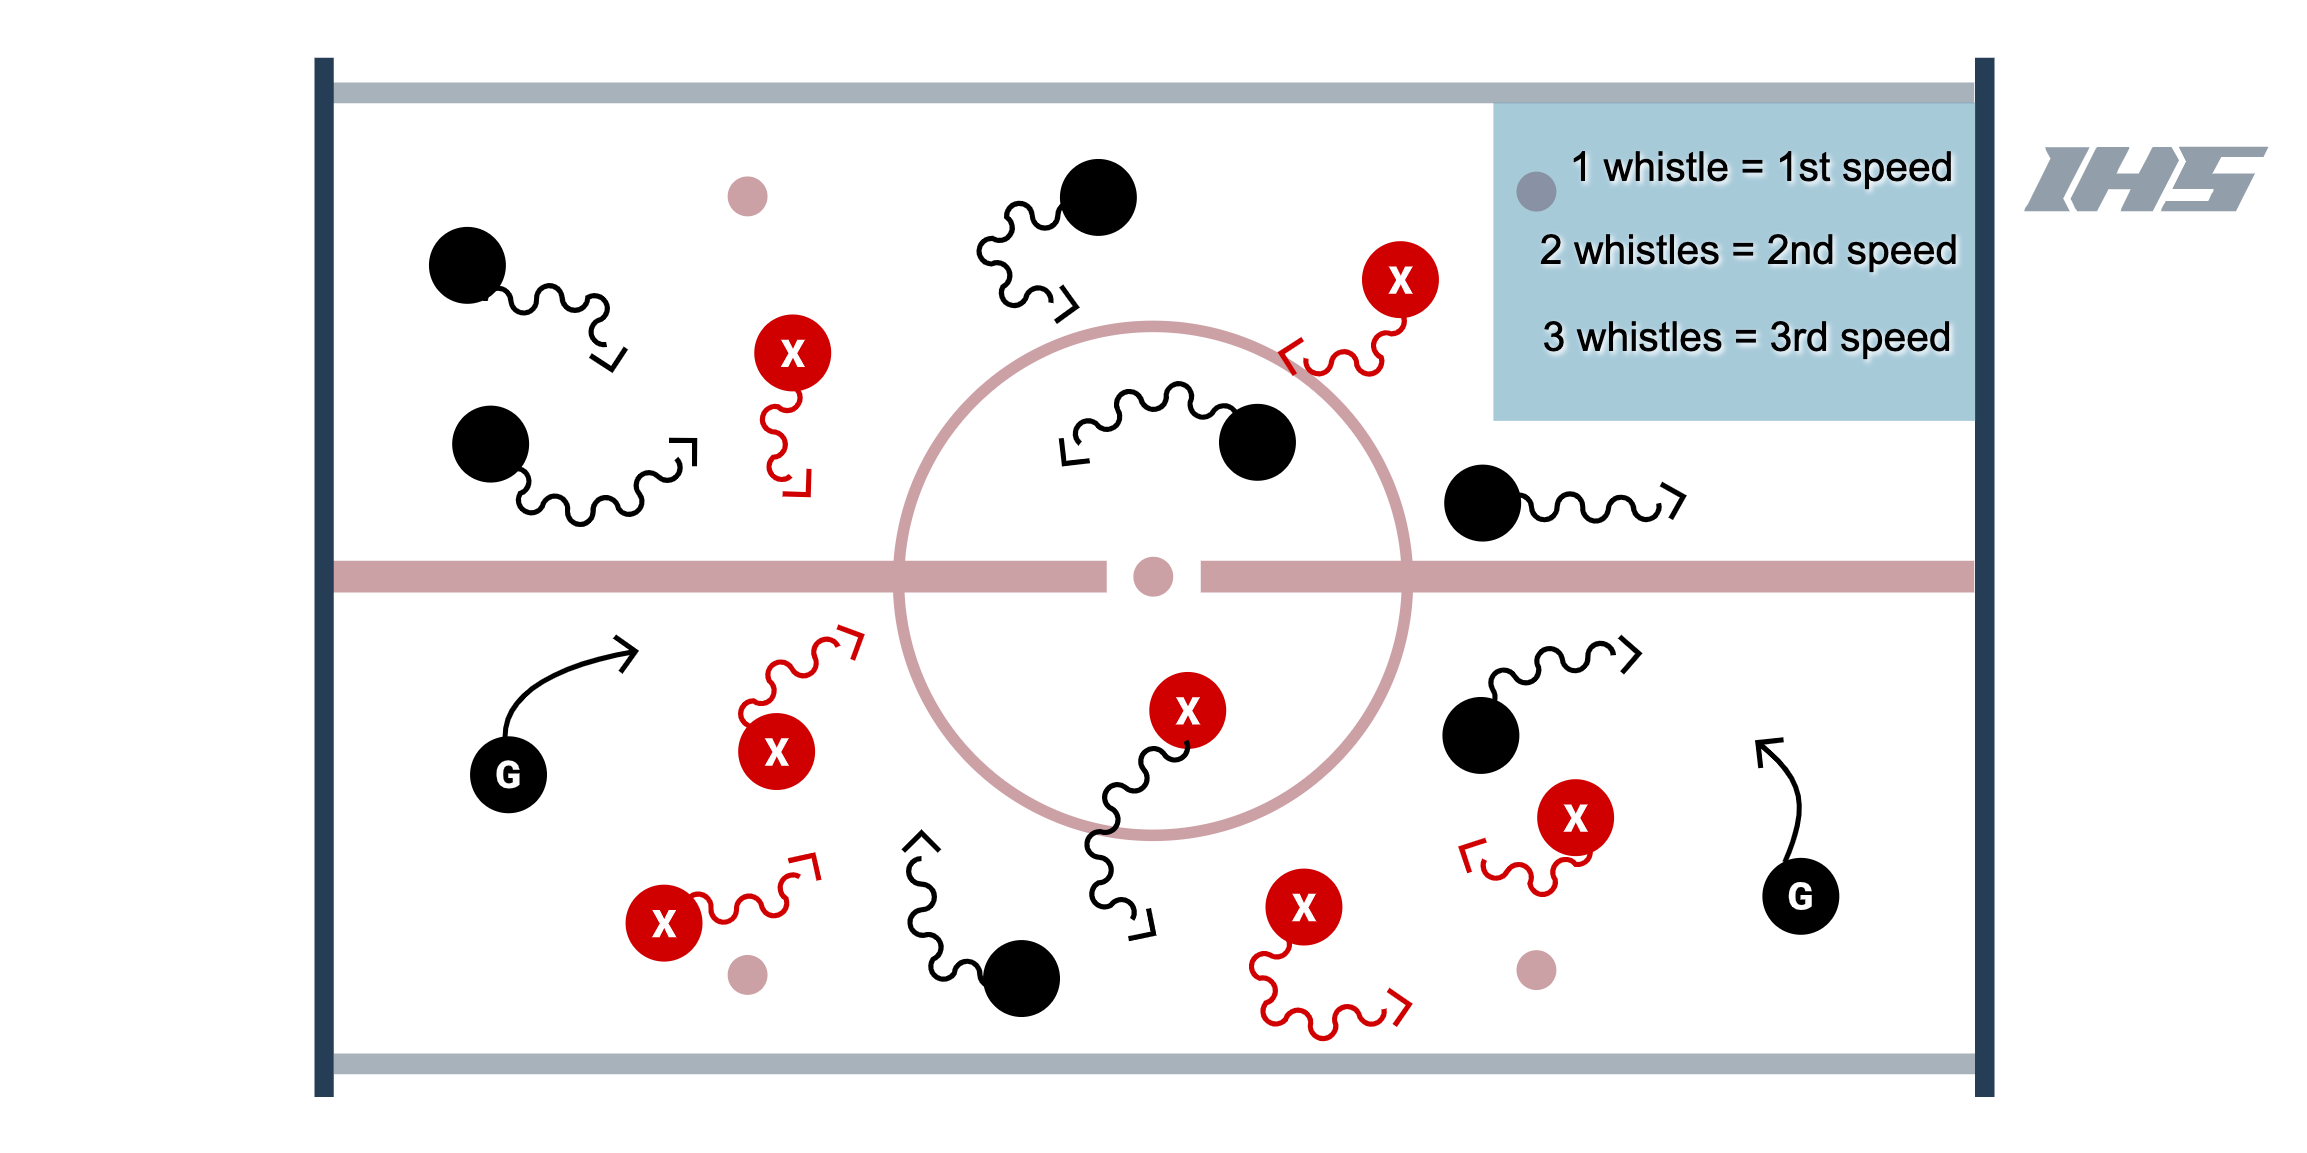
3 Speed Warm-Up Drill
A warm-up drill that can be performed in any zone with the entire team. Coaches can customize this warm-up activity with different skills based on the age and ability level of the team.
Setup
- Each player has a puck.
- Whistle # 1 - players skate at 50% speed and their feet do not leave the ice.
- Skates are in the ice at all times and players move by driving their weight off of their inside edges. Players stickhandle the puck side to side with wide lateral movements as they shift their weight looking for open ice.
- Whistle # 2 - players skate at 75% speed and their feet can leave the ice.
- Be creative! Players can pick their feet up from the ice and they are moving at about 75% while being creative with tight control turns, sharp lateral movements, and still looking for open ice.
- Whistle # 3 - players skate at 100% speed.
- Be explosive and move their feet outside of your comfort zone. Jump to open areas of ice. Goalies skate backwards.
Coaching Points
- Players must keep head up and look for open ice during all 3 speeds.
This is a warm-up activity. No points will be scored here.
3 vs. 3 Handball Game
The 3 vs. 3 Handball Game from Topher Scott of The Hockey Think Tank is a fun game that reinforces offensive principles. Teams will have to communicate and perform lots of give & go's to be successful. No sticks and no pucks. Use any type of ball: soccer ball, basketball, football or anything else (even an extra glove can work)!
Setup:
- 2 nets and two teams.
- Can only have the ball for 2 seconds (for younger teams or less skilled players you can increase that time). You must get rid of the ball quick (give & go!)
- If a player has the ball for longer than 2 seconds, the coach blows the whistle and there is a change of possession.
- If the ball falls to the ice, it is a change of possession.
- 15 - 30 second shifts. Encourage players watching to cheer their teammates on.
Coaching Points:
- Give and go's!
- Support the ball by being an outlet for your teammate.
- Get open!
Variations:
- Can be 2v2, 3v3, 4v4.
- Can be set up as a station or a half-ice game.
- Can add goalies (even players as goalies).
- Can let players hold on to the ball longer than 2 seconds.
Gretzky 2 vs. 2 Game
The Gretzky 2 vs. 2 Game from Topher Scott is a fun small area hockey game that has one major modification to a normal 2 vs. 2 game: each team has two "Gretzky's" behind the net that they can pass to. These "Gretzky's" behind the net must stay behind the net. The setup of the game allows for a lot of creativity, and give & go's!
Setup:
- In a half ice setup, place two nets facing each other in opposite face off circles.
- Each team has 2 players behind the net in their offensive zone. They can not go in front of the net.
- Have a 2 vs. 2 in the middle of the ice.
- To start, coach can pass a puck, take a shot on net, or chip it in the middle of the ice for a battle.
- Keep score!
Coaching Points:
- Offensive players:
- Players in the middle of the ice: work on give and go's! Pass and get open.
- Players behind the net: know where you want to pass to before you get the puck. Use the net as protection and get creative!
- Defensive players:
- Head on a swivel and know where all of the players are.
- Keep stick on ice to block passing lanes.
Variations:
- Can be 2v2 or 3v3 in the middle of the ice.
- Can allow 1 or 2 "Gretzky's"
- Can require players to only hold the puck for 1 or 2 seconds or a whistle is blown.
Sticks In Lanes Game
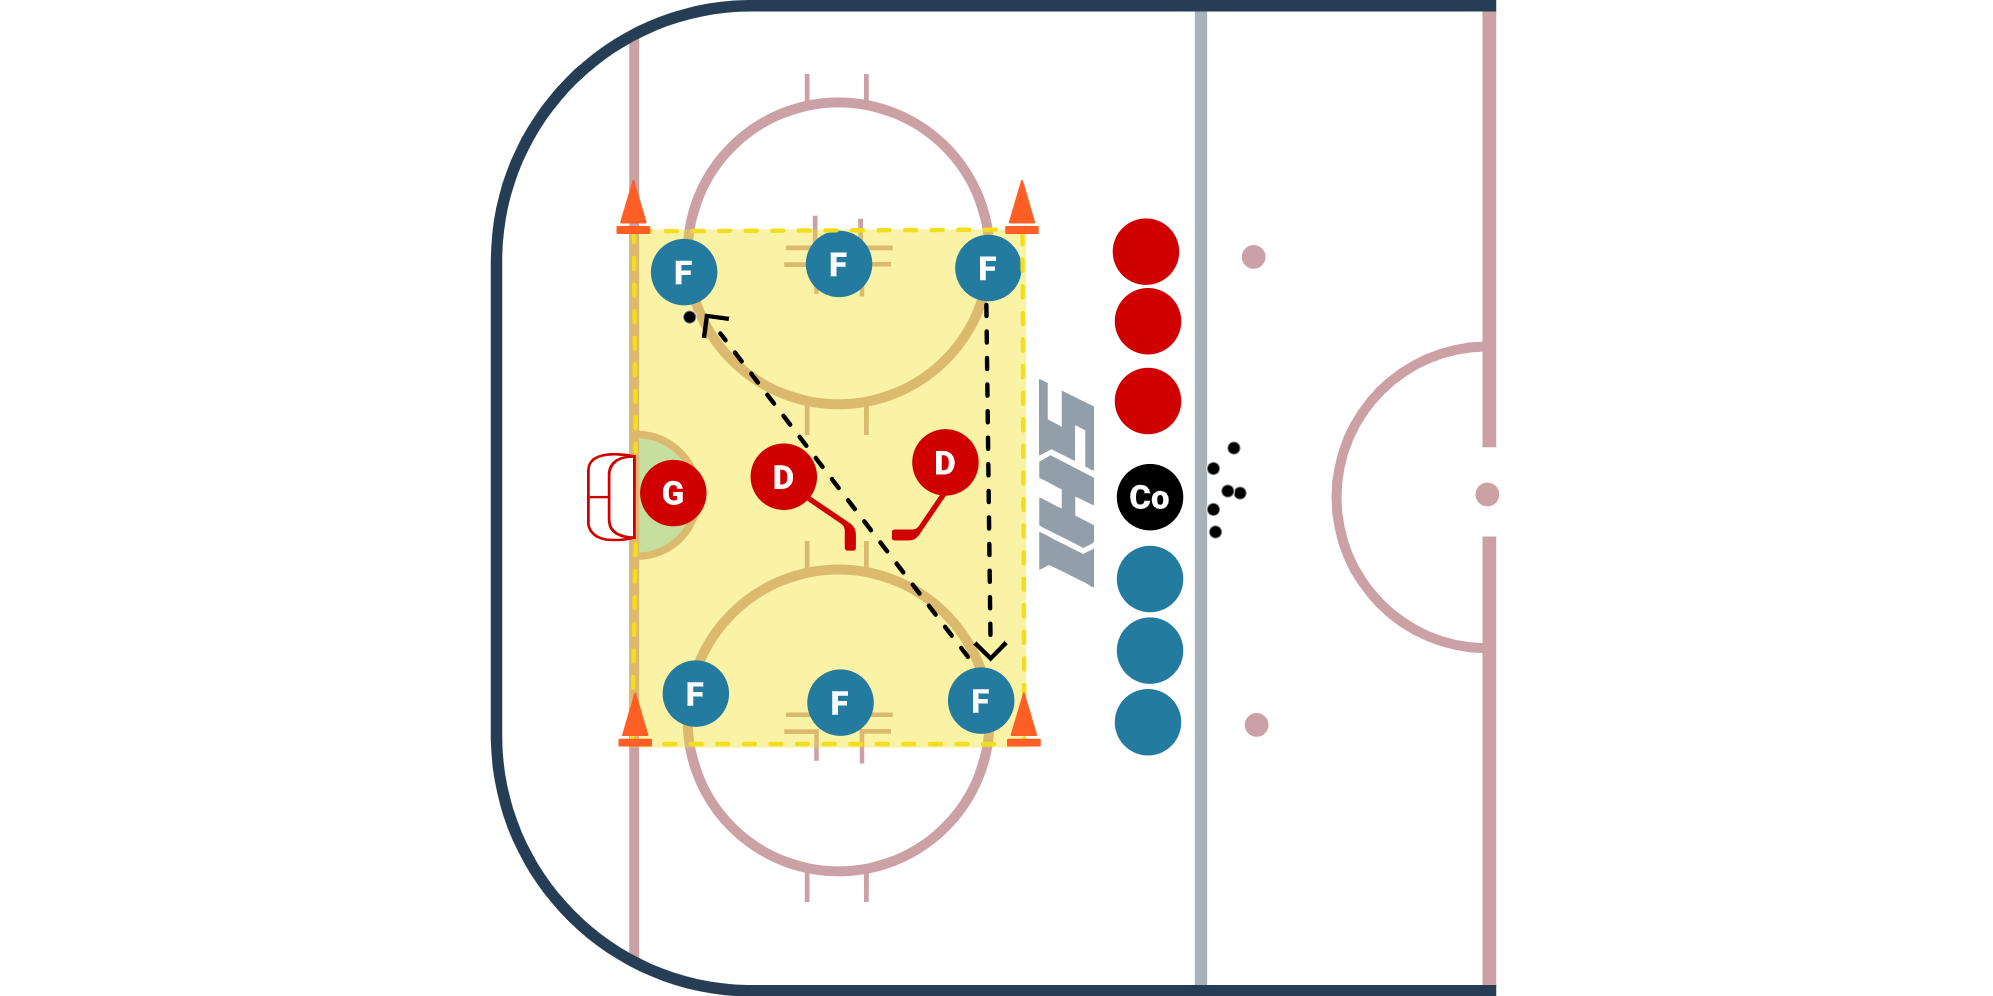
The Sticks In Lanes Game from Topher Scott of The Hockey Think Tank is a great small area game to help the offense practice passing in the offensive zone while the defense works to block passing lanes by keeping their sticks on the ice. This is also a great drill for practicing your Power Play & Penalty Kill. This game is a 6 vs. 2 but can be set up to be more challenging for the offense by making it 4 vs. 2, or 6 vs. 3.
Setup
- KEEP SCORE (as you can see from the video, this can become a very fun and competitive drill).
- The playing area is highlighted in yellow in the diagram above.
- Have 6 offensive players set up as shown in the diagram. They can move slightly but can not skate around and must stay in their designated area.
- 2 Defenders will defend the middle of the ice.
- On the whistle, the offensive team is trying to score. They must pass the puck through the middle of the ice 2 or more times before they can shoot.
- The defenders work to break up the play.
- Switch teams after each rep and let forwards play defense and defense play offense.
Coaching Points
Offensive Team:
- Use deception (look or fake passing one way and pass the other way) to create openings.
- Think about where you pass before the puck comes to you.
- Shoot quickly if you have an opening!
Defensive Team:
- Keep sticks on the ice at all times! This will allow you to block passing lanes or intercept passes.
- Use quick starts and stops to cover ground.
Variations
- Can make this drill harder for the offense by making it a 4 vs. 2 (view example) or a 6 vs. 3 (view example).
- Can make the playing space larger or smaller (the smaller it is, the harder it is).
- Can require 3 (or more) passes through the royal road before a shot is allowed.
- Use different point-scoring to make sure the game is exciting and competitive for the team. For example (2 points for a goal, 1 point for 2 consecutive defensive takeaways).
Offensive Advantage Game
Description
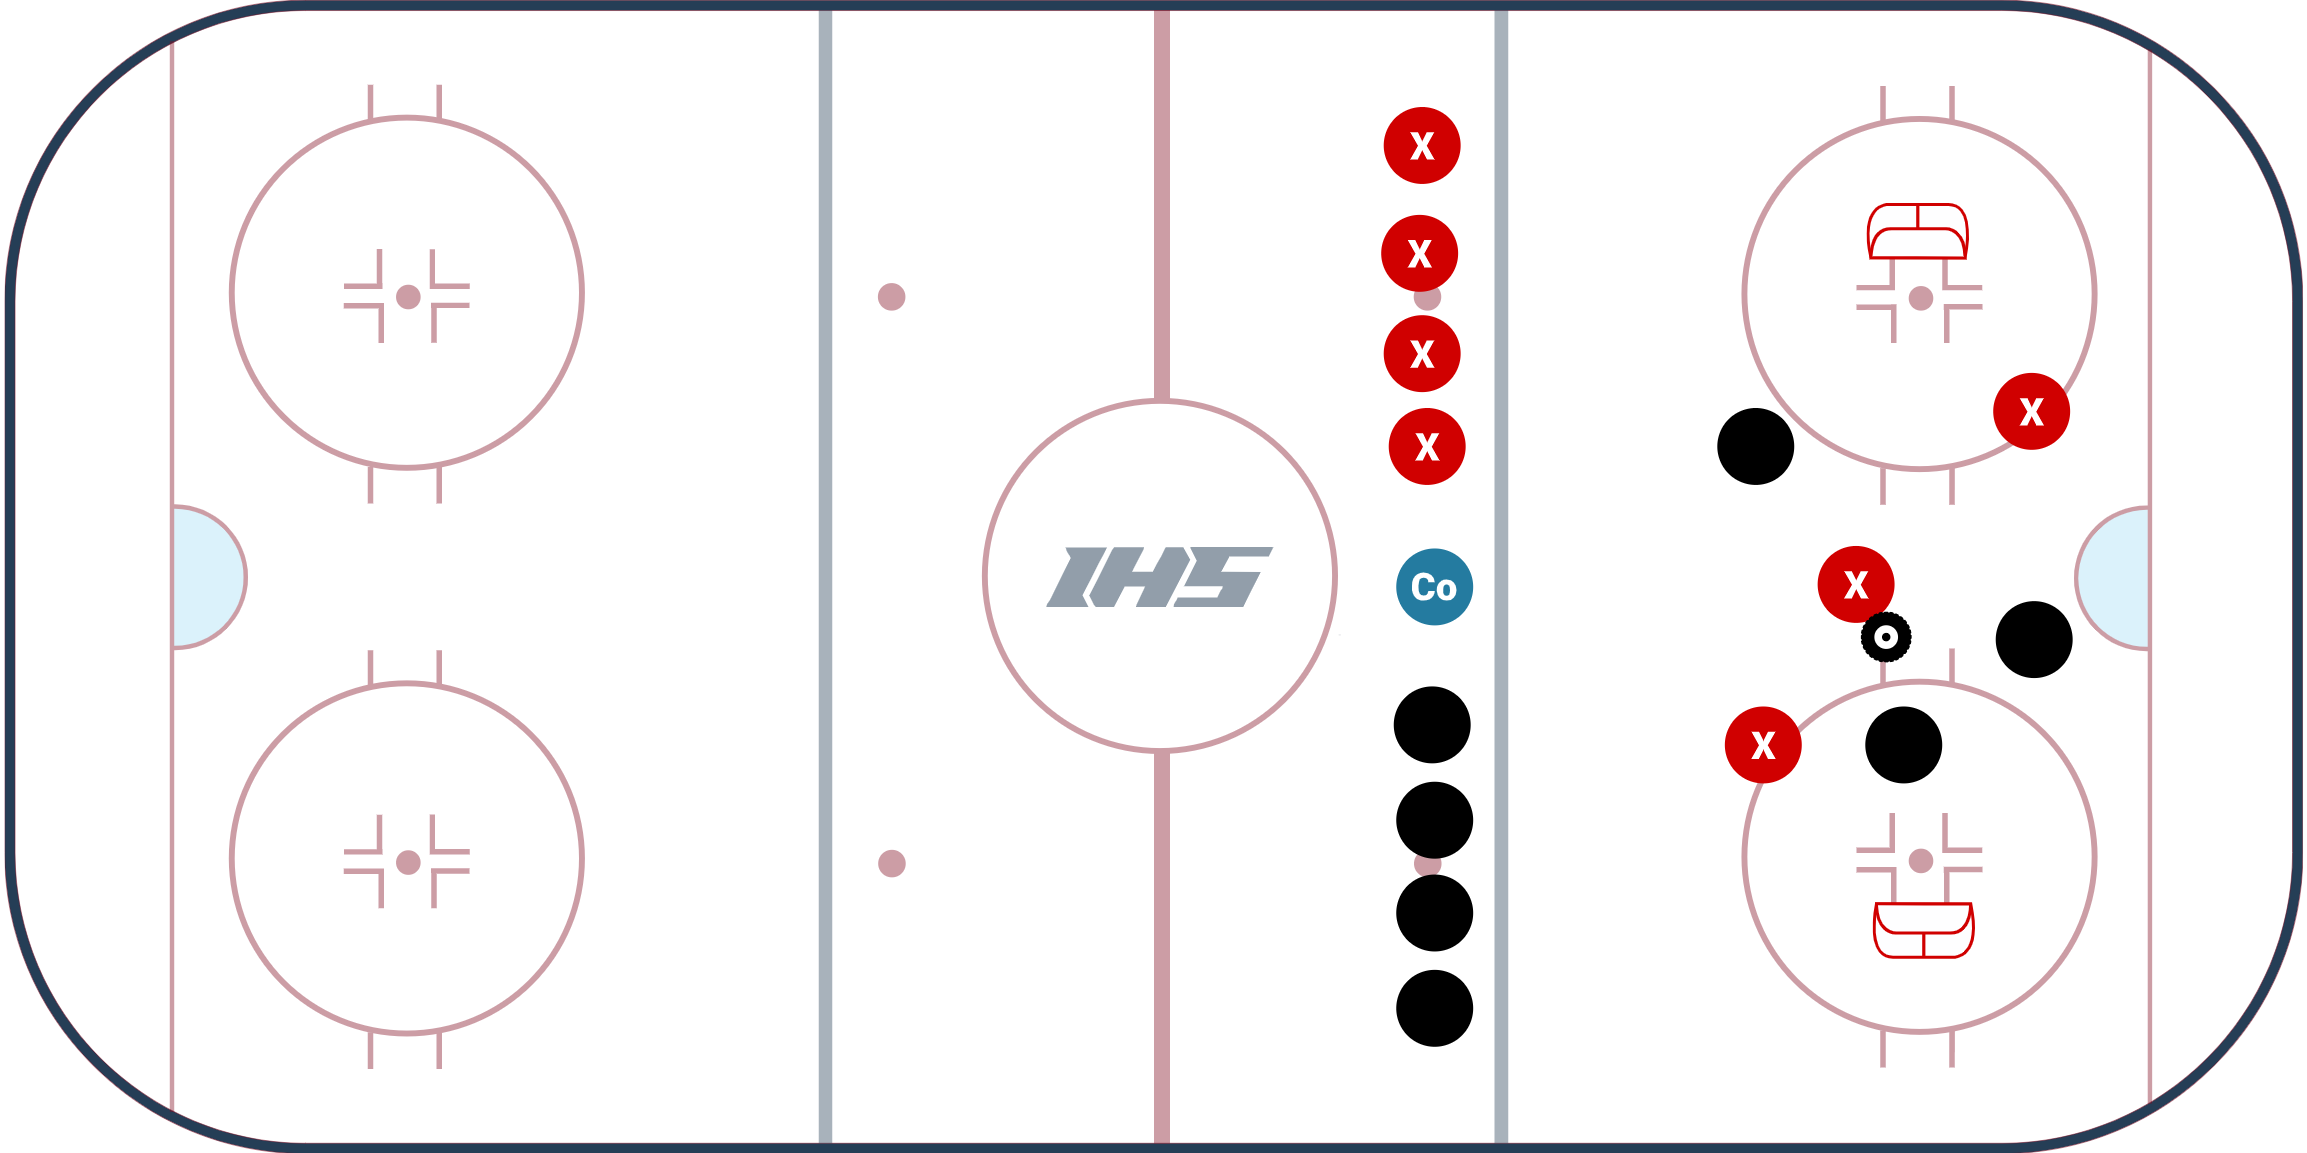
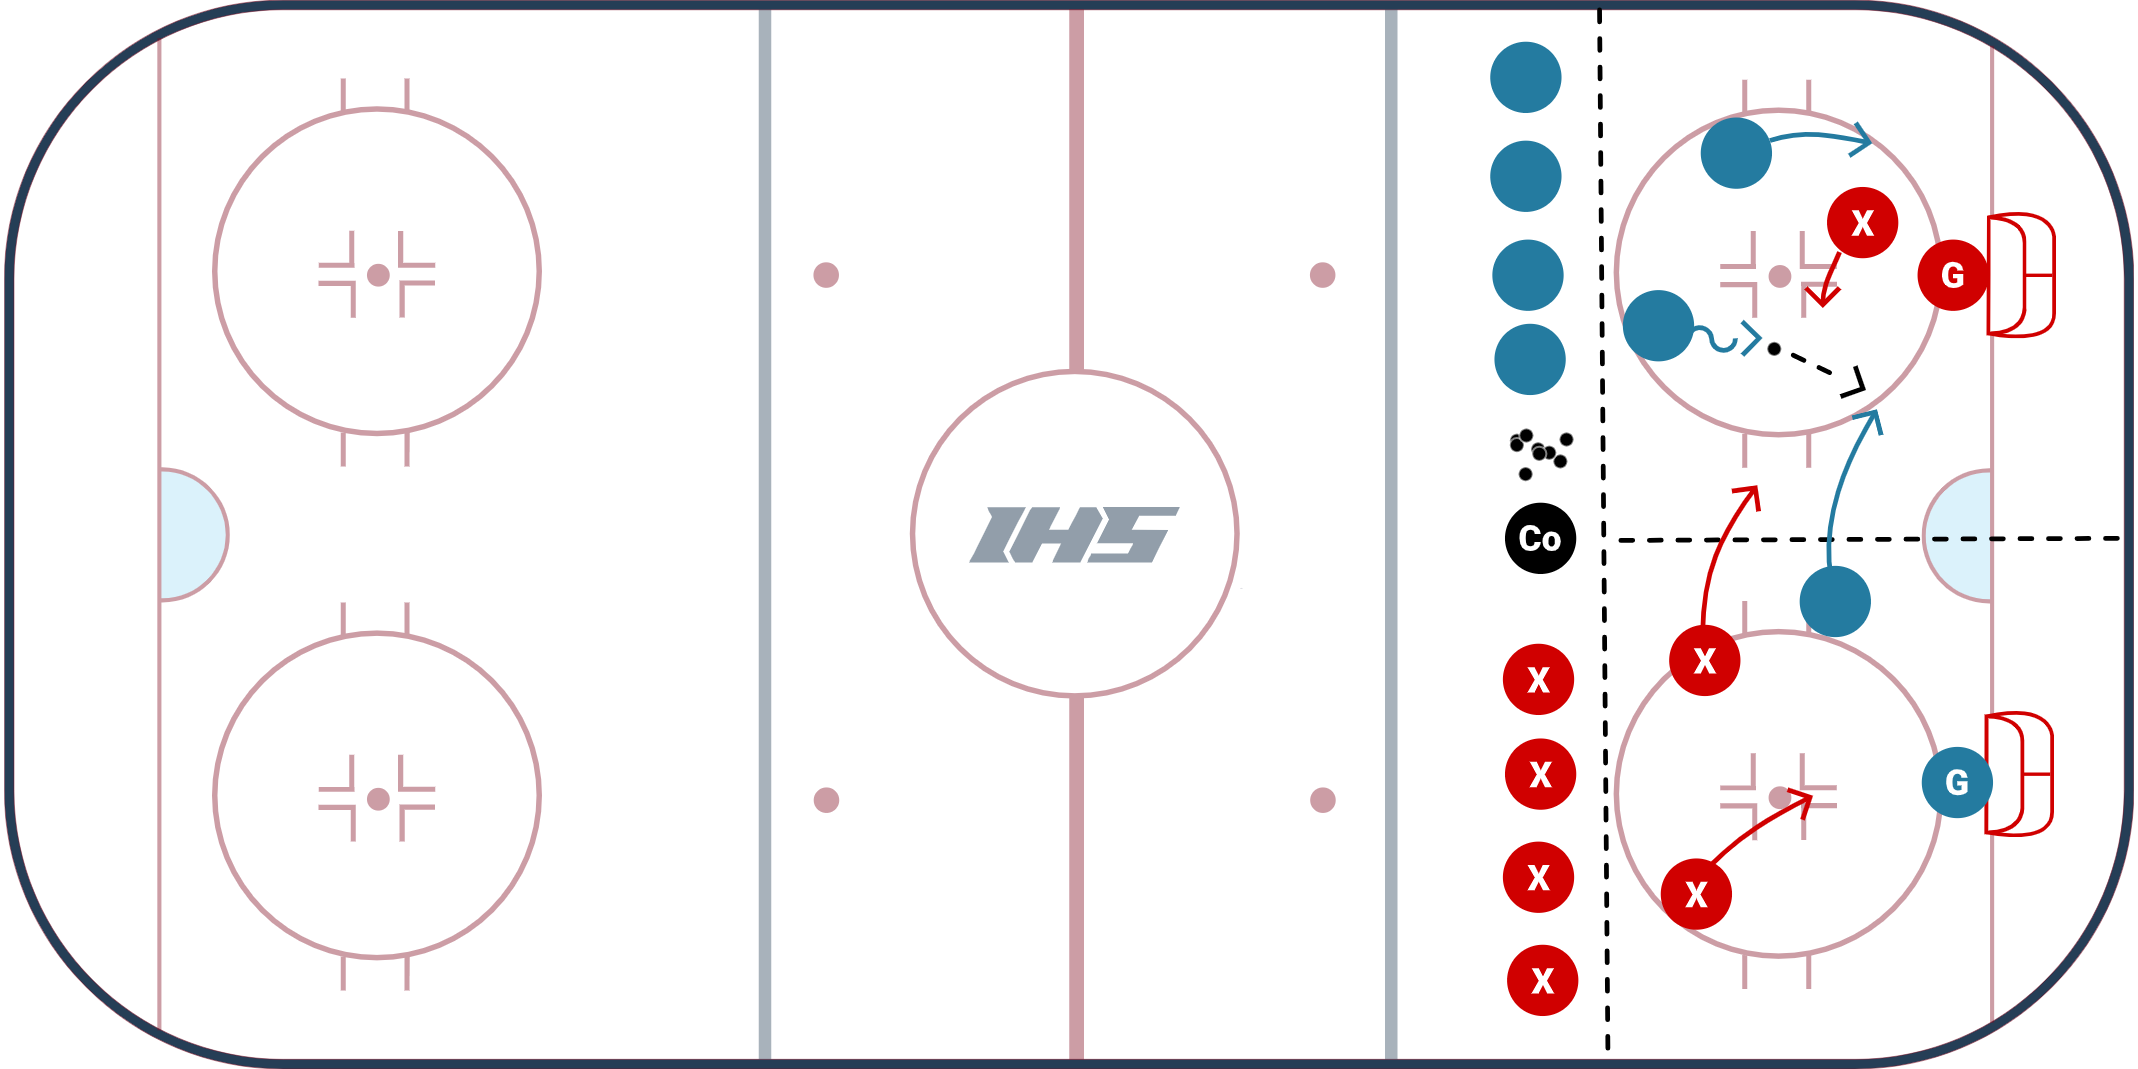
This Offensive Advantage small area game by Kendall Coyne Schofield is a great way to work on skills, scoring and multiple decisions in small spaces. The activation element of this game requires players to be alert, make quick decisions and communicate. Depending on the decisions made by the players, this can be a 2 v1, a 3 v 1 or a 3 v 2 at any given point. Players need to be mindful when activating as they are leaving an opposing player (or two) all alone with the threat to score.
Set Up
- Setup 2 nets, both on the goal lines (as shown in the diagram above)
- Draw a line (or use cones/tires) across the tops of the circles
- Draw a line (or use some cones/tires) across the middle of the zone between the top of the circles and the end boards (through the crease)
- Have 2 players on offense and 1 player on defense on each side of the ice
- Have coaches at the top of the circle (in the middle of the ice) with a pile of pucks
Game
Play a game up to a certain number of goals, team "X" vs team "O"
- Coach should dump the puck in the middle so players have to battle to get it to their side
- The game starts as a 2 v1 on which ever side the puck is on
- At any point, the defensive player on the opposite side can activate over to his or her team's side to make it a 3 v 1
- If the defensive player activates over to the other side, one of the forwards from that original side can join if he or she wants to make it a 3 v 2
- Players do not have to activate if they don't wish to
- At least one offensive player must always remain on their half of the ice
- If the puck crosses the tops of the circles, the coach should put in a new puck
- Coach can rotate in new players as he or she sees fit
- Keep score
Above the top of the circle, the puck is out and the coach needs to put a new puck in
Coaching Points
- Decision Making - players without the puck need to make smart decisions on whether or not to activate to the other side
- Communication - your teammates need to be on the same page to take advantage of the opportunities that present itself with this setup
- Quick Release- the setup calls for a constrained space where players need to use quick releases and one touch passing to create scoring opportunities
Griffs 2 V 2 Game
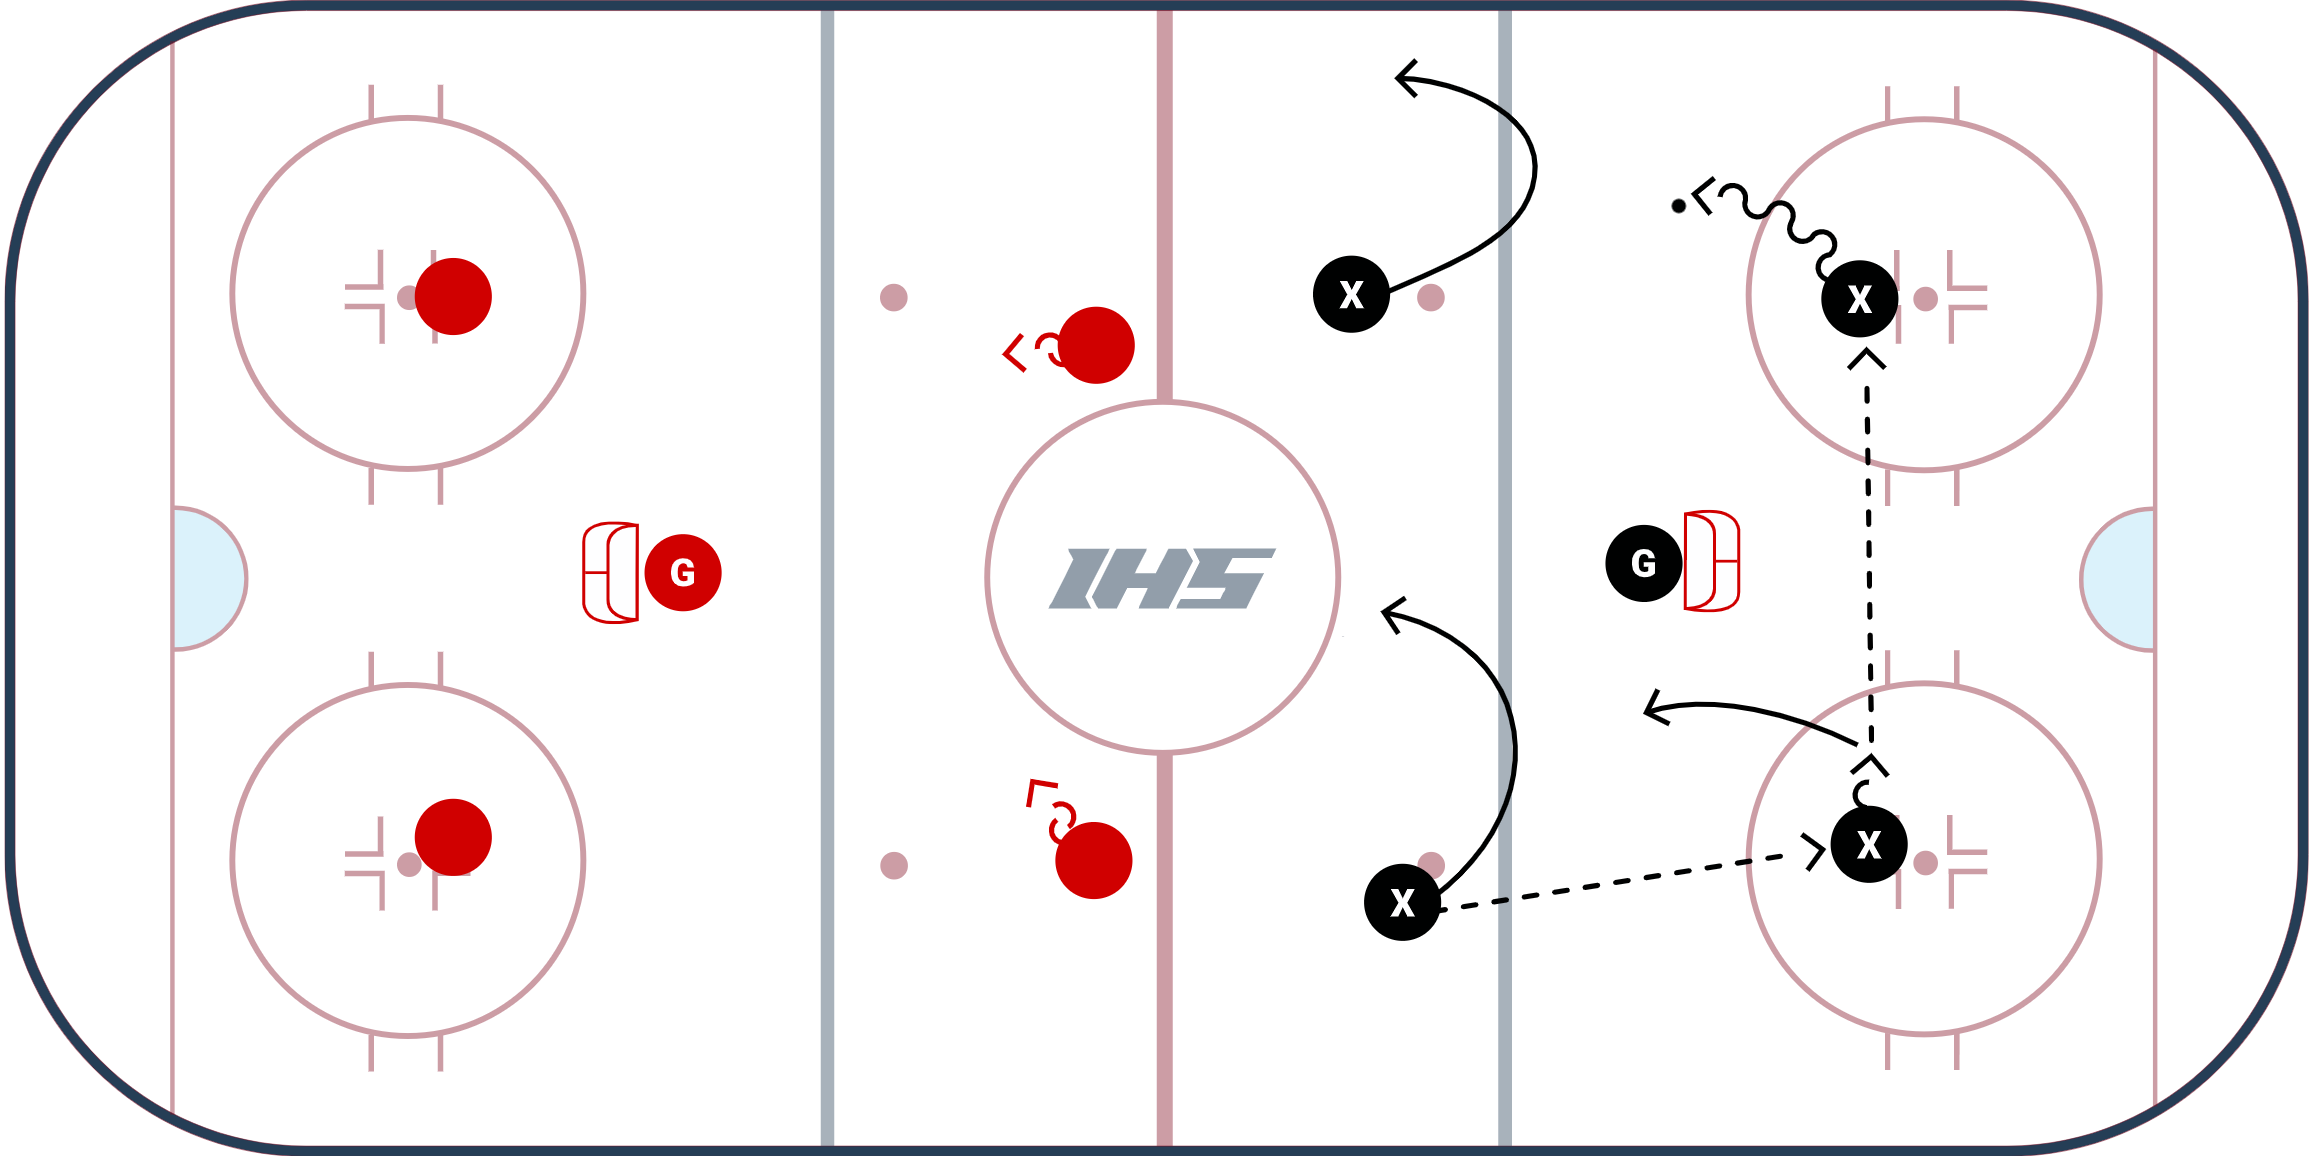
The Griffs 2 V 2 Game from Coach TJ Manastersky was shared with the IHS Community while he was an Assistant Coach at Union College. TJ is the Current Head Coach at Brock University in St. Catharines, Ontario. Griffs 2 V 2 can be used to emphasize neutral zone transition and fundamentals of rush attack.
Setup
- Move nets to the top of the circles as shown in the diagram & videos.
- Setup a 2 on 2 in the neutral zone.
- Each team has 2 defenseman behind their net, just above the face-off dots.
- The forwards in the neutral zone do not need to use their defenseman. However, if they do, it creates an automatic D to D pass, and the defenseman who first received the puck will join the 2 forwards in the neutral zone to create a 3 on 2 rush. The defenseman with the puck tries to hit one of the 3 players to begin the rush.
- The activated defenseman is allowed to stay for the rush but must go back to their original position after the rush is completed.
- After the coach blows the whistle to change the lines, the forwards leave the ice, the defenders become forwards in the neutral zone, and two new players for each team become defenders.
Coaching Points
- Players with the puck need to communicate with each other to get open and provide support.
- On the rush attempt, it is beneficial to have a middle lane drive, wide lane support and the puck wide so there are multiple options off of the rush.
- Defenders need to make sure to keep their sticks on the ice to block passing lanes and angle the opposition.
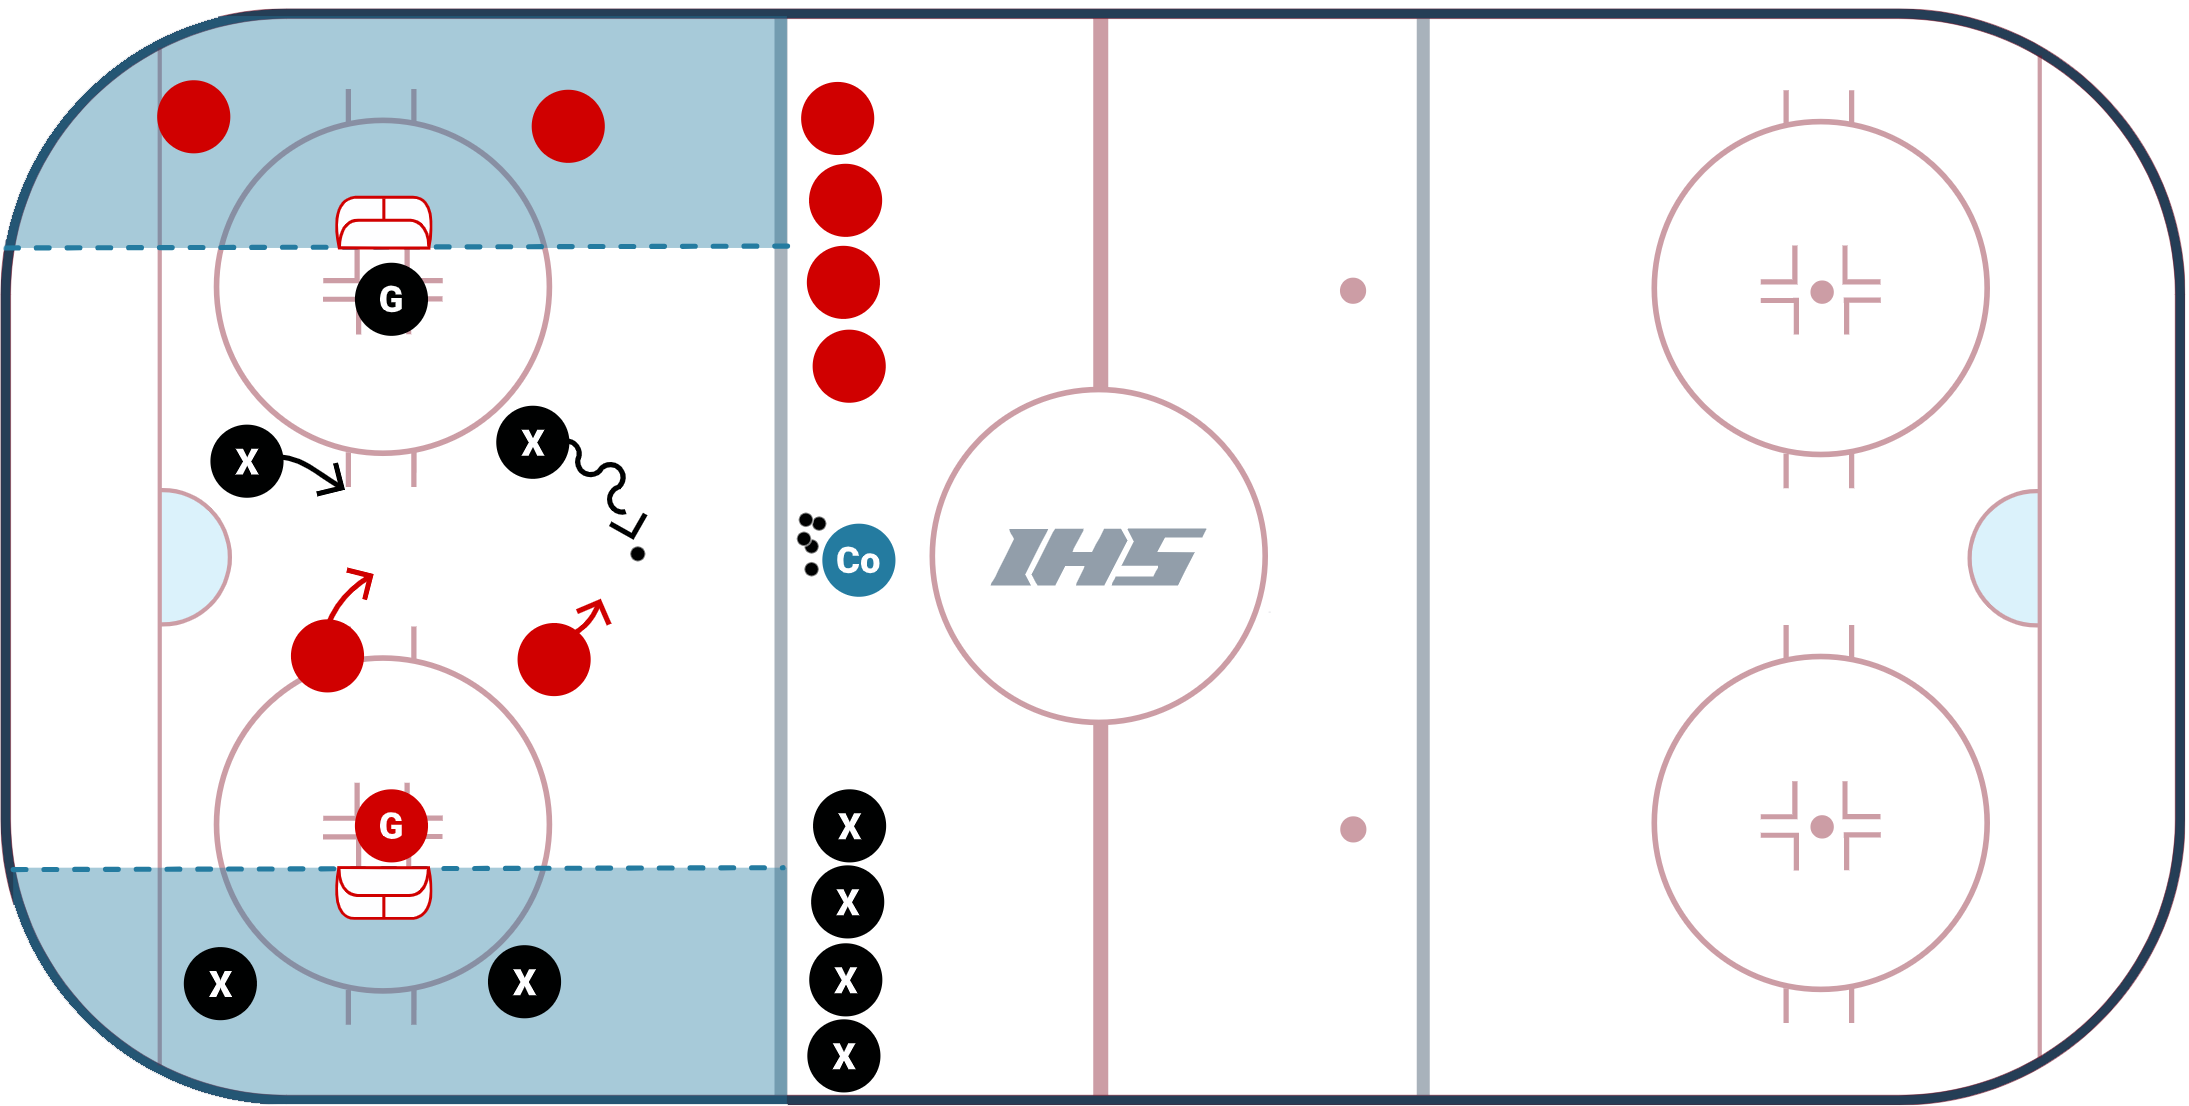
Poker 2 V 2 Game
Description
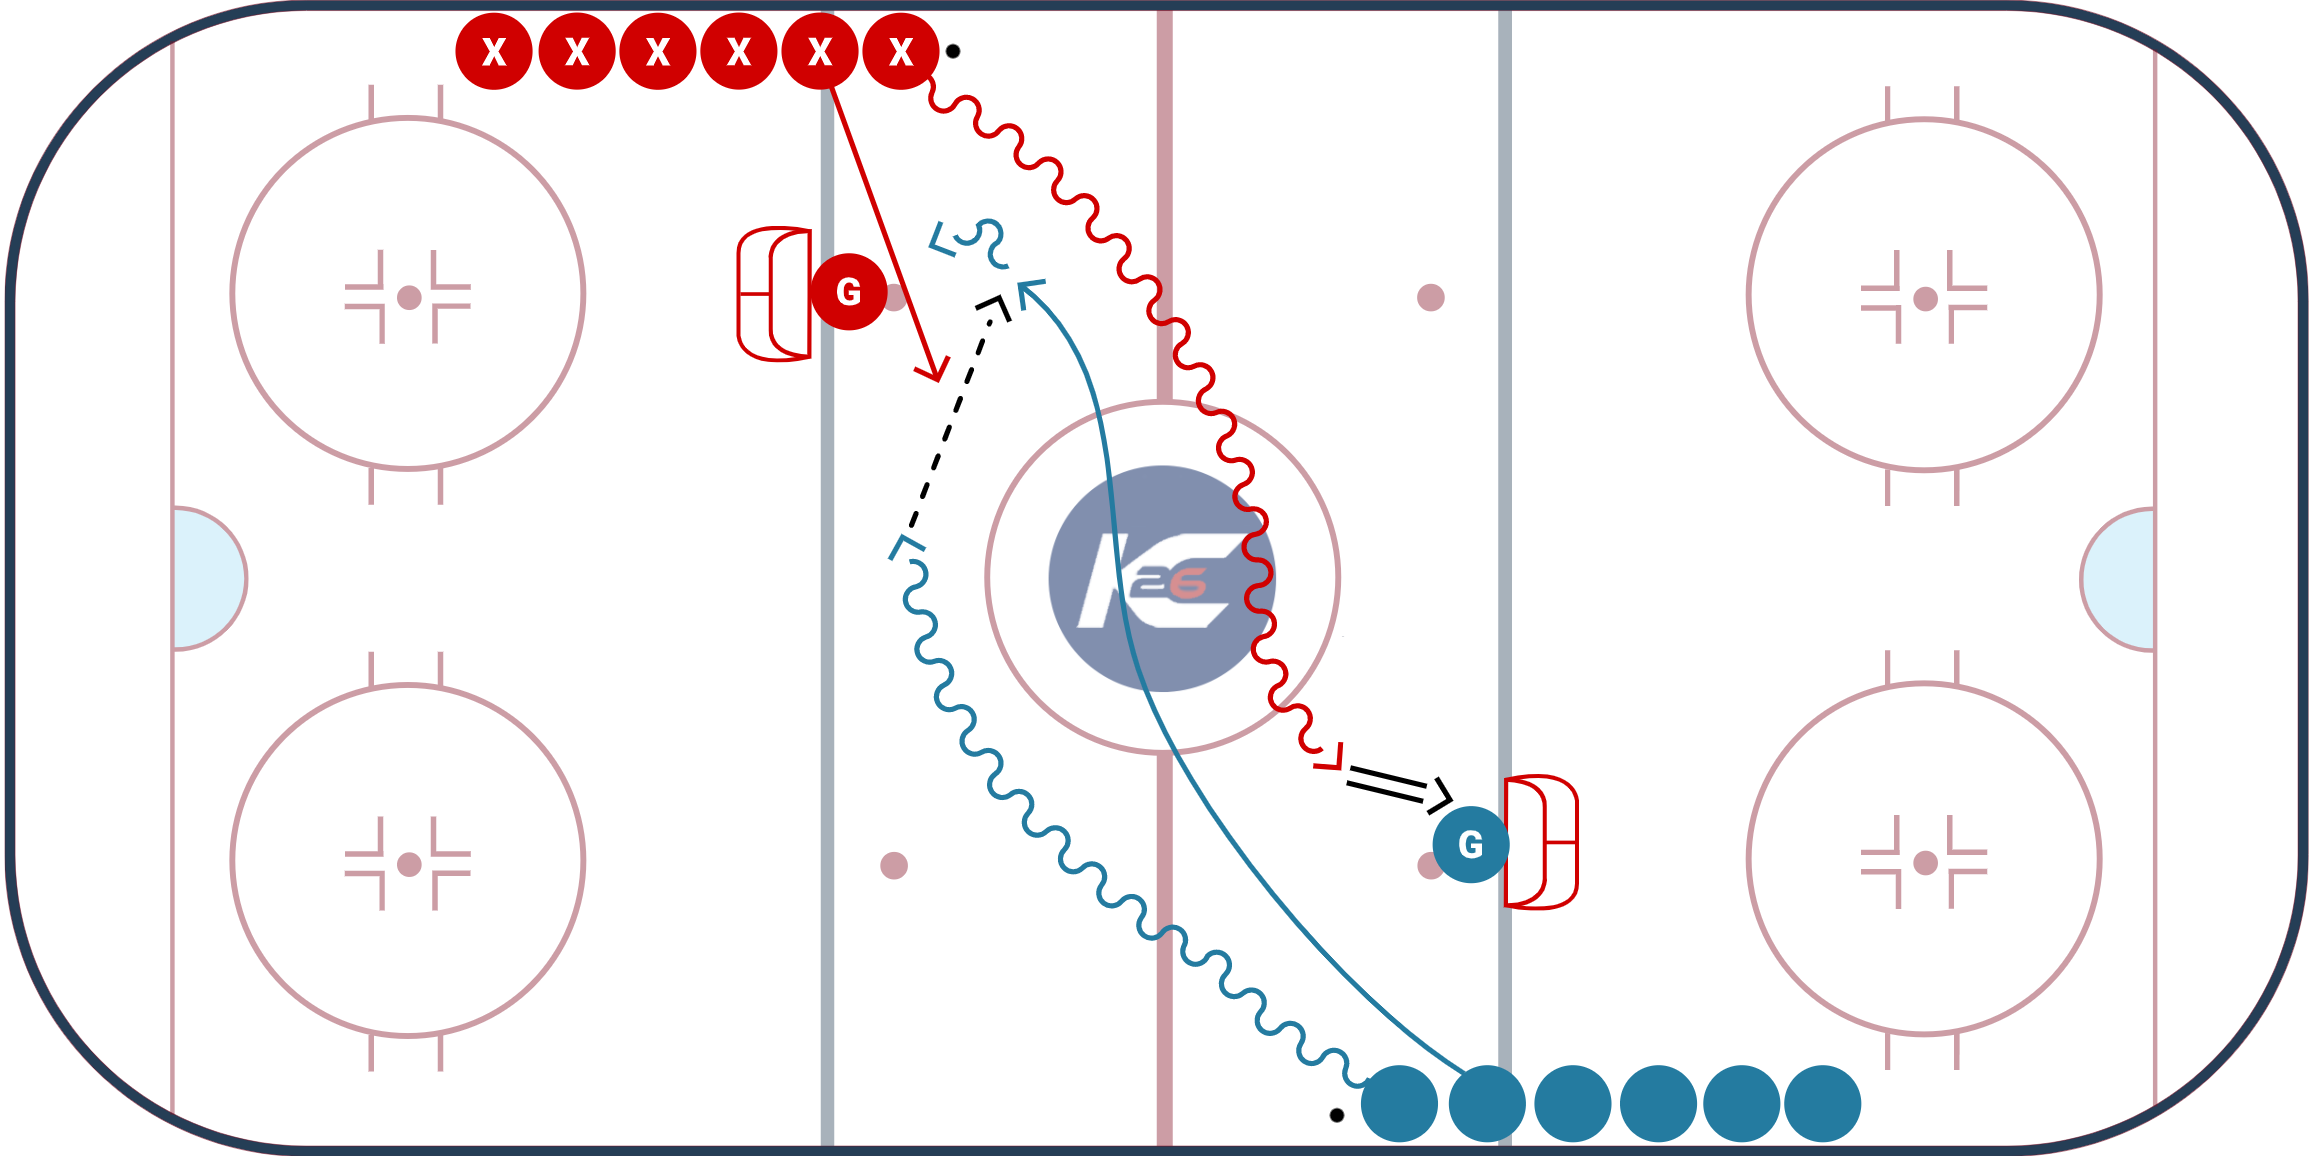
The Poker 2 v 2 game from Kendall Coyne Schofield is a high risk/high reward game that involves two pucks. Players need to make decisions as soon as the game starts and be on alert as the game plays out.
Set Up
- 1 net should be placed along each blue line in line with the neutral zone face-off circle (facing center ice)
- Players from team "X" should be lined up along the boards near one blue line
- Players from team "O" should be lined up along the boards on the other side of the ice and opposing blue line
- Goalies should be in each net
- Pucks should be at the front of each line
Game
Play a game up to a certain amount of goals, team "X" vs team "O"
- On the whistle, 2 players from each team leave their line with one puck
- Each team is trying to score on the opposing net while defending their own net
- Players on each team determine how they try to score a goal or how they try to defend a goal
- Both players can go in attack mode, 1 player can stay back an defend or both players can attempt to defend while controlling their puck
- The entire ice surface is open for the players in the game and they can switch between attacking and defending whenever they wish
- The puck can be cleared anywhere on the ice surface
- If the goalies makes a save, they can send the puck wherever they want, which can be a lot of fun for them as the players have to chase it
- As soon as one team scores, the play is over, that team gets a point and the next 2 players in line start on the whistle
- Keep score!
Coaching Points
- Communication - teammates needs to have a plan as soon as the whistle blows and continue to communicate throughout the game
- Keep Your Head Up - awareness is crucial in this game and will dictate your decision making on whether to attack or defend depending on the surroundings
- Active stick - when defending you need to have an active stick, even if you are on the attack and the opposing team is in your vicinity you can defend while attacking
3 v 3 Cross-Ice Scrimmage
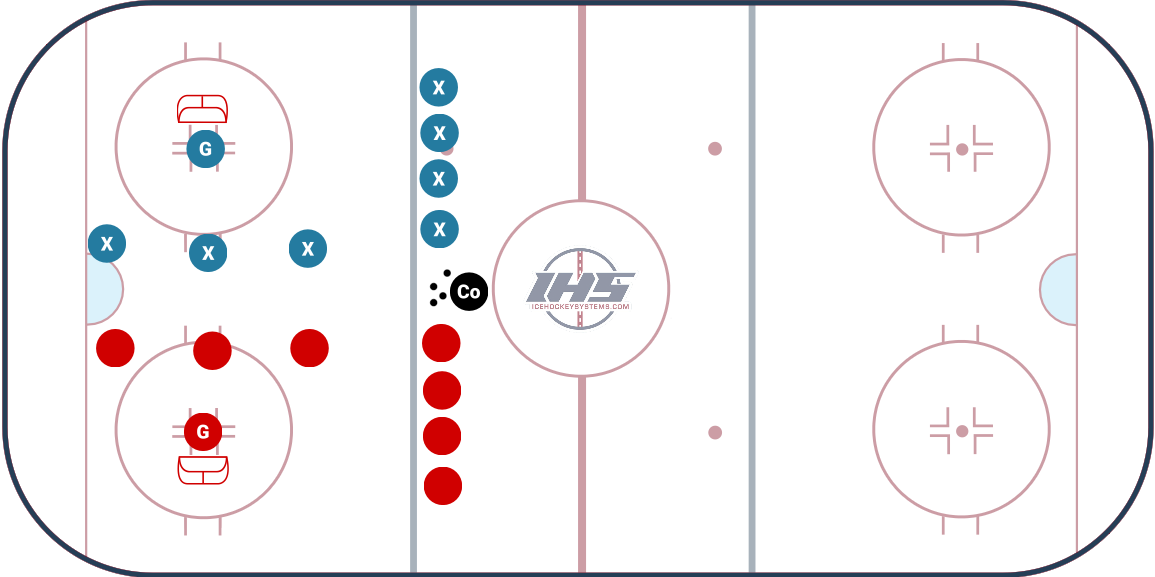
Finish Battle Day with a 3 v 3 Cross-Ice Scrimmage. Encourage players on the blue line to keep the puck in the zone and to cheer for their teammates.
Coaches can award 2 points for specific skills the team is working on. For example - 2 points for a goal that is scored on a one timer. 1 point for a normal goal.
Below we have links of resources you can use to create your own Battle Day.
