U14 - U16+ Quick Transitions Practice
U14 - U16+ Quick Transitions Practice

Please Note: The Practice of the Week is usually designed to be utilized across multiple age levels. With that being said, we highly encourage you to adjust the drills based on your team's age and skill levels. These drills and practices can be modified to become more basic or more advanced.
The drills and games in this practice are designed to help your players work on quick transitions.
Focus Points
These themes for the practice come from Topher Scott's video on Winning the Transition:
Themes
- Starts with Mentality - your team needs to have the mentality to push the pace and play fast when transitioning on offense or back on defense
- Transition offense comes from good defense - creating turnovers creates opportunities on transition because the other team is not set-up in their defensive structure
- Anticipation - players should be aware of when the transition is happening and what your mentality should be on both sides of the puck
Offensive Tips
- Right up fast - as soon as a turnover happens you need to get through the neutral zone fast to attack quickly in transition and catch the defenders off guard
- Changing sides - if you can get right up fast and get the puck to the other side of the ice it can create more time and space and causes even more confusion for the defenders
- Anticipation and communication - identifying when a turnover happens or is about to happen will lead to quick strike attacks
Defensive Tips (transitioning to defend)
- Get back hard through the middle - 3 hard strides to get back
- Great sticks - lead with your stick on the ice and in lanes when getting back
- Communication - verbal and non verbal communication is crucial to sort things out when there is chaos with an attacking transition
Pop Warm Up Drill
The Pop Warm Up Drill is a drill from Topher Scott that is excellent for helping players warm up in the beginning of practice. It helps to get the hands and feet going while also working on transitions, passing, shooting and screens.
Setup:
- This is a full ice drill that goes out of both ends.
- Have a bunch of pucks in the neutral zone circle.
- Forwards are lined up against the boards on each of the blue lines. Defense are lined up in the middle of the ice facing the neutral zone circle
- On the whistle, the defenseman picks up a puck from the neutral zone, and hits a forward with a pass on their left side, who goes down the ice to take a shot. The defenseman picks up a second puck at neutral ice and hits the forward on their right side, who goes down and takes a shot. Then the defenseman picks up one last puck from the neutral zone circle, performs an escape and then skates down the ice to take a shot on net. The two forwards who took a shot can stay in front of the net to try to tip the puck.
Coaching Points:
- Communicate verbally and non-verbally (have stick on ice where you want the pass).
- Head up: both forwards and defencemen should practice keeping their head up during the drill and being aware of their surroundings.
- Skating: when skating up ice with the puck work on cross-overs and stickhandling with headup.
- Shooting: players can work on shooting in stride, or changing their shot angle when shooting the puck.
Variations:
- Coaches can be in the neutral zone so defencemen and forwards have an object they need to pass & skate around.
- Players can work on different shooting techniques.
- Defenceman can work on different escapes.

NEHDA Loop N Drive - 4 Part Progression
NEHDA Loop N Drive from Rob Sedia of NewEdge Hockey is a 4 Part Progression that works on a variety of passing, shooting, timing & transition skills.
Setup (Progression # 1)
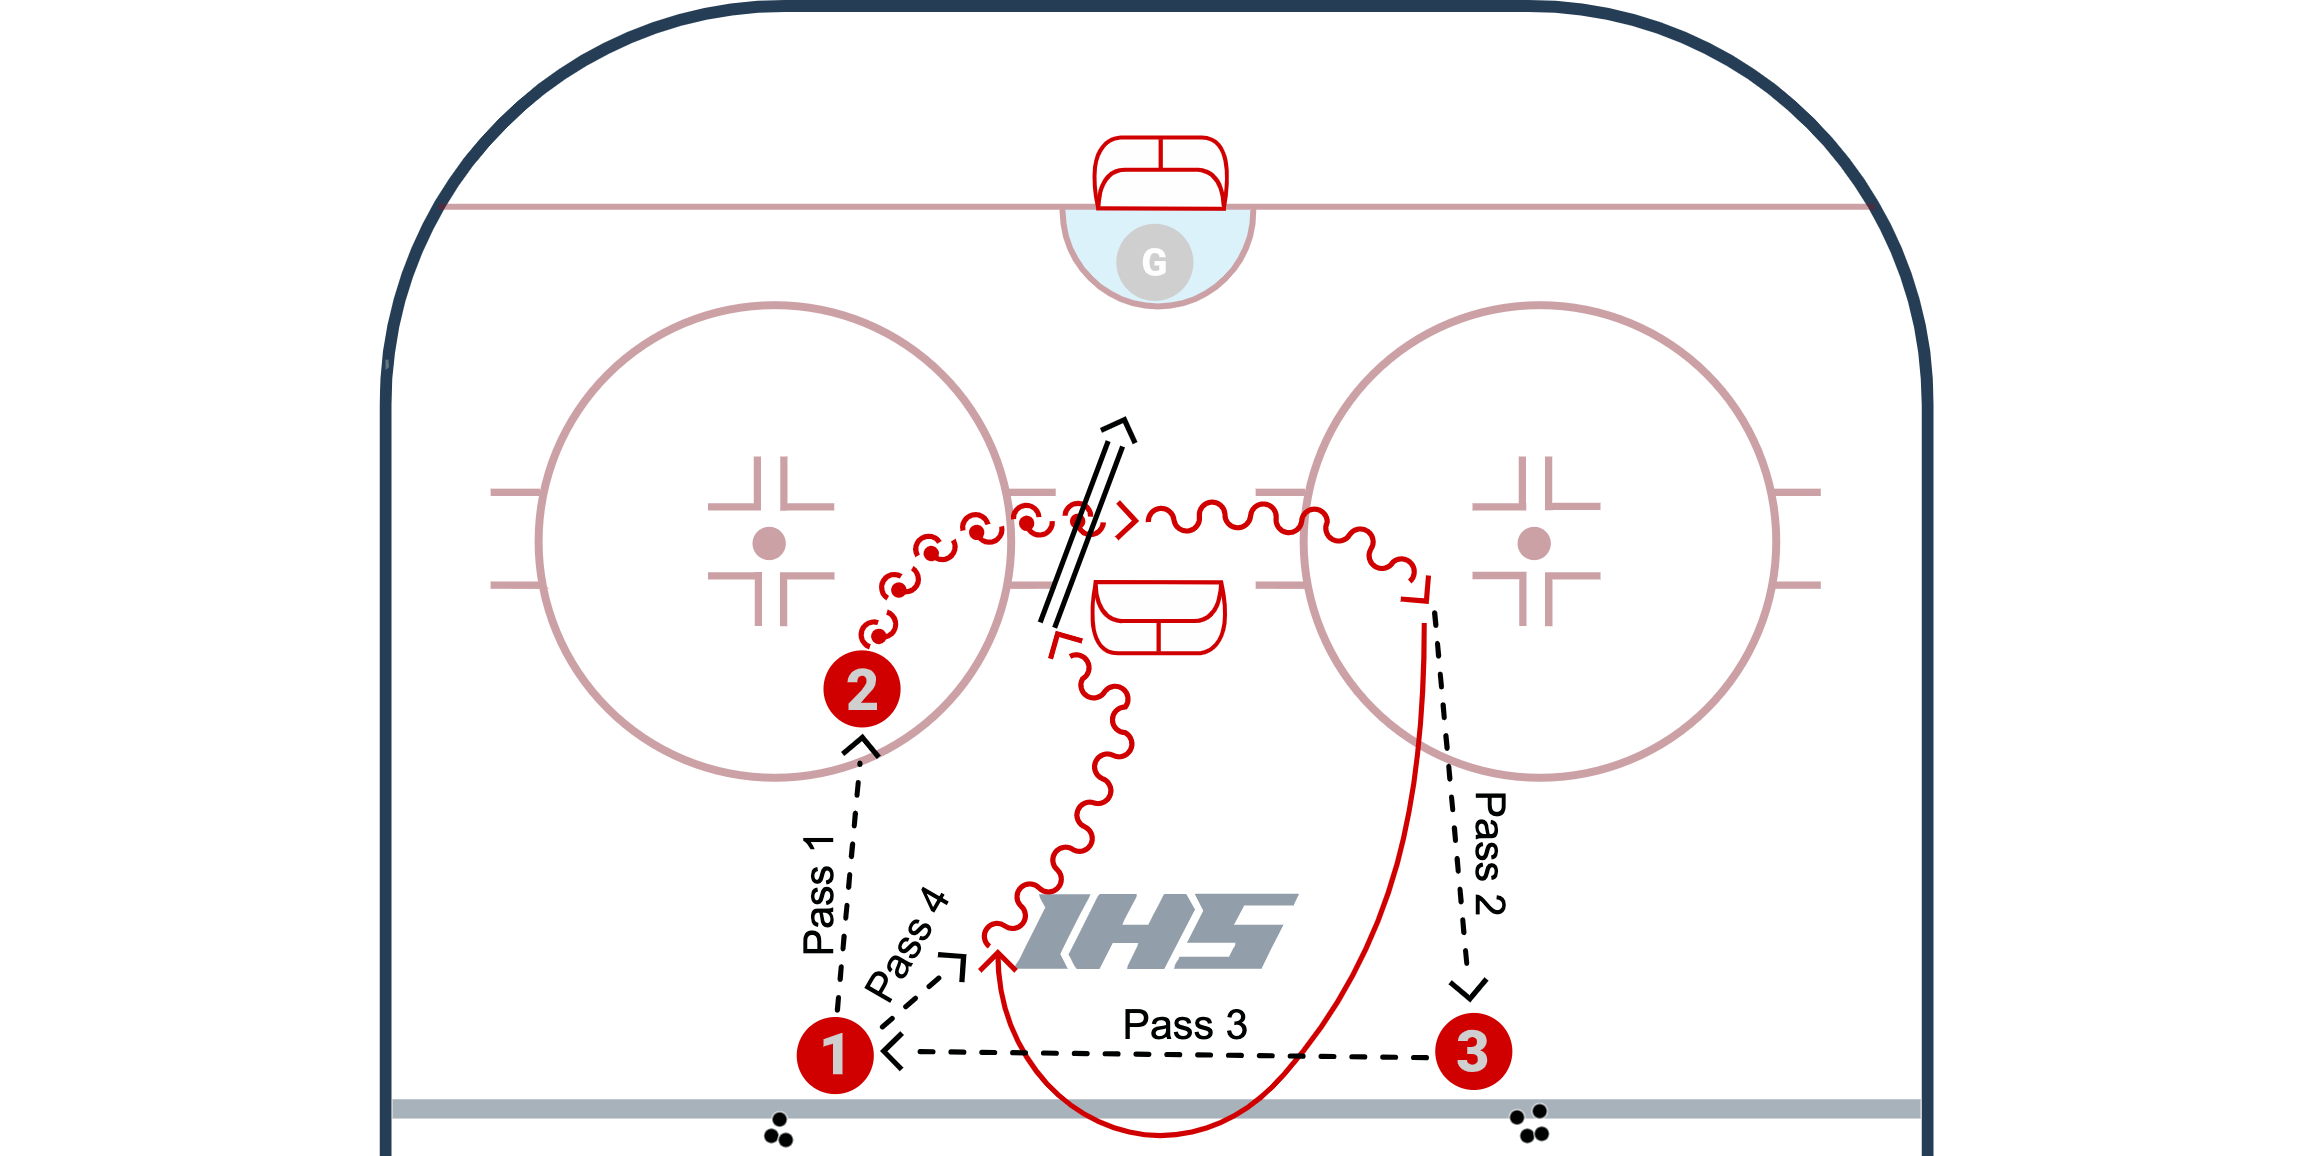
- Place one net flipped around at top of the slot (as pictured in the diagram)
- Players line up inside the blue line, inside the face-off circles
- On the whistle, player 2 starts to skate backwards and receives a pass from player 1.
- Player 2 skates around the net with their shoulders, heads, and eyes facing up ice so they can see the whole ice in front of them.
- Player 2 makes a pass to player 3. Player 3 passes quickly to player 1 while player 2 touches the blue line and drives back into the zone.
- Player 1 passes to player 2, who drives the net in the slot, then makes a weight shift move and fires a puck on net.
Progressions
The coach can use this setup to work on different escapes, and shooting skills. The progressions shown in the video are listed below:
- Progression # 1: Loop & drive and perform a weight shift move around the net before shooting.
- Progression # 2: Grab the puck & go up ice quickly with a fake slap shot around the net.
- Progression # 3: Reverse up & pull the puck to change the shot angle around the net.
- Progression # 4: Fake reverse up & shoot the puck with heals towards the boards.
Coaching Points
- Verbal & Non Verbal Communication: call for the puck and keep your stick on the ice to show your teammate where you want the puck.
- Head Up: keep your head and eyes up so you can see the whole ice.
- Skating: Get up and down the ice quickly! Being quick is a mindset.
- Timing: For the player who is driving to the net, make sure to time your zone entry so you can get a pass back. Do not be too far ahead or behind the play.
- Shooting:
- Progression # 1 Weight Shift: Use deception to fake like you are going one way, then shift your weight to explode the other direction.
- Progression # 2 Fake Slap Shot: Use deception to fake a slap shot, then push the puck out wide to change the angle and shoot around a defender & goalie.
- Progression # 3 Change Shot Angle: Pull the puck inside to your skates to change the shot angle.
- Progression # 4 Heals Towards The Boards: Create space from the net / defender by having your heals face the boards, which will pull you away from the center of the ice to create a shooting lane for you.
Variations
- Add a goalie
- Modify - coaches can use this setup to practice a variety of different escapes, and different shots on goal. Change it up based on your teams skill sets.
- Coaches can add pressure at different points in the drill so players are forced to keep their head up.
Defense only. Just do progressions 1 and 2 (unless time permits)
7 Pass Transition Shooting Drill
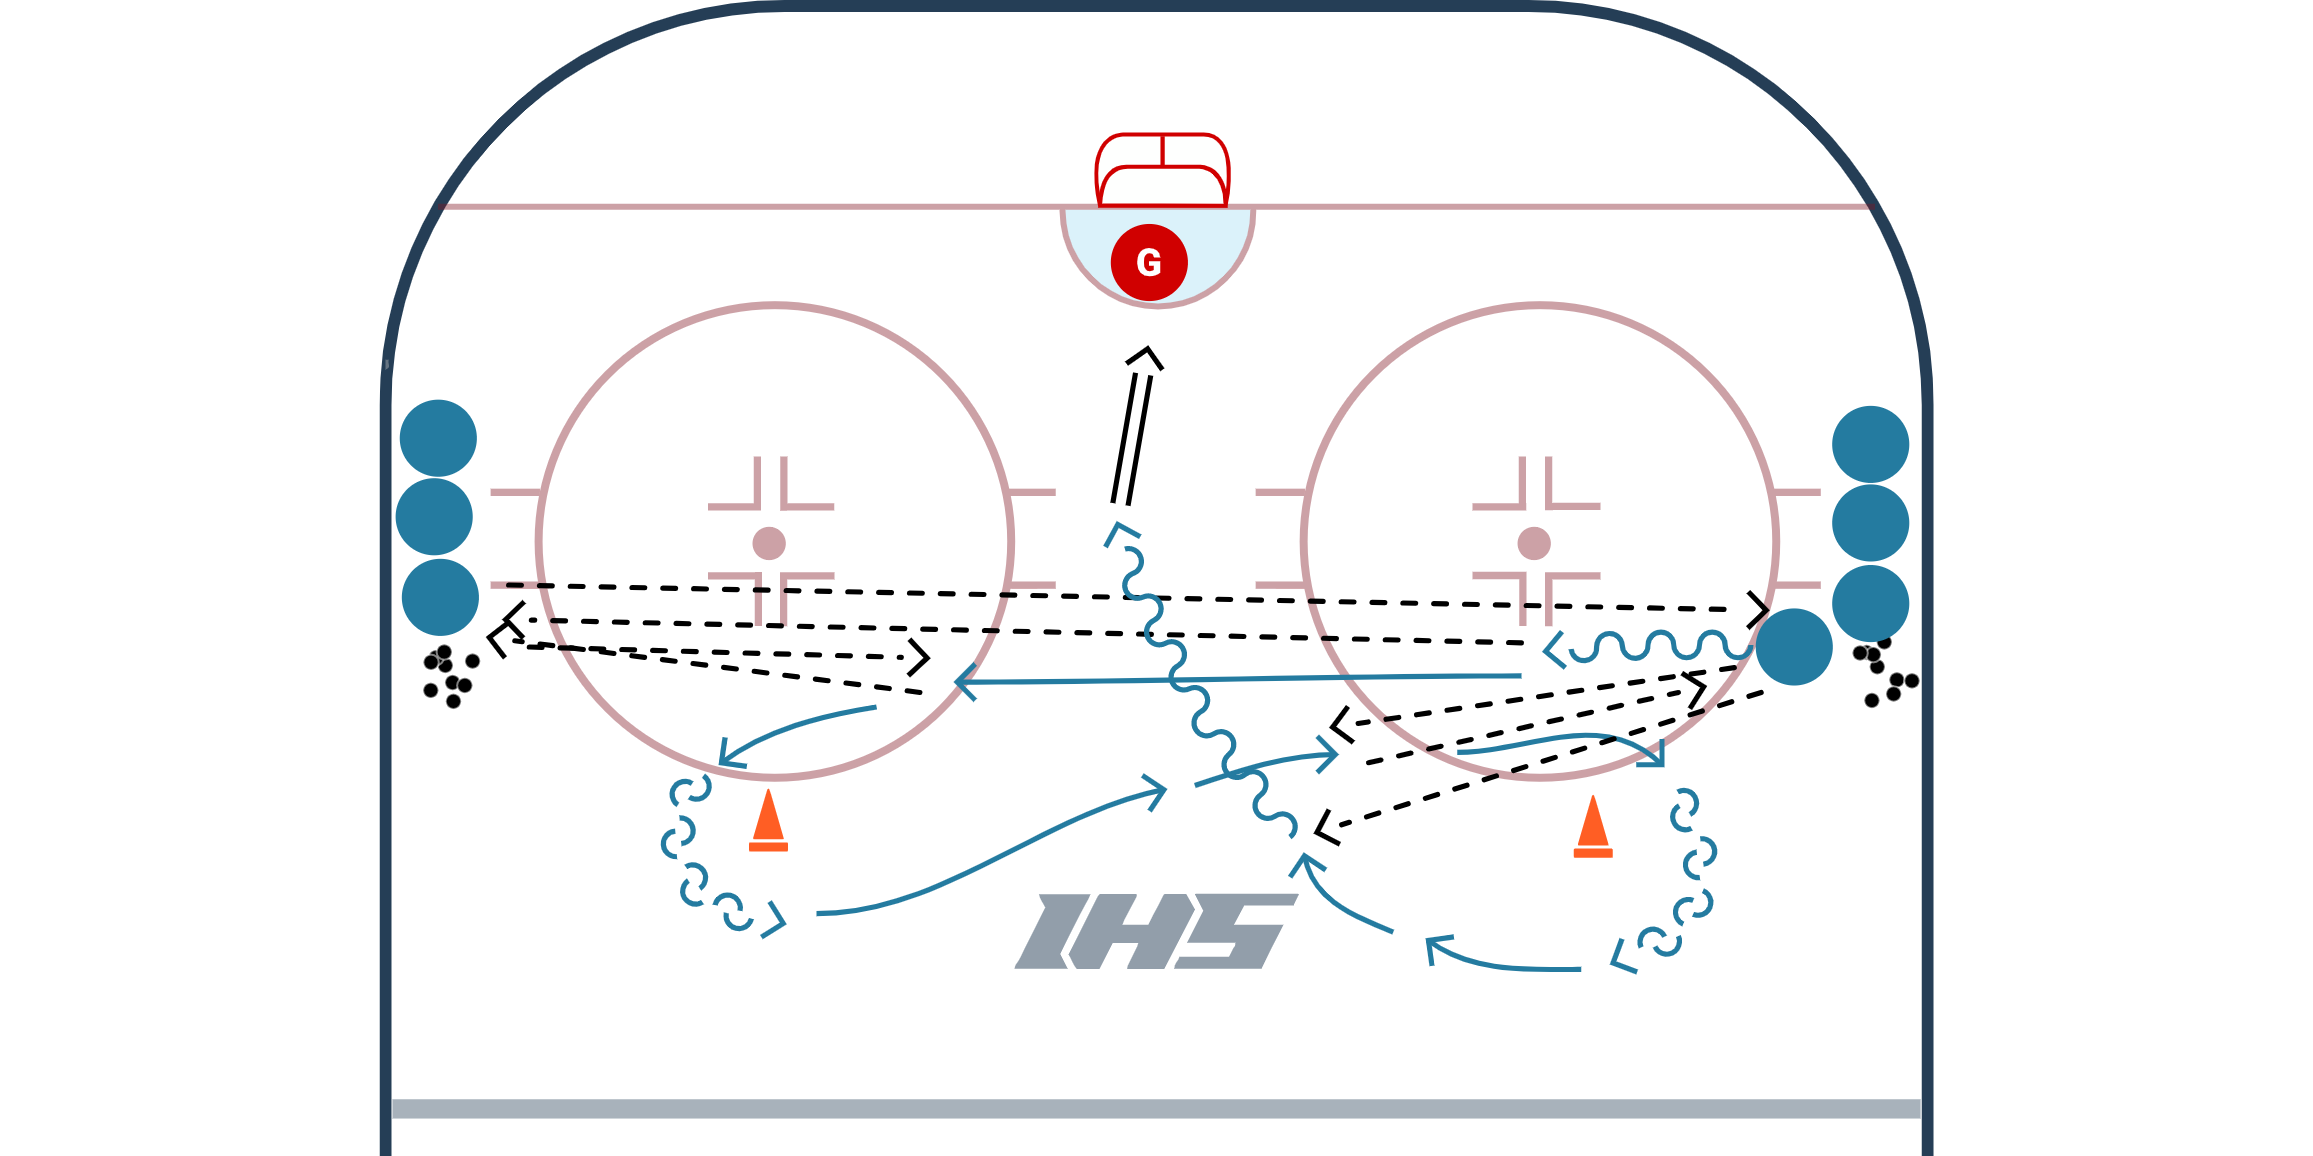
A high tempo hockey drill that works on one-touch passing, transitions, shooting off the pass with quick shots, and following shots to the net. This drill can be setup as a cross-ice drill inside of the blueline (like it is shown in the video above), or set up as a station for shorter passes.
DRILL SETUP
- Can be set up as half ice or as a station (view how it would look as a station at the bottom of this post). A smaller space will provide the opportunity for shorter, quicker passes.
- Players: place players at both sides of the ice on the hash marks of the face-off circle.
- Cones: Place two cones on the top of the face-off circle that players will transition around.
- The 7 Passes: The first player (Player 1) in line will start the drill off by making a pass to the player (Player 2) that is waiting in line on the other side of the ice. Player 1 will skate directly at Player 2, present a target and receive a pass back from Player 2. Player 1 will one touch the pass back to Player 2 and transition around the cone. Player 2 then passes to Player 3 (who was waiting in line behind Player 1) on the other side of the ice. Player 1 will skate directly at Player 3 to receive a pass, and then pass back to player 3. Player 1 transitions around the second cone, receives a pass from Player 3 and looks to get a quick shot on net.
- Variations: Add obstacles that players must shoot around after they receive the 7th pass.
COACHING POINTS
- Players should make flat passes with soft hands. Slapping the puck results in in-accurate passes and wobbly pucks.
- Players should transition while facing the puck at all times.
- Receive and shoot the puck quickly after the 7th pass.
- Quickly shooting in stride or changing the shot angle can help to surprise the goalie.
- Make sure the player follows to the net to look for rebounds.
Below is an overhead view of how the drill looks like when set up in a smaller station space.
Forwards Only
Up and Back Progression Drill
Up and Back 2 Part Progression Drill from Topher Scott is a continuous drill that helps work on the transition and communication. There are two parts of this full ice drill: Part 1 is a continuous 1 vs. 1 that turns into a 2 vs. 2 and Part 2 of the drill is a 2 vs. 1 that turns into a 3 vs. 3. Coaches should reinforce communication, transitioning, and getting back quickly.
Part 1 Setup (1 vs. 1 into 2 vs. 2)
- When the coach blows the whistle, Black F1 & Red D1 begin a full ice 1v1.
- When the coach blows the second whistle Red F2 & Black D2 head down the ice while the first group (Black F1 & Red D1) stop and skate to join the play and make it a 2v2.
- Keep score. This drill is continuous!
View Part 2 of the drill (2 vs. 1 into 3 vs. 3) below

Sens Regroup
The Sens Regroup Drill from Coach TJ Manastersky works on offensive zone concepts and neutral zone transition.
TJ Manastersky shared this game with the IHS Community while he was an Assistant Coach at Union College. TJ is the Current Head Coach at Brock University in St. Catharines, Ontario.
Setup
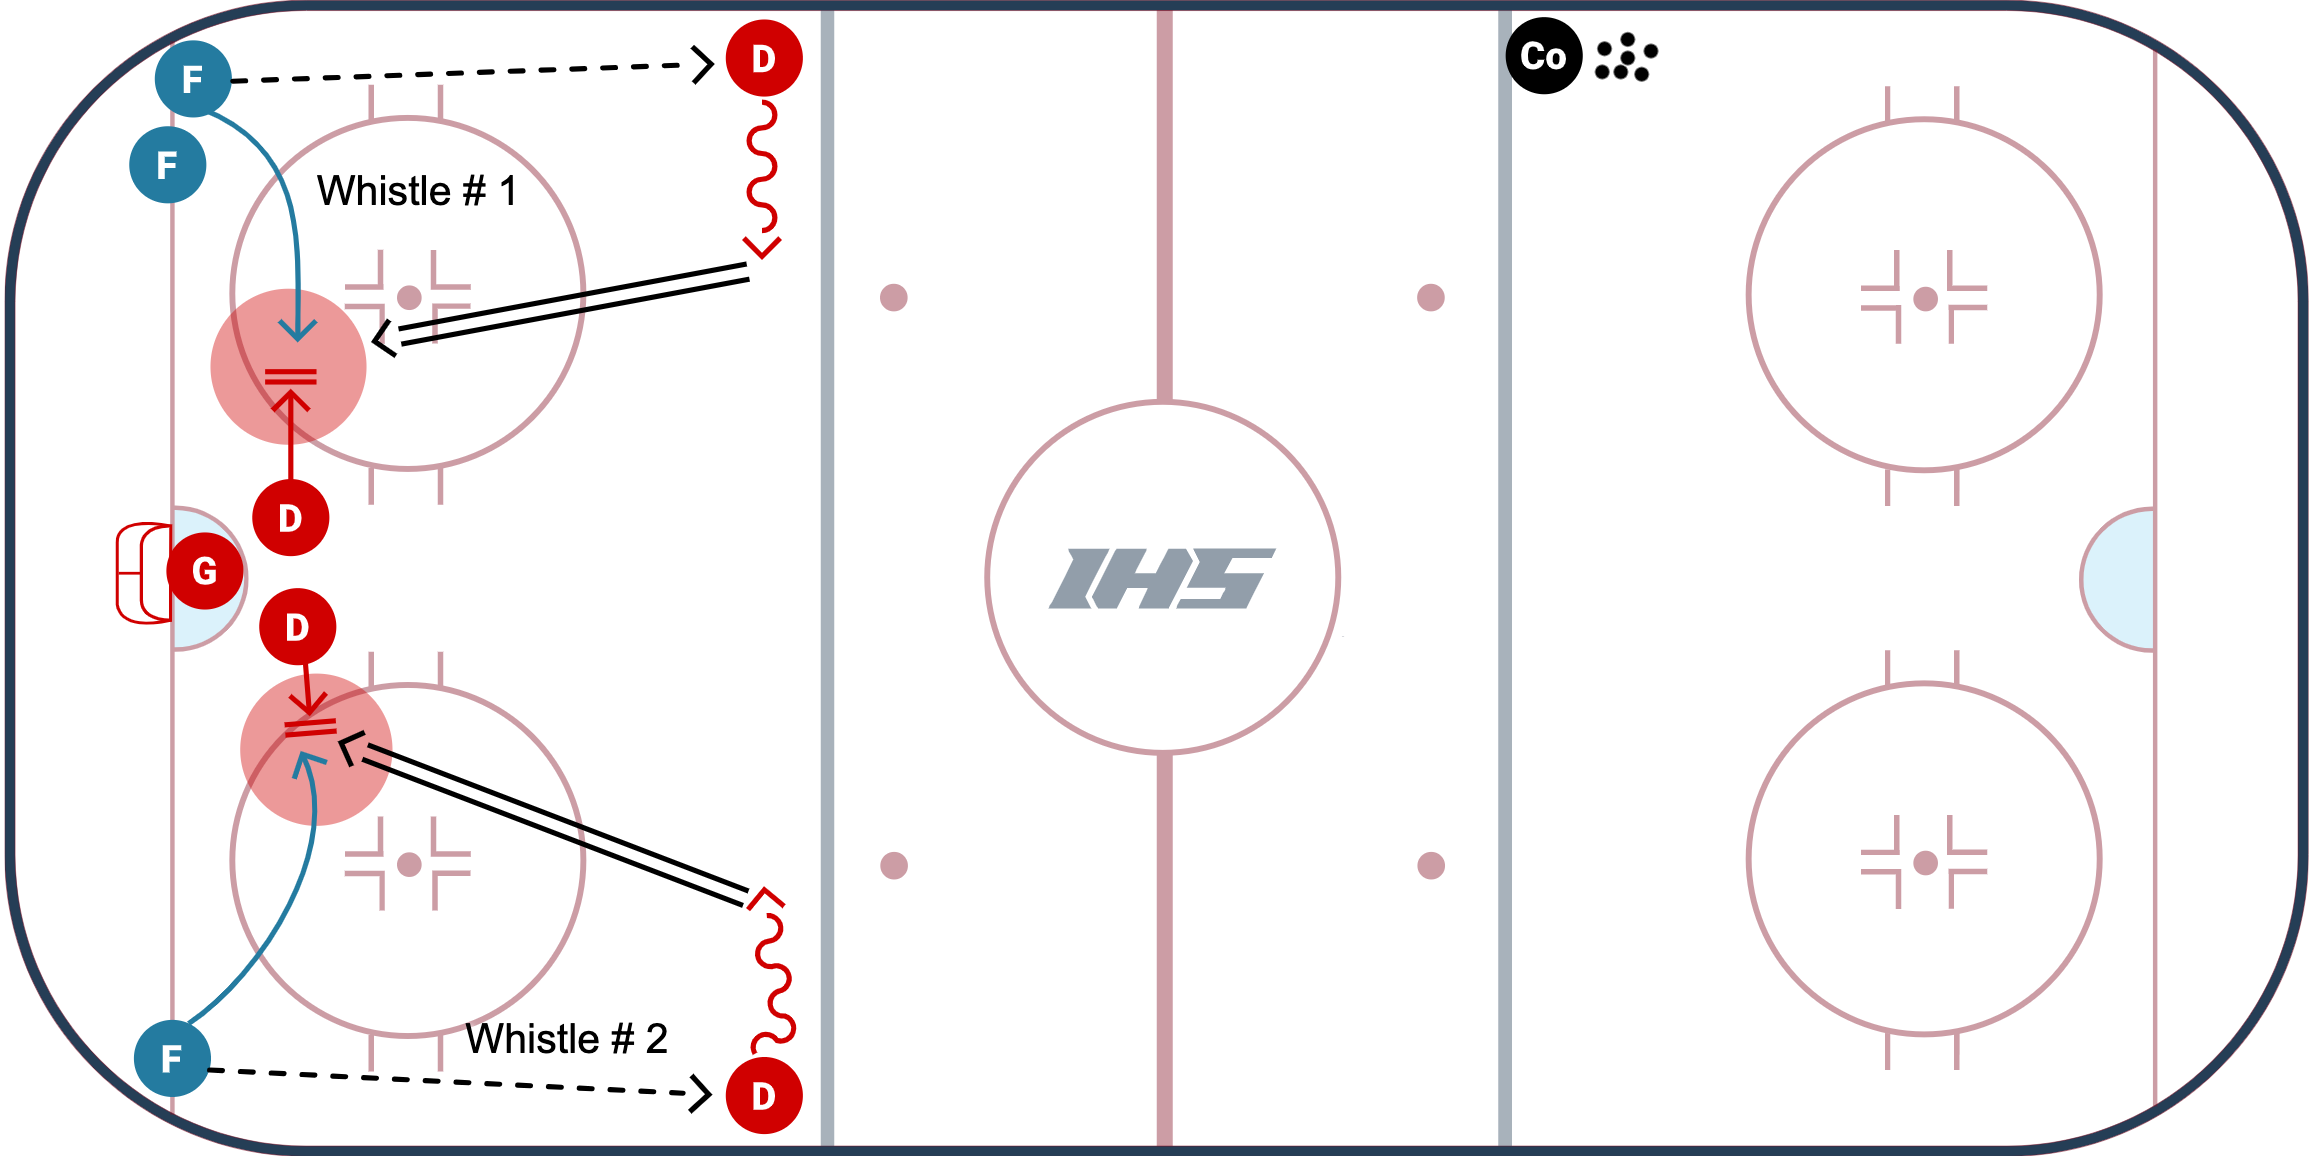
- There are forwards in the corners, two defensemen at the point and two defensemen in front of the net
- On whistle # 1, the forward in the corner passes to the defensemen at the point and begins a net front battle. The defensemen walks the blue line and tries to hit the forwards stick for the deflection.
- On whistle # 2, the same forward to defenseman low to high pass happens, but this time there is a 2 v 2 in front of the net. The defenseman walks the blue line and takes a shot on net.
- On whistle # 3, another forward out of the corner passes low to high to the defenseman at the point, who walks the blue line and takes a shot on net into the 3 v 2 in front of the net.
- On whistle # 4, the coach on the far blue line will spot a puck around the blue line. The defenseman that was at the point jumps back to retreive the puck while the other defenseman jumps in the hole as support.
- The 3 forwards that were battling in front of the net join the defensemen in the neutral zone, while the two defensemen that were in front of the net gap up. This begins a high tempo 3 v 2 rush.
Griffs 2 V 2 Game
The Griffs 2 V 2 Game from Coach TJ Manastersky was shared with the IHS Community while he was an Assistant Coach at Union College. TJ is the Current Head Coach at Brock University in St. Catharines, Ontario. Griffs 2 V 2 can be used to emphasize neutral zone transition and fundamentals of rush attack.
Setup
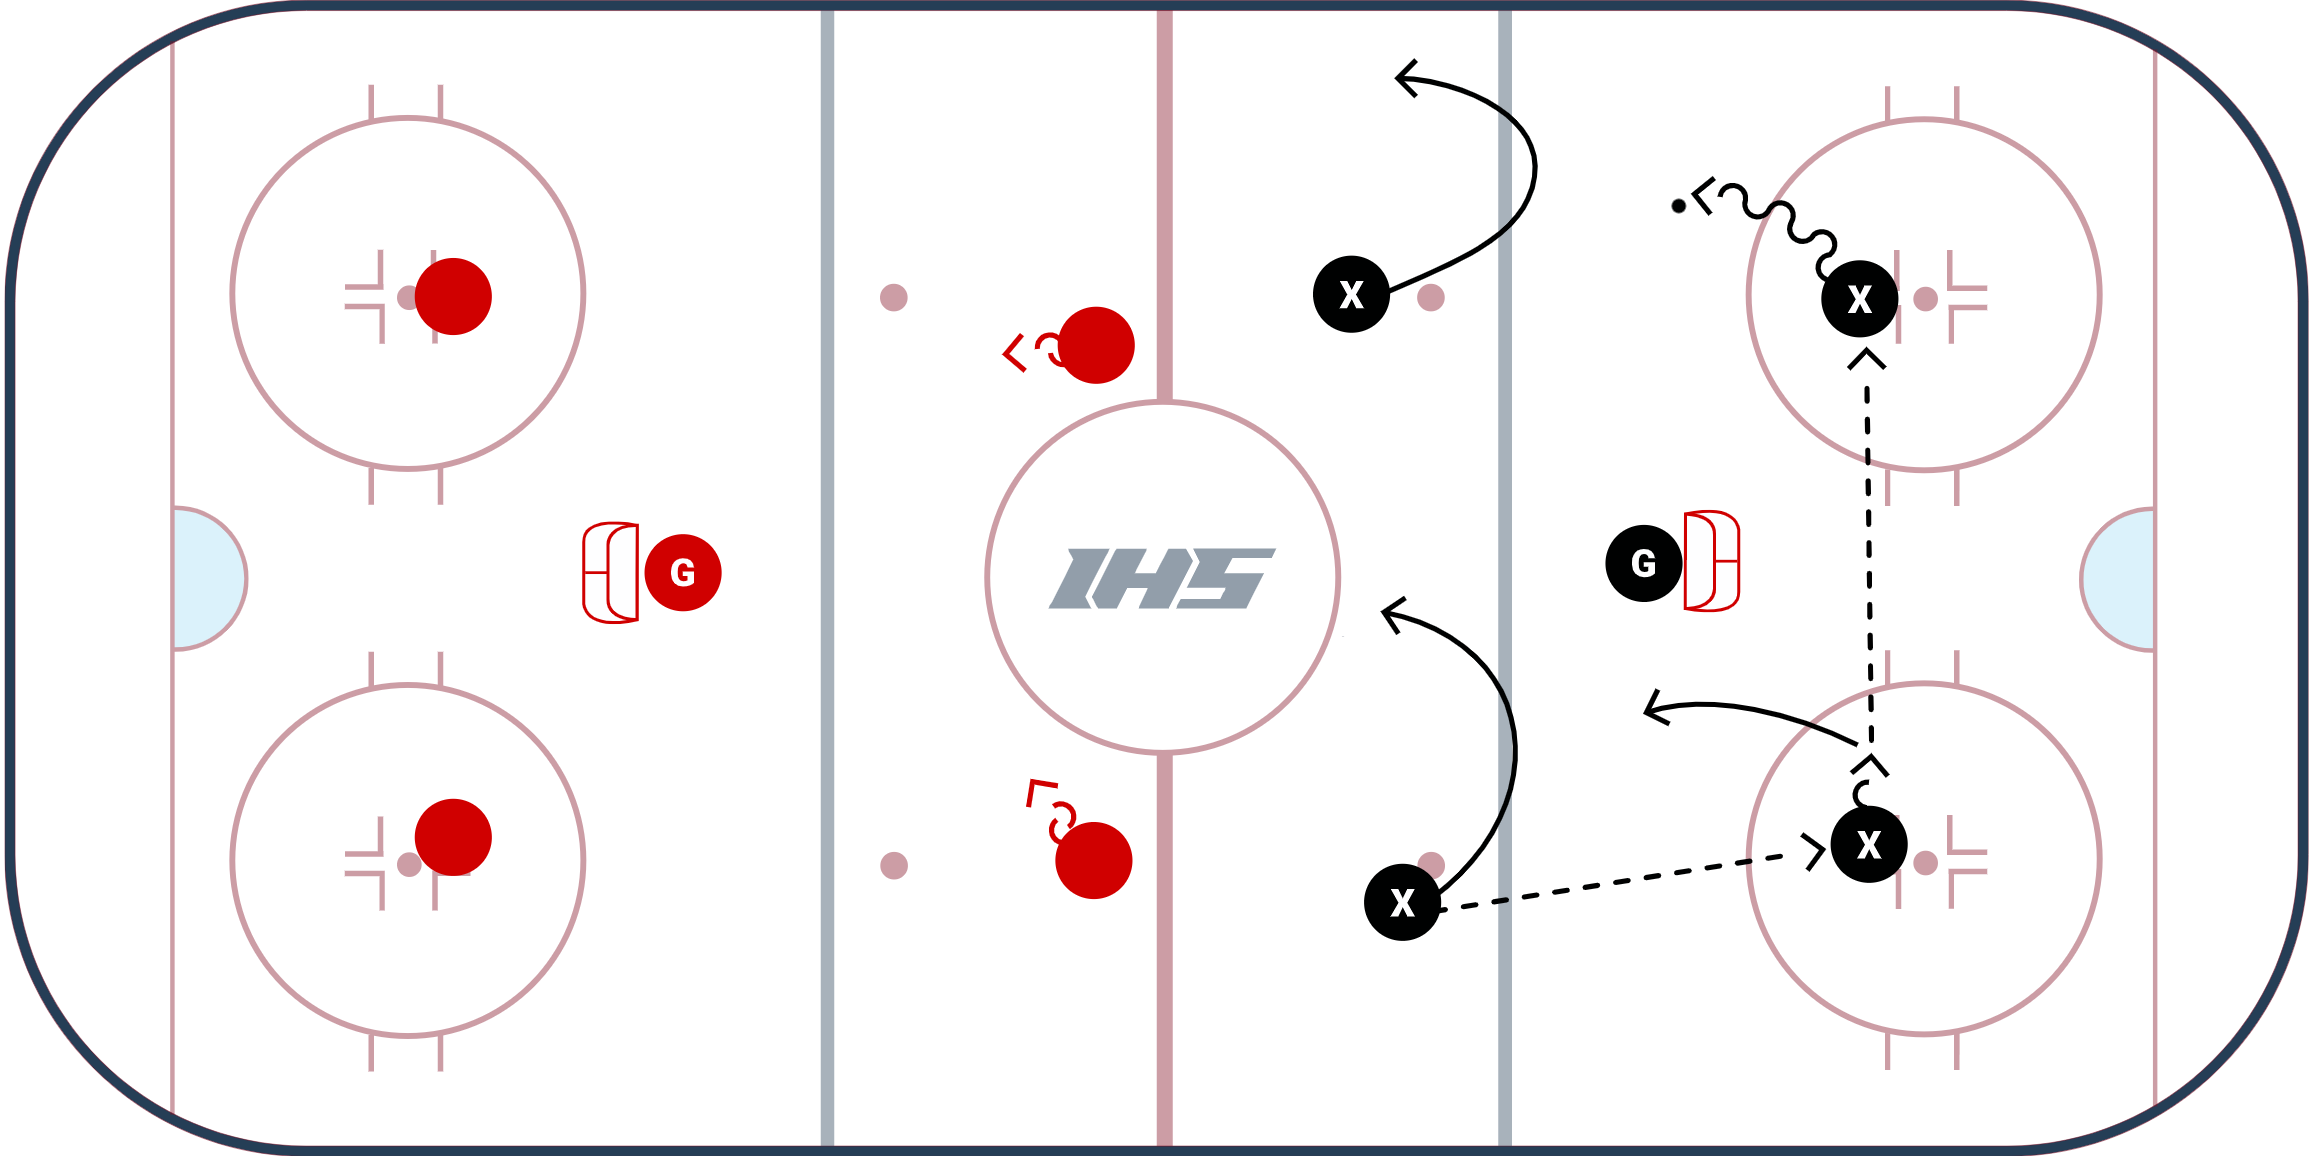
- Move nets to the top of the circles as shown in the diagram & videos.
- Setup a 2 on 2 in the neutral zone.
- Each team has 2 defenseman behind their net, just above the face-off dots.
- The forwards in the neutral zone do not need to use their defenseman. However, if they do, it creates an automatic D to D pass, and the defenseman who first received the puck will join the 2 forwards in the neutral zone to create a 3 on 2 rush. The defenseman with the puck tries to hit one of the 3 players to begin the rush.
- The activated defenseman is allowed to stay for the rush but must go back to their original position after the rush is completed.
- After the coach blows the whistle to change the lines, the forwards leave the ice, the defenders become forwards in the neutral zone, and two new players for each team become defenders.
Coaching Points
- Players with the puck need to communicate with each other to get open and provide support.
- On the rush attempt, it is beneficial to have a middle lane drive, wide lane support and the puck wide so there are multiple options off of the rush.
- Defenders need to make sure to keep their sticks on the ice to block passing lanes and angle the opposition.
How to Perform a Transition Turn
Transistion turns in hockey are necessary any time you need to change direction in the game of hockey. In this video Dwayne Blais discusses how to transition from forwards to backwards.
To break it down into steps:
- Side stop
- Backwards cross-over / backwards start
- Backwards skating into our C-cuts
Coaching Points
- start with a wide base
- Start low (instead of bobing up and down)
- Preferably 1, maybe 2 cross-overs as you transition backwards
- Try to maintain a straight line instead of a wide semi-circle
Bracket Turns for Hockey Players
A bracket turn is a transition turn where you go forwards, backwards briefly, and then forwards going the opposite direction. Let's break it down into 3 steps:
- Come in to start the turn with a wide base and basically do a two foot side stop.
- Roll into a couple of backwards cross-overs (push pull).
- Open up the hips and accelerate using your forward stride in the other direction.
Tips:
- Try to maintain your speed through the turn with your backwards cross-overs.
- Control the stick and upper body.
- Keep the head as level as possible, try to stay away from bobbing up and down.
Additional Transition Resources
- 75+ Transition Drills
- Winning the Transition Webinar by Topher Scott
- U14 Neutral Zone Transitions Practice by Alyssa Gagliardi
- U14 Quick Transitions Practice by Alyssa Gagliardi
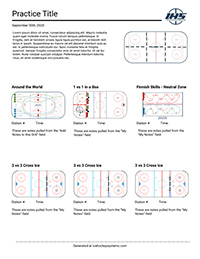
IHS Members can create their own practice plans that look like this. Learn how here
