Rows
Full Width
Grid
Cheat Sheet
U10 / U12 Tournament Teams - Use for level 5
U10 / U12 Tournament Teams - Use for level 5
Sunday, December 17th, 2023
Warmups
- Head Up Scan the Ice
- Chaos 1/2 ice - whistle button hook and go to a circle
Water Break
Stations 15 minutes each
- Adjust constraints as need based on numbers and skills
- Water break after 2nd station
Skating to end the practice

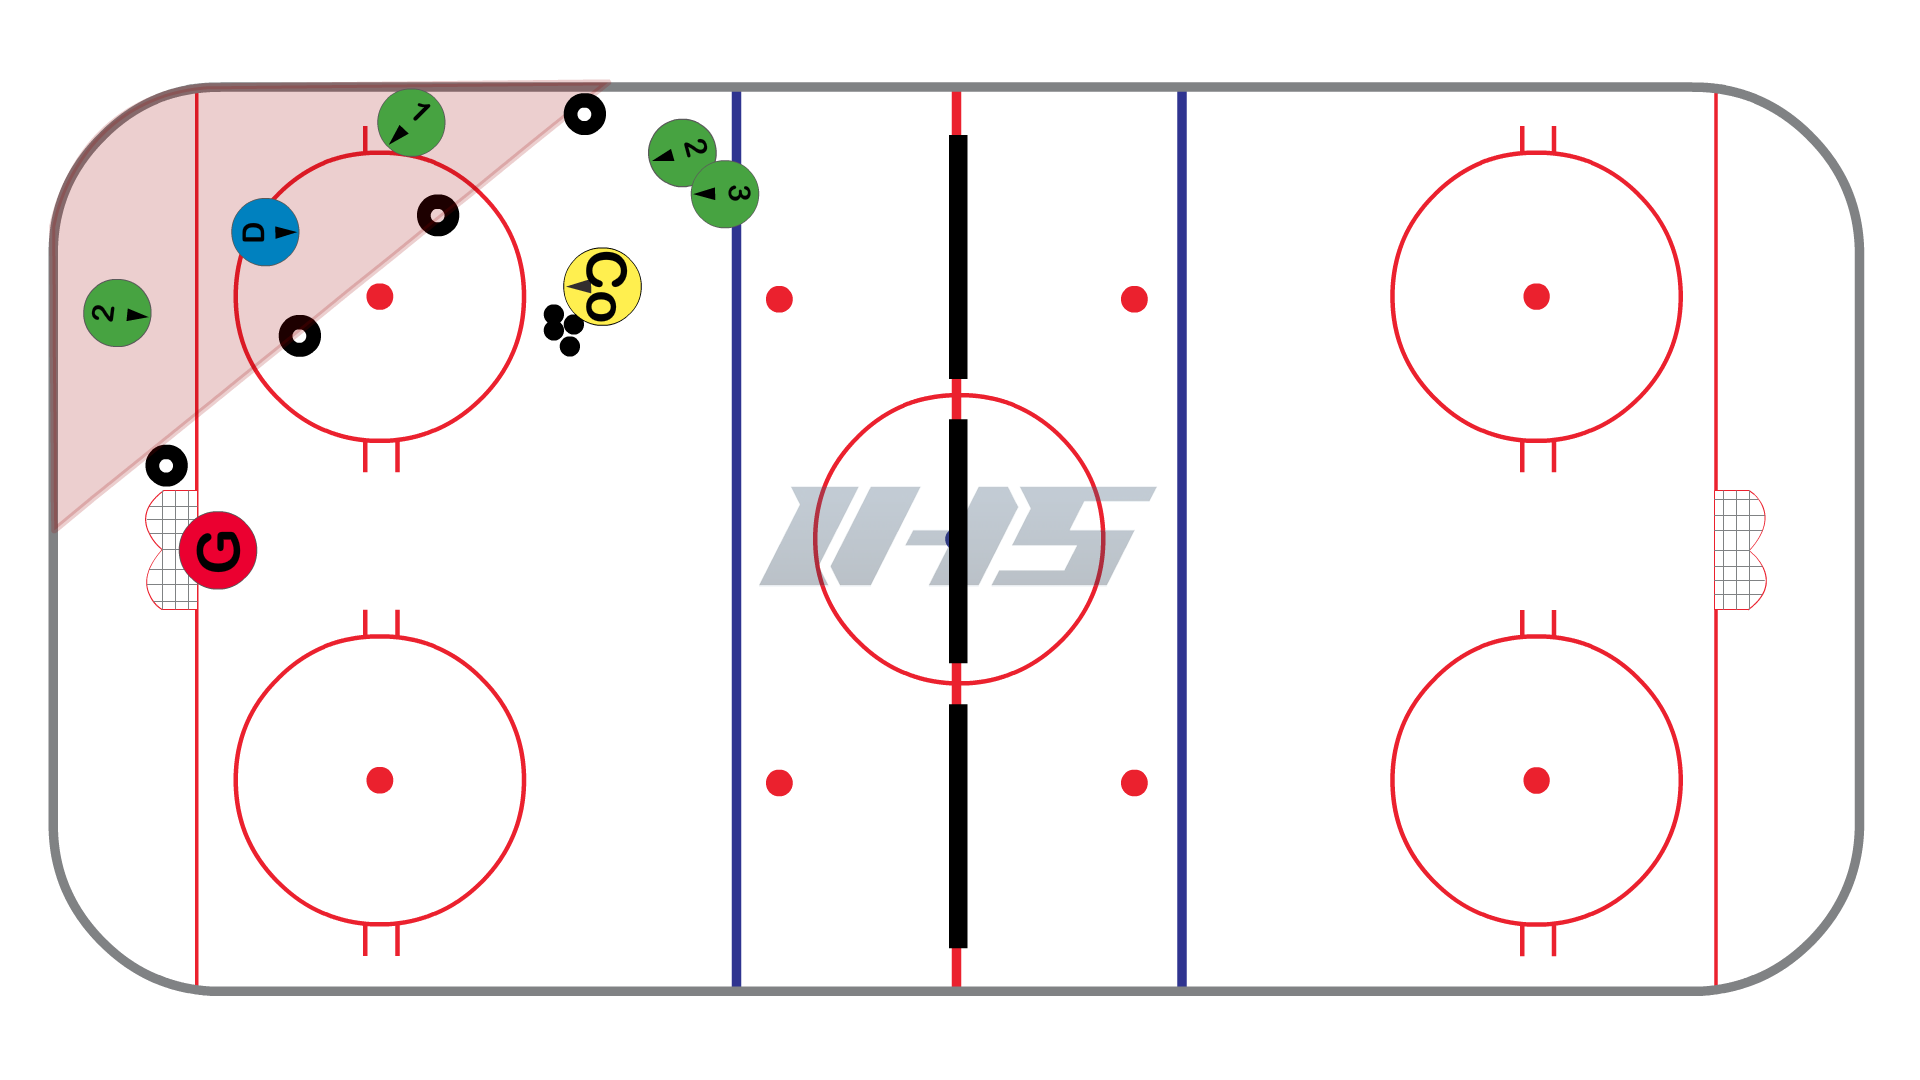
Corner to Half Wall 2 vs 1
Details:
The Corner to Half Wall 2 vs 1 is an excellent small area game for all age levels that helps players practice a 2 vs 1 in a small space along the boards in the corner of the ice. The game reinforces important skills like keeping your head up, moving to open spaces, protecting the puck, and verbal & non-verbal communication. Offensive players should practice using the boards to make bank passes.
The goal of the game is for the offense is to connect on 4 consecutive passes in a row. If they do so, they win and are allowed to shoot on net. If the defense takes the puck away, or the puck goes out of bounds 2 times during the game the defense wins and is awarded a shot on net.
Setup
- Playing Area: Use 4 cones or tires that create a triangle from the half wall to the corner that lines up with the inside post.
- Goalie Setup: This can be set up as a station with a goalie, or without. If you use a goalie they can be placed in the crease or the net can be moved to the point.
- Players: Alternate players. It is beneficial for players to get reps on both offense and defense sides.
- Passes: You can require 4 (or a different amount) of consecutive passes to win.
- Defense: If the defense is taking the puck away too much, you can tell the defense to flip their stick over.
- Winner: The winning side gets a shot on net. You can allow the winners to do a few options:
- If the offense wins:
- The last person with the puck gets a shot on net.
- Both players are given a puck and can shoot on different goalies.
- The game moves to a 2 vs 1 in front of the net and offense is allowed one shot if they can get it off.
- If the defense wins:
- They get a shot on net.
- The game moves to a 1 on 1 in front of the net and the defense is allowed one shot if they can get it off. The losing offense team needs to communicate with each other as to who is going to go after the defense.
- If the offense wins:
Coaching Points
- Use the boards! They are your friend!
- If used properly, the boards can be used as an extra player out there and are helpful for bank passes and puck protection.
- Offensive players need to protect the puck until they can make a play and then expose the puck to make a pass.
- Offensive players have to move without the puck. Think "Give & Go!" Go to open space!
- Defensive players are most successful with active sticks and stop and starts. There are no short cuts!
Progressions
- Require more consecutive passes.
- Make the game 2 vs 2.
- Create a smaller "playing area" to make it tougher on the offense.
- Move to the Point to Half Wall 2 vs 1 Game.
Related Links
Length of Time:
7 minutes
Station Number:
1
Coach's Notes:
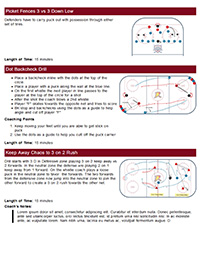
Setup the drill in both ends of the ice, same side of the boards. This will make the players use forehand in one end and backhand in the other. Finish 2 reps in one end and then switch. After they are done in both ends, move to neutral zone for faceoffs.
Communication both verbal and body language is key. Effective use of the yellow is also encouraged.
Emphasize the importance of this for both break-outs and forecheck.
Puck Retrieval Along The Boards
Details:
Retrieving the puck along the boards happens countless times throughout the course of the game and it is where many 1 on 1 battles are won or lost. When players collect the puck off of the boards is not usually a highlight-reel play, but if they are able to learn a few simple concepts, they will be able to impact the flow of the game. These concepts will allow players to create space so they have time to make a play. Plus, with an evasive move, they will be much harder to hit!
In the video above, Coach Ben Eaves discusses two major concepts when retrieving a puck:
- Look Over Your Shoulder: This is concept # 1 because it is most important. Looking over your shoulder will allow you to know if you have time, or need to make an evasive move to create time.
- Retrieve The Puck At An Angle: This will allow you to keep your speed up while you are going to get the puck. Plus it is much safer than going head-on into the boards.
The video gives you three options to practice:
- Option 1: If you look over your shoulder and see you have time, continue skating full speed at an angle to pick up the puck and bring it up ice.
- Option 2: If you look over your shoulder and you see you have pressure, skate at an angle but use your upper body to deceive the defending team and quickly turn up ice.
- Option 3: If you look over your shoulder and you see someone right on you, point your feet (which will point your body) one way and quickly move your hips and move your feet in the opposite direction to evade the defender. This is usually the most effective but will take time and good edgework to get comfortable with. Note: When you get comfortable with Option 3, combine the lower body fakes with upper body fakes to really throw off a defender!
Bonus: Watch the Toronto Maple Leafs practice their puck retrievals and forchecking in this fun 1 on 1 battle.
Length of Time:
7
Station Number:
1
Coach's Notes:
Retrieving the puck off of the boards is often times crucial in a breakout. It is also important to know how to defend it, so we can stay on the forecheck. It is also important to keep your head and make reads along the boards, if you do not have a good first move or pass, the play is coming right back at you.
5 v 5 Neutral Zone Face-Off Possession Game
Details:
The 5 v 5 Neutral Zone Face-Off Possession Game is a great game to practice face-offs, possession, and gaining the red line.
Setup
- Setup a 5 v 5 face-off in the neutral zone circle.
- After the puck is dropped, each team works to gain possession, and attack the gates on the center red line. Teams score points by skating the puck through a gate (it does not count if teams pass the puck through a gate)
- Each gate is worth different points:
- The Green center gate is worth 3 points
- The Yellow gates are worth 2 points
- The Red gates are worth 1 point
- Coaches should keep track of points and after a team scores points they can regroup and re-attack the red line if they are able to keep possession.
- Coaches can drop the puck or they can have one player on each team drop it (make sure to alternate which team drops it if you go this route).
Coaching Points
- Offense: support your teammates when you do not have the puck. Work to get open and be an outlet.
- Defense: keep sticks on the ice and defend the middle of the ice.
- Everyone: there are a lot of moving players in this game so make sure to communicate!
Variations
- Coaches can include goalies if they would like. Coaches can require a team to go through a gate before they can go down the other end of the ice and shoot, or they can require a specific gate (example - if you go through the center ice gate you are able to go down and shoot).
- Can play 5v5, 5v4, or 4v4.
- Can make a rule where the puck must exit the center ice face-off circle before a team can attack.

Length of Time:
10 minutes
Station Number:
2
Coach's Notes:
Make sure the players know their role and responsibilities on the draw.
Have them verbally communicate it to you and their linemates.
3 draws per line and then switch.
Once the tires are moved, we can utilize all three zones for the drill. - Rotate NZ - Zam | Zam to entry | Entry to NZ
Breakout Tips (Off-Hand Wingers)
Details:
Here are a few options for wingers on their off-hand (weak) side when the puck is rimmed around the wall. First and foremost you always want to check what the opposing defense is doing. Are they allowing you time and space to gather the puck or are they applying pressure?
Option #1
- Get to the wall and gather puck at the wall.
- Use forehand to collect the puck faceing your own net.
- Get off the wall and look to make a play to the center or high off the wall and out of the zone.
Option #2 - No Pressure from Defense
- Get to the wall and face up ice skating with the direction of the rimmed puck.
- Once you collect puck get head up and try ot get off the wall as you head up ice.
Option #3 - Heavy Pressure
- Get to the wall and trap puck using skates.
- Use your body to protect the puck from the defense.
- If possible use the angle of your skates to get puck off the wall.
- Once off the wall look to make a play or chip the puck into the neutral zone.
Station Number:
3
Coach's Notes:
Tips for breakouts
Strong Side Breakout Drill
Details:
The Strong Side Breakout from Nik Passero works on retrievals, strong side breakout, zone entry, and offensive zone concepts.
Setup
- Players and pucks are set up in the center ice circle.
- 2 Forwards (a winger and center) step out with a defenseman.
- Part 1: On the whistle, the winger (F1) chips the puck into the strong side of the defensive zone.
- The defenseman sprints back and shoulder checks before retrieving the puck.
- This starts a breakout where the defenseman plays the puck to the winger, who passes it to the center (F2) who is coming low and slow.
- The center with the puck skates down the outside of the ice, then gains middle ice after the zone entry and fires a shot on net. The winger drives to the net to look for tips, deflections and rebounds.
- Part 2: Coach chips the puck to the sidewall, the forward that took the shot retrieves the puck and wraps the puck along the boards for the net front player to pick it up.
- After the net front player grabs the puck off of the boards, they pass the puck to their defenseman who joined them on the rush. The defender walks the blue line and fires a puck on net while the two forwards look to screen, tip or deflect the puck.
Coaching Points
- Defenseman: shoulder check both sides when retrieving the puck.
- Winger: get to the side boards and keep your stick on the ice to let the defender know where you want the puck. Shoulder check before the puck comes.
- Center: low and slow with your stick on the ice in the breakout to be an option for your teammates.
Variations
- Can add forechecking pressure with a coach or a player to make the drill more dynamic after the players have gone through a few successful reps.


Length of Time:
10
Station Number:
3
Coach's Notes:
Here we will focus on the most crucial aspect of a zone entry. If we can get out of the d-zone effectively, we can enter the o-zone with numbers. To do this effectively, we need to be aware of the breakout, and if we are on the offside we need to push the pace and become the lead outlet or catch the defenders attention to give the puck carrier more time and space.
Breakout Tips (Strong Side Wingers)
Details:
Here are some breakout tips for wingers on their strong side when the puck is rimmed along the wall. There are three situations listed below but on all situations the wingers should do the following three things:
- look up ice to see what the defense is doing.
- get to the wall before the puck gets to your spot.
- get separation from the wall so you have more options.
Option #1 - No Pressure
- Skate with direction of the puck.
- Let puck come to you as you are headed up ice.
- Get separation from the wall.
Option #2 - Hard Pressure
- Stop the puck with backhand.
- Protect puck with body.
- Get separation from the wall.
- Chip high off the glass.
Option #3 - Hard Pressure
- Get to the wall and stop puck with skates.
- Angle skates to get puck off wall and to your stick.
- Protect puck with body if needed.
- Get separation off of the wall.
- Use forehand to chip puck high off the glass.
Transition, Transition, Breakout
Details:
This drill requires defense to focus on fundamentals of skating, passing, and timing. It is a drill that simulates a couple of situations that happen numerous times throughout a game and it is designed for more advanced players. The first situation is the turnover and counter attack at the blue line, the second is a turnover in the neutral zone followed by a dump in and then a breakout.
D1 and D2 start just inside the blue line. On the whistle D1 skates up around the first cone and transitions backwards. The coach places a puck along the boards near the blue line. D1 pivots to get the loose puck and pivots again to face up ice while maintaining control of the puck. D2 stays in a good support position to receive a pass from D1. D2 then transitions up ice and makes a pass back to the coach. Both players should try and keep feet moving as much as possible.
D1 and D2 then move up ice. D1 goes around the first cone again before transitioning backwards. The coach then dumps the puck in the corner. D1 pivots to go retreive the puck in the corner while D2 first stays at home in front of the net before going to the corner to provide an outlet pass. D1 carries the puck around the net and gives a pass to D2. D1 explodes up throught the middle of the ice to receive a return pass from D2. D1 then gives the puck back to the coach to start the drill over. The next player in line (D3) then becomes D1 in the next repetition.
Length of Time:
10
Station Number:
4
Coach's Notes:
10 U - Zam end
In a hockey game, there are typically around 100 transitions. Handling them when they happen to us, and making them happen for us is tantamount. To fully transition from defense to offense, we need possession of the puck and we need to breakout of the defensive zone and get into the offensive zone.
Breakout Tips for Centers
Details:
One of the hardest things to teach centers on the breakout is the timing. It is critical that the centers have a good sense of timing so they can support the defense and wingers when they have the puck. If they get too far ahead of the play they create a bad angle for a pass and put themselves in a bad position to receive a pass. By staying low and below the puck then they give their teammates better options.
Tips for the Centers on Breakouts
- Stay low and slow.
- Support your defense and wingers.
- Be ready to skate into the puck.
- Communicate with your defense and wingers.
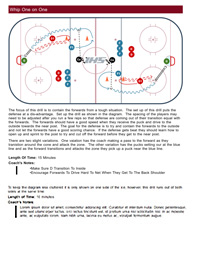
Breakout Communication Drill
Details:
This focus of this drill is for defense to work on their communication skills in the breakout. This drill was designed with a half-ice practice in mind. It is a situational drill that will force the defense to use communication in order to make the right pass in order to break out. The weak side defensive player will have to read where the second forechecker is, then make the call to the player who is under pressure from the first forechecker. To set up, the coach should have all the pucks in the middle of the ice at about the hash marks. The breakout defensive players should be on each side of the coach with their heels pointing to the net. The two breakout forwards should be placed at the top of the face-off circles and start on their knees. The two forechecking forwards are in a single file line just outside the top of the circles (see diagram).
To start the drill the coach will dump a puck down past the goal line to either side of the net. The strong side defense will transition forwards to go retrieve the puck. The first forechecking forward will always pressure the puck. The second forechecking forward has a choice. They can cheat to the strong side wing along the boards, or they can anticipate a D to D pass and pressure the other defense. The weak side defensive player has to read where the second forechecking player is going and make the call accordingly. If the second forechecker goes to the strong side wing on the boards, the correct call would be OVER, and the defensive player that retrieves the puck then makes a pass to their defensive partner. If the second forechecker goes towards the weak side defense, then the correct call would be UP. Then the defense would retrieve the puck and make a quick pass to the strong side winger on the boards. The winger who receives the breakout pass controls the puck and then makes a pass to the other breakout forward who is skating through the high slot.

Length of Time:
10
Station Number:
5
Coach's Notes:
Stay in the same end of the ice.
Decision making and communication is key. They have to have their heads up, scanning the ice and making reads. Make the read and make the play.
Weak Side Face-Off Tips
Details:
It is important to know if you are on your strong side or your weak side and note where your opponents strong and weak side are. This will help you determine where they will most likely be trying to win the puck. Most ofter the other players will be trying to win the face-off to their backhand.
Face-Off Tips for Weak Side
- Take advantage of the strength of your backhand by turning your lower hand over.
- Spread your legs out and get nice and low.
- Watch for when the referee releases the puck and pull back to your backhand side.
- Another options is to clear the circle and sweep the puck backwards.
5 V 5 to 5 V 3 Face-off Game On The Circle
Details:
The 5 V 5 to 5 V 3 Face-Off Game helps teams practice face-offs by rewarding the winning team with 2 extra attackers.
Setup
- Setup 2 nets in 1/2 of a zone as pictured in the diagram.
- Use bumpers if you have them. If you do not have access to bumpers you can use cones to identify the boundary, or use players that are waiting in line to keep the puck in.
- Coach drops the puck for a face-off.
- Once possession is clearly determined, the losing teams must send off 2 players (either the 2 wingers, or the 2 defensemen) to make the game a 5 v 3.
- The defensemen on the offensive team must remain below an imaginary goal line.
- Both teams try to score.
Coaching Points
- Face-off:
- Get low and strong on your stick to win the face-off.
- Wingers jump in to help with possession.
- Offensive team with 5 players should move the puck quickly and support each other.
- Defensive team should keep sticks on the ice to block passing lanes.

Length of Time:
5 - 7
Station Number:
6
Coach's Notes:
Finish on some faceoff work
Strong Side Face-Off Tips
Details:
Tips for Winning Face-Offs on Your Strong Side
- Turn over bottom hand.
- Spread legs out wide and get low.
- Use timing to win puck back using your backhand.
- If you are struggling with timing then another option is to clear the circle and then sweep puck back.
- Try to play games with the opponent to throw off their timing. eg. talking to the referee