U16 Game Plan Example
U16 Game Plan Example
Big first playoff game!
We worked so hard and came together as a team to make the playoffs a reality. Remember this will be the last time most of us will be playing together. Have fun & work hard!
3 habits we need to focus on all game long:
- Communicate: Talk on the ice and on the bench. Be loud and supportive.
- Head up & Scan Ice: Look for open ice & opportunities.
- Sticks On The Ice: Keep your stick on the ice all game long to remove passing options for the other team.
Matchup notes:
- Offensive zone: Their goalie is slow at lateral movement. Shoot low and shoot quickly!
- Defensive zone: Protect the house (see system video below).
- Penalty Kill: Heavy pressure on the PK (see system video below).
- Power Play: Move the puck and look to shoot quickly off of a pass.
Videos:
- Video 1: a pump up video we will play in the locker room 5 minutes before we jump on the ice.
- Video 2: GOOD: a refresher of the mindset video we watched last month on facing adversity.
Roster Notes
Forwards
#16 Goergen - #9 Satterstrom - #21 Howard
#40 Boll - #42 Eaves - #18 Savard
#25 Scott - #26 Coyne - #17 Blais
Defense
#2 Gagliardi - #7 Manastersky
#91 Atkinson - #28 Stevens
Goalies
#30 Brennan
#31 Goldman
Special Teams Units
Power Play - 42, 26, 25, 7, 2
Penalty Kill - we will rotate through lines
Systems
Defensive Zone Coverage - Protect the House
Hi. This is Denis Savard of Ice Hockey Systems. Welcome. First of all we are talking about the D-Zone coverage here. One of the key things that’s going to be important for D-Zone coverage is about protecting the house. As you saw up here, I put a little design here where it looks a bit like a house. My artwork is not the best thing in the world but this is what it looks like. So it’s very, very important that we protect this area, and that’s why how we position our guys or whenever D1 and your puck here, F1 is supporting, and whenever D2 -- you follow that. We’re going to have our F2 in this area. We’re going to have our F3 down in the slide area.
This should be our positioning once we get in our zone, wherever, you should be in position. Now, depending on what the other teams are doing, one of the key things that you’re going to see is what their X1, their X2, obviously their X3 would position themselves on top here and be the shooter. You have their D1 and their D2 in this position here.
So right now as we speak, we got pretty much everything covered. If X1 has the puck, obviously we want our defenseman to be on the puck, to be on the opponent on their X1. The quicker the better. And the whole key about this as a defenseman, when you go out and check somebody, you want to make sure that you stick on the puck. You want to disrupt a separation from the puck and their player so your F1 would be able to come in and help and move the puck up maybe to F2 or however, just get it out so we’re on offense. The quicker we are or better defensively, the better we’re going to be on offense.
Now, situations are going to happen where the puck is going to be moved to X2. Pretty simple. There’s a rotation that has to be made now. They will have a D1 that was on this guy here. Now, F1 is on X2 because the puck has been moved. Key situation where D1 is to get back in this position here protecting their net.
Now, the one thin g that we’re going to be talking about too a lot of times is their X3 which is shooter, we want to make sure that our D2 comes out and locates their X3. We know that there is help here with our F2 in case he falls down or any circumstances that could happen. But obviously, D2, your job is to come out and locate X3, denying him to get a shot if that’s the case here and try to move the puck to X3.
Now, a lot of times you see a lot of forwards on D-Zone coverage are going to end up starting to creep up towards the boards when the puck is in the area here. The reason why we don’t want you to keep up along the boards, if I take you up here as an example, you would see how much time and space there is in this area here. And again, we want to protect the house. The house is there for a reason so that’s why we need you in this position here. If the puck is moved to the plank, obviously you want to get in the shooting lane and get out of the defenseman which is an easy task for you to do. And that’s pretty much your responsibility as F2 on the strong side.
F3, if there’s a breakdown down in this area here, that’s why you’re the support guy. You come down and help. And if there -- happened that somebody had fell down, you’re going to help us out in that situation here. At the same time, if they activate your D2, you will be going with it with your D2. That’s your guy all the way through. No matter what he does, you need to cover him to your way to the net.
Now, we talked about also when the puck changes side, we’ll go over this. When we do have a puck that changes side, we got X1 here, we had X2. For some reason X2, he’s got the puck, he’s starting to move. Their X3 start to go all the way out to the other side. Now, pretty simple. We are D1 and the puck originally that was bumped to their X2. Now, their F1 is going at him, our D is starting to return. Puck has changed side. This D2 in front of the net, you cannot leave your area until D1 calls you to go. Remember, once X3 is done in this area here, his chance of scoring from behind the net are pretty slim. Sometimes it’s going to happen the guys throws the puck at the net but we call that a bad goal.
So the thing that’s very important for D2 to know is when your D1 gets back to the front, that releases you to go on to X3. Nothing changes as far as for F1. He comes over and he continues to be the support guy to our defenseman. Our F3, obviously you become the strong side guy helping out and locating where the defenseman is at. Obviously F2 back to the slide area. And D1 that came back to the front, you will then locate their IS guy which will become their X3.
Hopefully that helps you. Thanks for watching.
We need to make sure that our sticks are always on the ice in the defensive zone. Do not let players shoot or pass in the house! Use your stick to block passing lanes and angle players to the outside.
Aggressive Box to Diamond Penalty Kill
Neutral Zone Face-Off Win
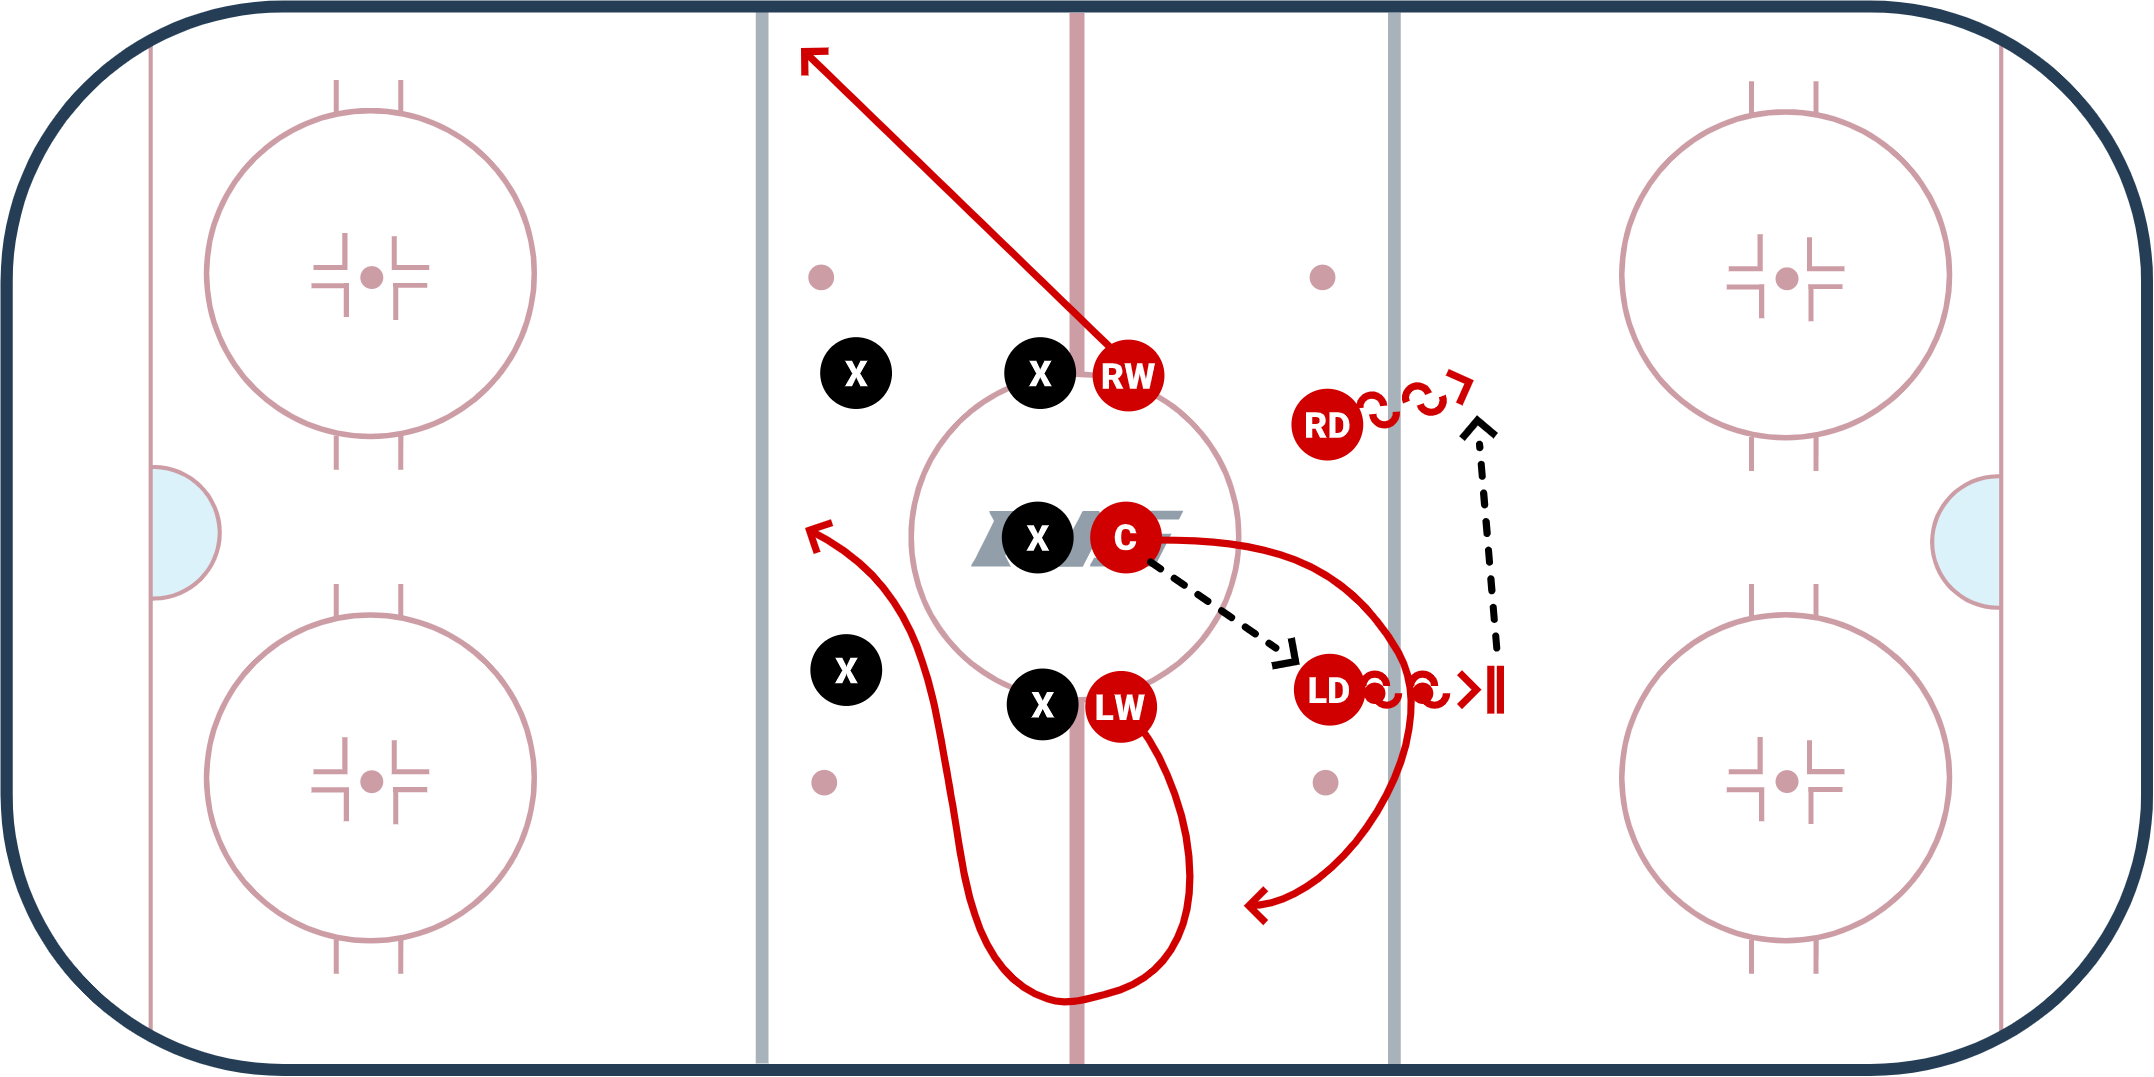
An excellent set neutral zone face-off play from Topher Scott that works great at the higher age levels. The main concept of this face-off play is to create a lot of confusion for the defense since your forwards will be going to different set lanes. These set lanes will create openings and allow your defense to find one of the forwards steaking up ice.
We will use this on the opening face-off. Going to bring the pressure early!
Offensive Zone Face-Off #1 - Circle Attack
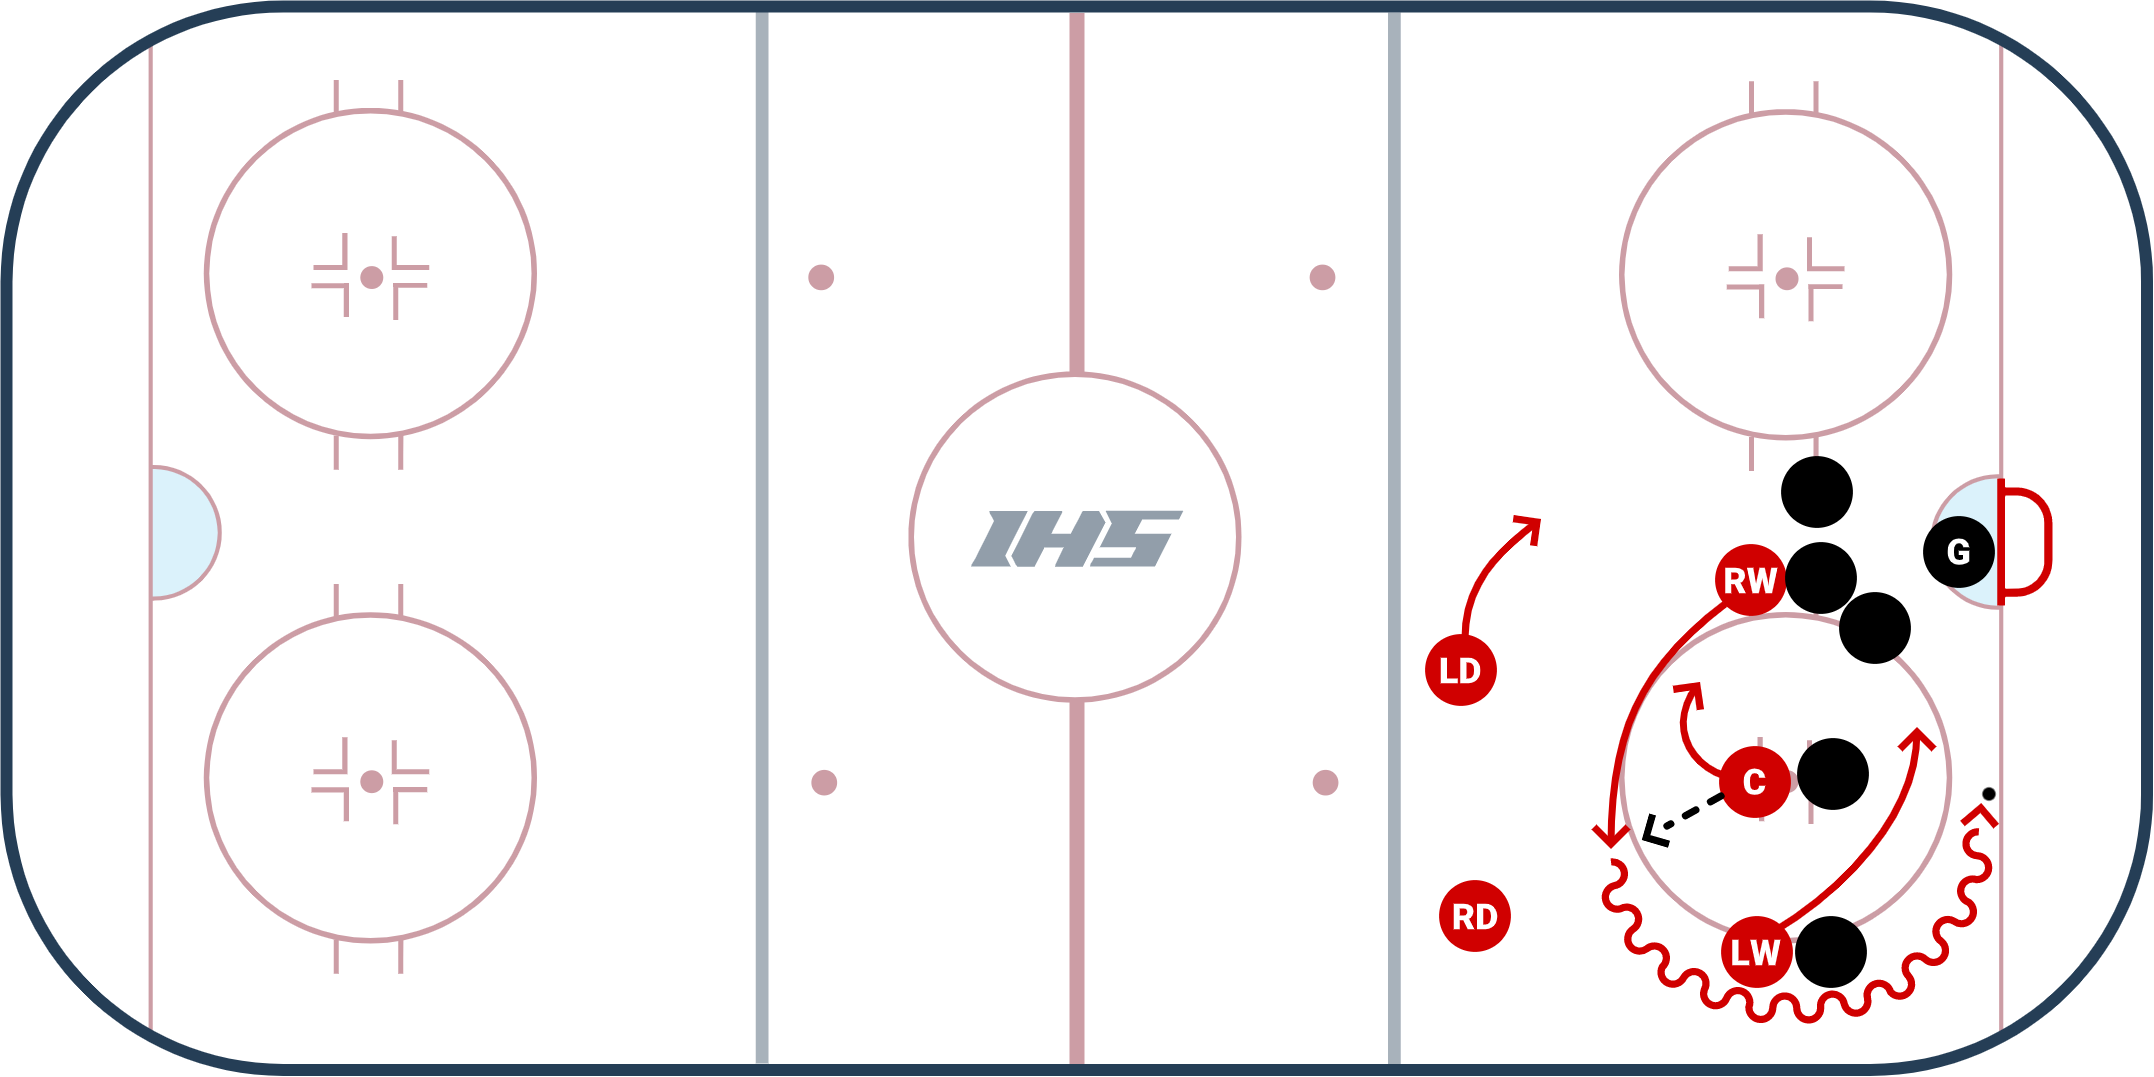
The Offensive Zone Face-Off #1 - Circle Attack from Topher Scott is a great way to generate offense off of a set play and have multiple options when you gain possession. The goal is to have the center win the puck backward so that the winger that is in front of the net goes around the circle and picks it up with speed. As the winger rounds the circle they have the following options:
- Bring the puck to the net
- Pass to the open winger or center
- Go around the net and look to pass or shoot
This face-off has worked well for us this season. Coach will let the line know when we will use this in the offensive zone.