What would happen if you were given an extra 1 to 5 seconds to make a play every single time you touched the puck? Your game would INSTANTLY transform. You would be able to create more passing and shooting options while giving your teammates extra time to become outlets.
Many younger players and coaches ONLY focus on advanced stickhandling drills instead of basic puck protection concepts. Basic puck protection can be easier to learn and will help your game at every level of hockey, in every area of the ice.
The difference between Protecting and Exposing the Puck
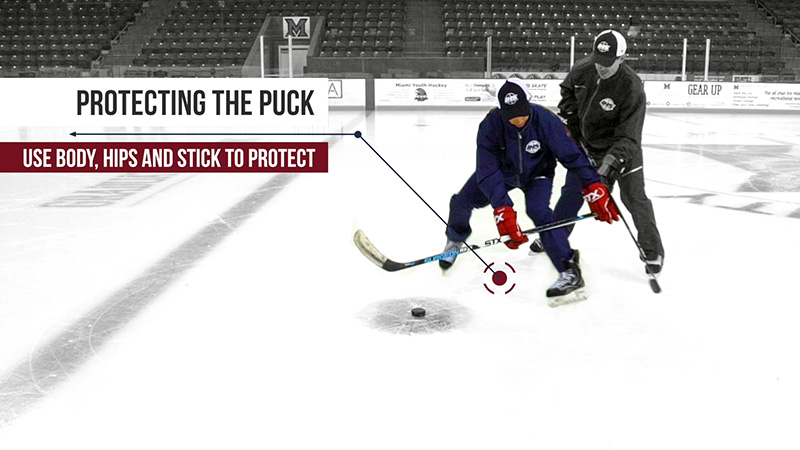
As discussed in the video above, it is important to use your body, hips, and stick to create a barrier between the puck and the other team. When you are ready to make a play with the puck, look up, expose the puck, and make the play!
After most players win a 1 on 1 battle or receive a pass, they leave the puck exposed or quickly force a play. Forcing a play will result in an easy turnover for the opposing team. Learning how to properly protect the puck will give you the confidence to be patient with the puck, and allow you to keep possession until you are ready to make a play. Below are drills and examples of how coaches can help their team practice this extremely important skill.
Coaching 101: Always Start at the Foundation
Before you start coaching a new skill, system or drill, it is always important to start at the foundation. Explain to your players what puck protection is, why you are teaching the skill, and show real-life examples of why it is beneficial. When they have a full understanding of the concept, it will allow them to learn on their own and better apply the skill in practices and games.
- What puck protection is: using your body, hips, and stick to create a barrier between the puck and the opposing team.
- Why you are teaching it: You are teaching puck protection so your players can gain extra time with the puck to make smarter plays.
- On-ice examples of puck protection: Demo on-ice examples of puck protection with another coach or a player. Contrast puck protection examples with examples of players leaving the puck exposed or forcing a play. Depending on the skill level of your players you can break out and work on specific puck protection skills (control turns, mohawk turns, inside & outside edgework, one-handed stickhandling, etc). Links to these individual skills and leg exercises are at the very bottom of this post.
- Show video examples of puck protection: It is extremely beneficial to show players video clips so the teaching can come full circle. This will allow them to fully grasp what the skill is, why it is beneficial and how it can be applied in practice or a game situation.
Below is a video montage of Sidney Crosby, one of the best in the world at puck protection. He is masterful at using all parts of his body, great edgework and top hand stick strength to create a barrier from the opposing team. He uses these techniques in all areas of the ice, not just the corners.
As you can see, these skills help Crosby keep possession of the puck and generate extra time, which allows him to create better plays. Once you are able to explain the basic concepts of puck protection, it's time to have some fun with drills, small area games, and battles!
1) Start Simple
Watch the video below to view a simple drill and how you can demo puck protection. This basic game will allow players to begin to understand what movements they are trying to learn and how they can protect the puck. Split up the team into partners and give each pair a puck that is meant to stay in place. On the whistle, have one player protect the puck with their body and have the other player try to get the puck. Give each player a few reps of this activity so they can get comfortable with moving their body around to create a barrier between the puck and the defender.
2) Incorporate coaching points into basic activity
Heads Up Stickhandling Station: Get players comfortable with stickhandling around other players and keeping their head up. They should also use their edges to move their body around the puck instead of leaving the puck exposed in front of them.
3) Add fun and natural competition
King of The Hill Drill: This is a drill that players love, especially if you make it a game and encourage cheering for the last remaining players. This drill is similar to the Heads Up Stickhandling Station, but players are allowed to swat the puck away from others, so it is important for players to keep their head up and practice moving their body around their puck to protect it.
4) Drive home the skill with an additional drill
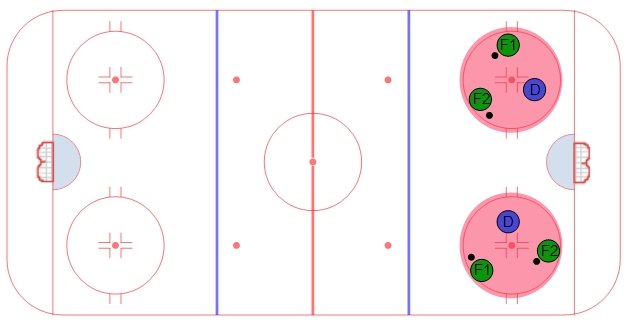
2 to 1 Puck Protection Drill: The drill setup is simple, place two offensive players and one defensive player in a circle (or area with boundaries). The goal is for the offensive players to skate around and work on protecting the puck with moves, their body and stick. The goal for the defensive player is to knock the pucks away from the players and out of the circle.
If the defense is knocking the pucks away too easily, you can have the defense flip their stick so that their butt end is on the ice. Or you can add another forward into the circle so there are 3 players and one defenseman. The drill is good to allow players to get reps at both sides.

5) Integrate a fun small area game into the coaching
The 7 Pass 2 vs 1 drill: Small area games are great because they can show why a skill is relevant and should be applied in game situations. The goal of the drill below is to protect the puck and make 7 consecutive passes before the defense knocks the puck away. Depending on the skill level of your team, you can drop it down to 3, 4 or 5 consecutive passes. You can also have the defense flip their stick. For a bonus, if you have goaltenders around, you can award the winning team that gets the specific number of consecutive passes to go down and shoot on net. If the defense strips the puck 2 times, they can be awarded the shot on net.
Forwards should focus on protecting the puck until they feel confident they can make a good play. The player without the puck should be jumping into open lanes to become a passing outlet. In the beginning, encourage players to take time and not rush the pass.
6) Integrate Battle Drills!
1 on 1 to 2 on 2 Battle Drill: One of the best ways to work on puck protection is with simple battle drills. At the beginning of the Crosby video (shown at the top of this article), there are a few examples of him battling 1 on 1 in practice. It is well documented that Sid, Brad Marchand, Nathan MacKinnon and a few other NHL players train together and battle against each other before the season to get their conditioning levels up.
In the video below, Denis Savard explains a 1 vs. 1 to a 2 vs. 2 battle progression. You can run this drill on both sides of the ice and even make it a 3 vs. 3 battle drill. If you do not have access to multiple goalies for the drill, you can have players take the puck back to a designated area and return on the same goal.
Battle drills are excellent because the players love them, there are many coachable moments and the natural competition instantly brings up the intensity in practice. Encourage players to focus on what they learned about puck protection. This is practice, it is ok to make mistakes. In fact, they should be making mistakes! Challenge them to hold on to the puck and work on protecting the puck with their body. Once they are ready to make a play, expose the puck and go for it! Blow the whistle and change up the players if a play is forced.
Two exercises players can do anywhere to improve
Top Hand Strength: If you watch the Sidney Crosby puck protection video, you will notice he is a master at handling the puck with one hand as he uses his body and arm to protect the puck. This skill is valuable in tight and also in the open ice where you can rush with the puck far from your body while you fend off a defender with your opposing hand. Strengthening your top hand and getting comfortable with stick handling with one hand is a valuable asset for all hockey players. Below is one example of how you can practice with your top hand. Get creative with your practice and freestyle!
Pavel Datsyuk Six Puck With Reach: This drill will help you get comfortable with moving the puck around different areas of your body and not just in front of you. Set up six pucks and work on stick handling the puck (or ball) all around your body. Get used to moving your body around as well. As you improve, increase the speed and keep your head up. Make sure to throw some music on and have fun with it!
At the end of the day, there are a lot of different drills and exercises that can help you improve puck protection. Hopefully, the ones above give you a better idea about how valuable the skill is, and how it can be practiced. There is no set path to improvement because every coach and every player is different. However, it should be known that puck protection is a fundamental concept that should be practiced at all age levels and it's valuable in all areas of the ice, not just the boards. If you don't believe me, ask Sid!
Find Coachable Moments: As a coach, it is important to find moments to remind the player of the skill in practice and in games. New information and skills are easy to forget, but if we are reminded of them and practice them enough, they become habits!
When Practice and Hard Work Comes Full Circle
Watch Jonathan Tavares display all of the puck protection fundamentals we discussed earlier. As you can see, there were a few times he could have given up, chipped the puck in the corner, or forced a play. He battled to get the puck, then protect the puck with his body and used his top hand stick strength to keep possession. The extra time allowed his teammate extra time to find a lane which resulted in an overtime win!
Additional On-Ice Puck Protection Drills:
Puck Protection Skill Development Videos:
- Inside Edges Video
- Outside Edges Video
- Control Turns Video
- Mohawk Pivoting Video
- Exposing the Puck vs Protecting the Puck Video
- Finnish Skills Series Video
Off-Ice Leg Strength Exercises:
Additional NHL Puck Protection Examples:
- Sidney Crosby Puck Protection Montage (video shown in post)
- 2nd Crosby Battle Practice Video
- Crosby, Mackinnon, Duchene, and others Play 2 vs. 2
- Jon Tavares OT Assist (video shown in post)
- One-Handed NHL Puck Control Examples

