When creating a practice, coaches must take many different factors into account. They need to think about offensive zone play, defensive zone play, special teams, play with the puck, play without the puck…and they want to create this in an environment that the players enjoy. It is not a small task.
This article will be not so much looking at specific tactical drills but rather the creating progressions for the drills based on decision making. Our game is so great because players must skate, stick handle, pass, use their teammates, avoid the opponents etc. while doing all this on a small blade of steel. There are a multitude of decisions that players must make every second during a game, and our job as coaches is to create a practice environment that is representative of the challenges they will face during a game.
Questions I want you to ask yourself as you create your drills are:
- Am I creating a drill that has only one possible outcome OR am I creating scenarios where players must solve problems and make decisions with time constraints?
- Do my drills require players to have their head up to scan the ice looking for opportunities (chances to score) & threats (the opponent trying to steal the puck)?
- How much does the player have to think in this drill?
The best players in the world are gifted physically but I believe their real gift is they have the ability to make the right decision, at the precise time, & execute it flawlessly under pressure.
Phases Based on Complexity
I propose a progression of creating drills based on the complexity of the decisions the players make during the drill:
Phase I –Simple (most drills already fall under this category)
- Basic drill (understand the pattern of the drill along with the technical skills required)
- Execute it well at the highest speed possible
Phase II- Simple + 1
- Take the basic drill & add 1 decision to made by the player
- A coach can hold up fingers that the player must find & yell back
- A player can lift his/her stick when they do NOT want to puck, but put the stick on the ice telling their teammate they are prepared for pass (perform a give n go)
- A coach can slide cones at the player while they are performing the drill so the player must find the coach and avoid the cones coming in their direction
Phase III – Complex
- Add multiple decisions during the drill
Phase IV- Game Like (Small Sided Games)
- Create a small sided game with a specific objective (think Rondo’s from soccer)
- E.G. the 2 v 2 game starts with a rimmed puck so the offensive player must pick the puck off the wall while a defender is on his hip trying to disrupt the play
Example drills for Phase II - coach creates a scenario for the player to make a decision.
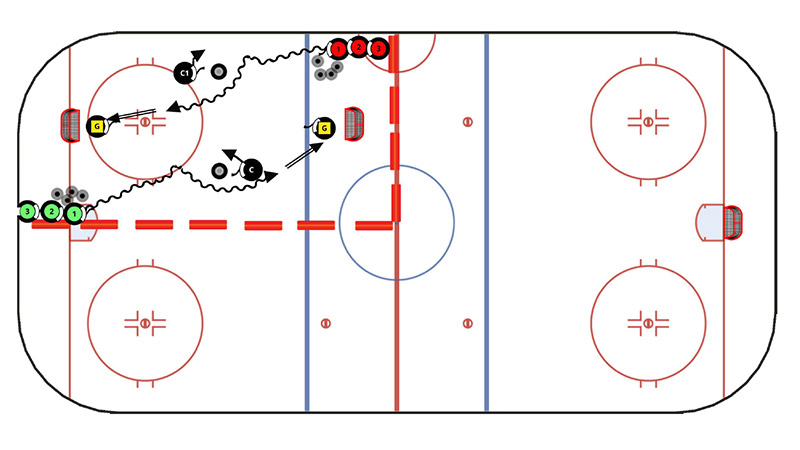
Decision Time 2 v 1
In this first drill, it is a 2 v1 drill against a coach. The drill is designed so the player with the puck will cross the blue line first and cut across the middle of the ice; the player without the puck must delay and then cross behind the pick up the dropped pass. Once this occurs, we added a coach that will either attack the puck carrier OR fade towards the player without the puck. Our player with the puck must ‘read’ the coach’s position and then either attack the net or pass to their teammate.
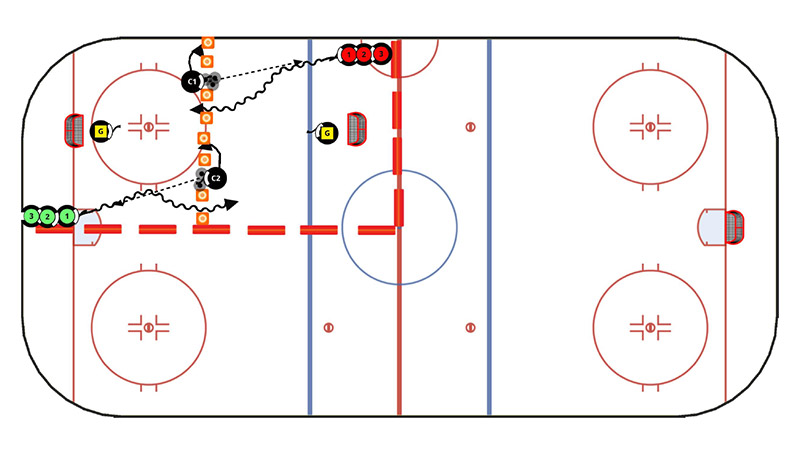
Quick 2 vs 1 Attack – Situational Drill
This drill is very similar to Decision Time 2 v 1 but has two major differences. The first difference is we now have a player acting as the defender & the second difference is that we shrunk the space the offensive players must execute their play (aka process the situation and make the correct decision). By forcing the offensive players to make plays with less time, we have added cognitive load to the drill which challenges our players.
Single Shift Decision

This drill sets up perfectly for a group of players or team that only have ½ of the ice for their practice. The player must identify where the coach moves (his body or stick) and then perform the single shift to the opposite side. As the players get more comfortable with the skill & the decision to attack right or left, the coach can hold his/her movement until the very last moment to further challenge the player.
Choose a Gate

Another great drill for ½ ice practices, this drill again forces players to scan the ice and look for the open space (gate). If the coach moves as he/she passes, what was an open gate may now be a closed gate. This drill like all the drills in Phase II force players to get their heads up and use their eyes to gather information on what are the opportunities (open gates) and threats (another player skating right into what was just an open gate).
Example Drills for Phase III - coach creates a scenario where players have to make multiple decisions
Chicago 5 Puck Warm Up
This warm up drill activates the players eyes and brain as there are more pucks than lines in the neutral zone. This forces the players, upon receiving the puck, to get their head up to make sure they don’t get run over by another player & to find the line with a player ready to accept a pass. This player may have to delay & slow down his/her play to allow a line to become available to he/she may be able to lock in their teammate and pass the puck after taking a few hard strides. The scenario will be different every time each player receives the puck in line. The number of small decisions each player makes will create positive energy to start a practice. And to encourage players to focus, if a player passes to player who just received a puck, coach c an blow his whistle and have all the player do 5 push ups.
6 v 3 Alley Game
A game/competition like this has many game-like read and decisions. The emphasis here is to take proper angles to disrupt any passes cross ice. The players without the puck must be aware of where the offensive players are positioned so they can use their body & stick to deny passes. The offensive players (who are relatively stationary) must see where their teammates are positioned and look for open space as the defender charges. No two scenarios will ever be exactly the same during the 6v3 game and the players (both offensive and defensive) must constantly scan the ice to make sure they are using their teammates to ‘win’ the game. Every player must use their eyes to know what to do ahead of time which will directly translate to an actual game.
This could be a great competition between the two jersey colors. Each team gets their 6v3 for 30 seconds with the goal of completing more cross ice passes than they concede.
In conclusion
I hope that you will look at your drills & find more ways to challenge your players by adding more decision making. Our game is a great one because a slow player has a chance to beat a faster player if they can read the patterns of the game & use their brains to outsmart the opponent. The more coaches can cognitively challenge their teams, the greater potential to create ‘smart’ teams that utilize time and space together.

